
5 ingredient earl grey lavender cake: Incredibly moist & easy
Remember the last time you needed a show-stopping dessert for a special gathering? Perhaps it was a bridal shower or an intimate birthday celebration. You wanted something that felt elegant and unique, not just another chocolate or vanilla option.
That’s exactly how this journey began. The search for a sophisticated treat led to the discovery of a tea-infused masterpiece. This moist and easy creation requires only 20 minutes of your time to prepare. It then bakes to perfection in about half an hour.
You will adore how the delicate floral notes blend with the robust, citrusy essence of bergamot tea. It creates a flavor profile that is both comforting and excitingly new.
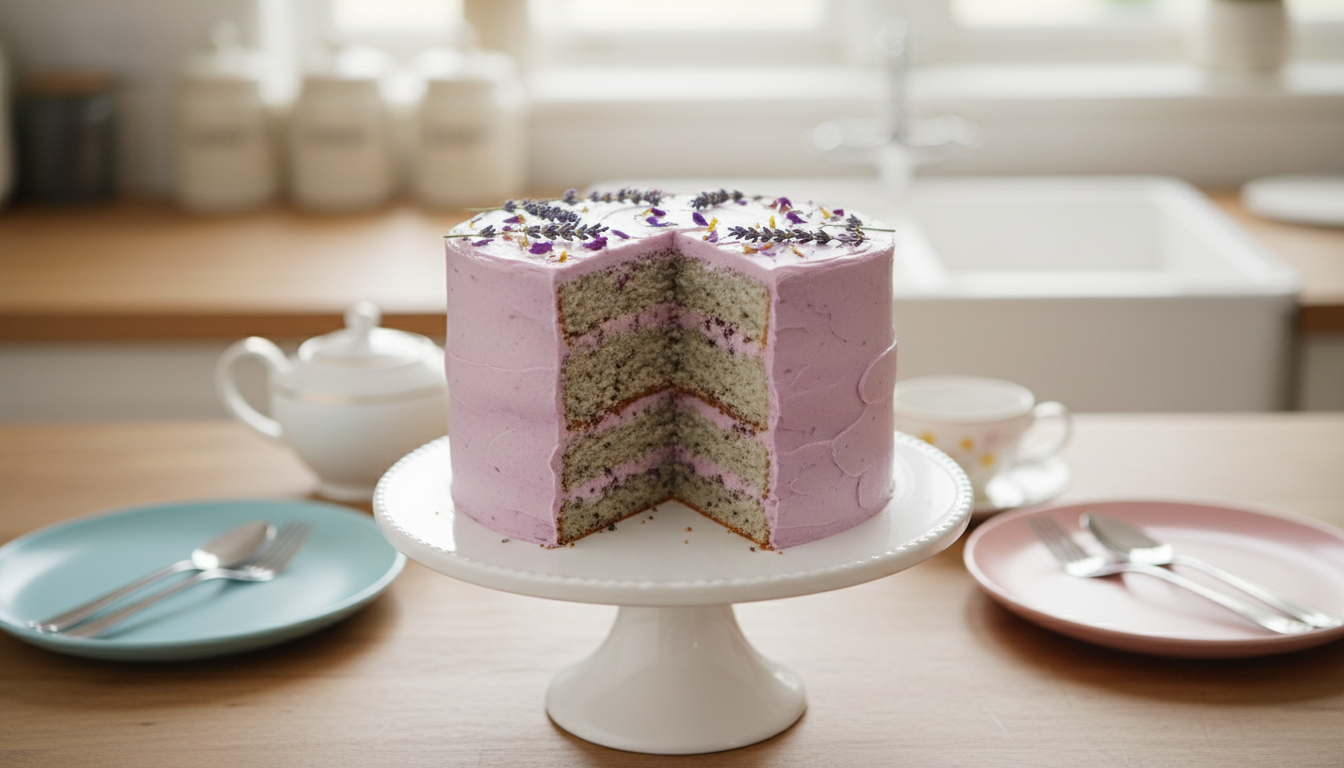
This dessert is a popular choice for weddings and showers. When sliced as a wedding cake, it can generously serve up to 24 guests. It transforms into a beautiful centerpiece that is sure to impress everyone.
We invite you to explore the simple joy of baking with us. Follow this straightforward guide to achieve a perfect crumb and texture. Let’s create a memorable experience for your next special event.
Introduction to Earl Grey Lavender Cake
The magic of this confection begins long before the oven is even turned on, in a warm pot of milk. The steeping process is the foundation for building an incredible depth of taste. You will infuse the milk directly with tea leaves and floral buds.
This technique unlocks a wonderfully fragrant and herbal profile. The combination of bergamot-scented earl grey tea and dried lavender creates something both delicate and decadent. The citrusy tea provides a sophisticated base.
It pairs perfectly with the subtle, calming notes from the lavender. The result is a harmonious blend. Your dessert will feel luxurious and comforting for any special celebration.
As you follow this recipe, the aromatic qualities will fill your kitchen. It’s a truly special sensory experience. Mastering the balance between these two ingredients is the secret to this unique treat.
Essential Ingredients and Pantry Staples
The foundation of any successful recipe lies in the quality and preparation of its elements. Having the right components on hand transforms the baking process from a chore into a joyful creation.

- Decorate your Earl Grey Lavender Cake with this 9 piece reusable piping set 6 stainless steel tips, cotton bags, coupler & cleaner. Easy to use, eco friendly.
- Don’t miss our almond flour chocolate cake,Try our mochi ice cream recipe and strawberry icebox cake.
List of Key Ingredients
Your ingredient list is simple. Always use room temperature butter and eggs. This ensures your batter emulsifies correctly for a light, moist texture.
You will need a few basic pantry items:
- Dry Base: 2 1/4 cups all purpose flour, 2 teaspoons baking powder, and 1 teaspoon salt.
- Creaming Mixture: 1/2 cup unsalted butter and 1 1/2 cups white granulated sugar.
- Liquids: 1 cup whole milk, 3 large eggs, and 2 teaspoons pure vanilla extract.
For the signature flavor, steep your milk with 2 tablespoons of culinary lavender and 4 bags of earl grey tea. This creates the most authentic and potent floral citrus profile.
Ingredient Substitutions and Swaps
Do not worry if you are missing a specific item. This recipe is quite flexible.
You can swap dairy milk for almond or soy milk. Hard baking margarine works instead of traditional butter.
For the tea, use 4 tea bags or 3 tablespoons of loose leaf earl grey. Always prioritize culinary lavender over essential oils. Oils can leave a soapy aftertaste and ruin your dessert’s delicate balance.
Step by Step Preparation Process
Achieving the perfect texture and flavor is a straightforward process when you follow these key stages. The method is divided into two primary phases: creating your infused base and then combining all components.
Preheat and Steep Milk with Tea and Lavender
First, preheat your oven to 325°F. This lower temperature is crucial for even baking. It protects the delicate crumb from drying out.
Now, build your flavor foundation. Heat one cup of milk until steaming. Remove it from the heat immediately.
Add your tea bags and lavender buds to the hot milk. Let this mixture steep for a full 15 minutes. This time allows the bergamot and floral notes to fully infuse.
Once cooled, strain the liquid carefully. You must remove all solid leaves and buds. This ensures a smooth batter later in the recipe.
Mixing Dry and Wet Ingredients
Grab a medium mixing bowl. Whisk your flour, baking powder, and salt together. Do this until they are perfectly combined with no lumps.
In a separate, large bowl, cream the butter and sugar. A hand mixer or stand mixer works best here. Beat until the texture is pale, creamy, and fluffy.
Add your eggs one at a time. Beat thoroughly after each addition. This step guarantees a stable and light structure for your dessert.
Finally, combine everything. Pour in your cooled, strained milk mixture. Then, gently incorporate the dry ingredients.
Stir in half of the flour mixture first. Add the rest and beat for just 1-2 minutes. Stop as soon as your batter is beautifully smooth.
Baking Techniques for Perfect Texture
Your journey to a flawless dessert culminates in the oven, where precise techniques make all the difference. The final texture of your layers depends entirely on controlled heat and careful preparation.

Proper Oven Settings and Pan Preparation
Always preheat your oven to 325°F. This lower temperature is key. It lets your dessert rise slowly and stay wonderfully moist.
Prepare your pans before you pour the batter. Grease two 8-inch rounds thoroughly. Then, line each bottom with a round of parchment paper.
This simple step guarantees your layers will release cleanly. Divide your batter evenly between the pans. Consistent volume ensures they bake at the same rate.
Place the pans in the center of the oven. Bake for 30 to 35 minutes. To test, insert a toothpick into the center after 30 minutes.
If it comes out clean, your baking is complete. Resist opening the door during the first 25 minutes. A steady temperature prevents collapse.
Once done, let the pans cool on a wire rack for 10 minutes. Then, gently turn out your beautiful layers.
Frosting and Decorating Ideas
Once your layers have cooled, the fun part begins: adding the finishing touches with icing and garnish. This stage transforms your baked creation into a stunning centerpiece. A smooth buttercream and creative decorations make your dessert truly special.
Lavender Buttercream Frosting Tips
Start your frosting in a large mixing bowl. Whip softened butter until it is light and fluffy. Gradually add powdered sugar and a splash of vanilla extract.
For the signature flavor, use a concentrated infusion from your steeped tea. This replaces liquid in your recipe. It gives the buttercream a subtle floral and citrus note.
Ensure your final mixture is smooth and spreadable. If it’s too thick, add a teaspoon of milk. Too thin? Mix in a bit more sugar.
Creative Cake Decoration Methods
First, secure your bottom layer. Spread a thin layer of icing on the plate. This acts as glue to prevent sliding.
Level each baked layer with a serrated knife. Brush away loose crumbs. Apply a thin crumb coat of frosting over the entire dessert.
Chill it until firm. This locks in crumbs. Then, apply your thicker, final layer for a professional finish.
For elegant borders, use a piping bag fitted with a star tip. Create floral designs or simple swirls. Garnish the top with dried buds or lemon zest for color.
Prefer a rustic look? Try the “naked” style. Leave the sides partially exposed to highlight the beautiful texture inside.
| Technique | Tool | Purpose | Pro Tip |
|---|---|---|---|
| Crumb Coat | Offset Spatula | Seal in loose crumbs | Chill for 15 minutes before the final layer |
| Final Smoothing | Bench Scraper | Create sleek, even sides | Use a turntable for consistent pressure |
| Piping Details | Star Tip | Add elegant borders & designs | Practice shapes on parchment paper first |
| Garnishing | Tweezers | Place delicate decorations | Add items just before serving for freshness |
Variations, Substitutions, and Adjustments
Adapting this delightful dessert to fit various dietary needs is simpler than you might think. The core recipe is wonderfully flexible. You can tailor it to your pantry or preferences without losing its special charm.

These adjustments let everyone enjoy the classic flavor. You can accommodate different needs right in your own kitchen.
Gluten Free and Dairy Free Options
For a dairy-free version, swap the whole milk for unsweetened almond or soy milk. Use hard baking margarine instead of traditional unsalted butter. This maintains the rich texture perfectly.
If you require gluten free recipes, use a high-quality 1 to 1 gluten free baking blend. It mimics the structure of wheat flour for a successful bake.
You can also create a lovely lavender vanilla variation. Simply omit the tea and steep only the floral buds in the milk. This yields a lighter, purely floral profile.
If you are out of earl grey, regular black tea or a mild chai blend works. Ensure it has no extra sweeteners. For egg allergies, try flaxseed eggs or a commercial replacer.
Do not reduce the sugar content. This ingredient is vital for a soft, moist texture. Always measure your flour by spooning it into the cup and leveling it off. This prevents a dense result.
| Original Ingredient | Substitution | Purpose/Effect | Note |
|---|---|---|---|
| All Purpose Flour | 1 to 1 Gluten Free Blend | Creates a similar structure for those avoiding gluten. | Use a trusted brand for best results. |
| Whole Milk | Unsweetened Almond/Soy Milk | Makes the recipe dairy free while providing liquid. | Choose unflavored varieties. |
| Unsalted Butter | Hard Baking Margarine | Provides fat for creaming in dairy-free baking. | Ensure it’s suitable for baking. |
| Earl Grey Tea | Black Tea or Mild Chai | Offers a similar robust base if bergamot tea is unavailable. | Avoid pre-sweetened blends. |
| Granulated Sugar | (No Reduction) | Essential for moisture, tenderness, and volume. | Reducing sugar can lead to a dry, dense cake. |
Pro Tips for the earl grey lavender cake
The difference between a good dessert and a great one often lies in the small details of preparation. These expert strategies will help you achieve a professional finish and intense flavor every time.
Mastering a few key techniques elevates your final result. They ensure your creation is both beautiful and delicious.
Maximizing Aroma with Steeping Time
Your infusion is the heart of the flavor. Ensure your milk is steaming hot when you add the tea and lavender.
Let them steep for a full 15 minutes. This allows the floral and citrus oils to fully extract into the liquid.
Handling Cake Layers for Stability
For easy stacking and frosting, bake your layers a day ahead. A day-old dessert is much firmer.
Chill layers in the freezer for 20 minutes before assembly. This prevents sliding and makes handling a breeze.
Always taste your creamed butter and sugar mixture before adding eggs. Use a light-colored metal pan to avoid over-baked edges.
If your hands are warm, wrap a towel around your piping bag. This keeps the delicate buttercream from melting.
| Pro Tip | Key Tool | Purpose | Expert Note |
|---|---|---|---|
| Full 15 Minute Steep | Saucepan & Strainer | Extract maximum flavor oils | Heat milk just until steaming, not boiling. |
| Chill Layers Before Stacking | Freezer | Increase stability for assembly | 20 minutes is ideal; longer can dry out. |
| Use Light Colored Pans | Light Metal Baking Pans | Promote even baking, prevent dark edges | Dark pans absorb more heat, risking overcooked edges. |
| Manage Buttercream Temperature | Kitchen Towel | Prevent melting from hand heat | Wrap towel around piping bag for delicate work. |
Achieving Maximum Moisture and Flavor
The secret to a supremely moist and flavorful baked good lies in a simple, often overlooked step: ingredient temperature. Proper technique here makes all the difference between a dry, crumbly result and one that is tender and rich.
Before you begin mixing, focus on your components. Using room temperature eggs and butter is non-negotiable. These elements emulsify into a smooth batter that traps air. This creates a lighter, fluffier texture.
Utilizing Room Temperature Ingredients
Cold ingredients can cause your mixture to break. This leads to a gummy, uneven dessert. Always plan ahead. Take your dairy and eggs out of the fridge at least an hour before baking.
The flavor of your bergamot tea is best preserved with gentle heat. Warm your milk to a simmer, not a boil. Then steep your floral buds. This protects the delicate aromatic oils.
Cream your butter and sugar for a full two minutes. This builds a foundation of tiny air bubbles. They expand during baking for a soft crumb.
When adding dry ingredients, use a low speed on your mixer. Overworking the flour makes a tough cake. Scrape down the sides of your bowl often. This ensures every bit is evenly infused.
By following these guidelines, you guarantee each slice is as moist and delicious as the last. Your careful attention to temperature and mixing time pays off beautifully.
Equipment and Tools for Success
The tools you choose can elevate your baking from a simple task to a smooth, enjoyable experience. Having the right gear on hand ensures consistent results and a professional finish. Let’s look at the essential items and some fun extras for decoration.
Essential Baking Tools
Start with a good mixer. A stand mixer with a paddle attachment is most efficient. A hand mixer works perfectly for smaller batches.
You need two 8-inch round cake pans. This size ensures even baking and a tall, beautiful presentation. A serrated knife is necessary for leveling your layers.
Use a digital kitchen scale for measuring flour and sugar. This guarantees consistent results every time. Have a few sturdy mixing bowls ready for your ingredients.
Optional Gadgets for Advanced Decor
For a flawless finish, a spinning cake stand and a large offset spatula are key. They help you apply frosting smoothly.
Keep a variety of piping tips on hand. A star tip is perfect for creating floral designs. A small round tip adds delicate details.
A greaseproof cake board provides a sturdy foundation. It makes transport and display easy for any event.
While optional, a food processor can finely grind your tea and lavender. This creates a more subtle texture in the batter.
Presentation and Serving Suggestions
Your beautiful creation deserves a presentation as special as its flavor. Thoughtful serving and storage ensure your dessert remains the star of any event. This final step in your recipe makes all the difference.
Serving Ideas for Special Occasions
Display your masterpiece on a beautiful pedestal stand. This elevates its elegant design as the focal point of your table.
For a truly harmonious experience, serve each slice with a warm cup of earl grey tea. The bergamot notes will complement the layers perfectly.
Storing Leftovers for Extended Freshness
Keep unfrosted dessert in an airtight container. It stays fresh for up to 7 days, with peak flavor within the first 3.
If your treat is frosted, refrigerate it for up to 3 days. Cover it with an upside-down bowl to protect the icing.
For long-term storage, freeze unfrosted layers. Wrap them snugly in two layers of plastic wrap. They maintain moisture for up to 6 months.
Thaw frozen layers at room temperature for about 3 hours. Then, proceed with your final decorating. Always bring a refrigerated dessert to room temperature before serving. This allows the butter in the frosting to soften and the flavors to fully bloom.
Conclusion
We’ve reached the end of our guide, but the memorable experiences with this unique cake are just beginning, as you’ve mastered a sophisticated dessert that harmonizes lavender and citrus flavor for any event.
Your dedication to the steeping process and moisture techniques has created something truly impressive, and remember that the secret to a great result always lies in quality ingredients and patience.
We encourage you to share photos of your beautiful creation online and let us know how your personal version of this recipe turned out!
Thank you for baking along with us; we look forward to your next delicious kitchen adventure very soon.
Your email will not be published publicly.