
Heart cake recipe easy perfect for quick homemade treats
Did you know that over 50 million heart shaped desserts are enjoyed each Valentine’s Day in the U.S. alone? This stunning baked good is more than just a sweet treat; it’s a timeless symbol of celebration.
Expert baker Erin Dooner recommends a specific oven temperature of 335°F for baking 8-inch layers. This precise heat is key to achieving a wonderfully fluffy texture that makes every bite delightful.
As noted by Sugar & Sparrow, a vintage heart shaped creation is perfect for marking life’s special moments. It shines as the ideal centerpiece for birthdays, engagements, and anniversaries.
This guide provides you with all the necessary steps to bake a delicious dessert that looks professionally made. You can easily adapt the instructions to suit your personal flavor preferences.
Whether you prefer a classic vanilla base or a rich chocolate version, the method remains straightforward. You’ll learn how to transform standard round layers into a stunning shape that will impress your guests.
Creating this beautiful homemade treat is a rewarding project that allows you to add a personal touch to any gathering. Follow along to make your next celebration unforgettable with a charming and delicious centerpiece.
Introduction to heart cake creations
Dreamy, vintage inspired designs are dominating social media feeds. This nostalgic trend is perfect for a romantic valentine day celebration or any intimate gathering.
You do not need to buy a specialty cake pan. As baker Anthea notes, you can craft this beautiful shaped cake using standard round pans from your kitchen.
This approach makes the project accessible and fun. Both beginners and experienced bakers enjoy the creative process.
It allows you to focus energy on artistic decorating. Experiment with different piping techniques and colors for a unique finish.
Your homemade creation adds a wonderful personal touch. It becomes a meaningful centerpiece for those you love.
Essential ingredients and must have tools
The foundation of any impressive baked creation lies in selecting premium ingredients and having the proper equipment on hand. This preparation ensures your final dessert is both beautiful and delicious.
Key ingredients for a fluffy cake base and buttercream frosting
Start with high-quality components for your batter. Expert baker Erin Dooner suggests using four large eggs, beaten well with sugar, to create an airy and light texture.
Fresh vanilla extract and a reliable flour blend are also crucial. For the frosting, plan to make a generous amount.
Sugar & Sparrow typically uses three full batches of vanilla buttercream to cover and decorate an eight-inch dessert. Mix your buttercream in a large bowl to have ample volume for smoothing and detailed work.
If you prefer a chocolate version, choose a rich cocoa powder for deep flavor that complements sweet frosting perfectly.

- Bake love into every bite with our 10 inch large heart shaped silicone cake pan set. Whether it’s for Valentine’s Day, an anniversary, or just because, these nonstick pans release your cakes effortlessly and clean up in a snap just pop them in the dishwasher. The cream confetti mold adds a playful touch to any layered dessert. Perfect for two cakes at once, so you can share even more sweetness .
- Love this recipe? You’ll also enjoy our Rosette Cake Perfect for Any Occasion, Baklava Cheesecake Recipe, and Strawberry Desserts
Baking tools: Piping bags, Serrated knives, Cake boards, and more
Your toolkit is just as important as your ingredients. A sturdy piping bag is non negotiable for creating those classic vintage borders and accents.
You will also need a serrated knife for gentle carving and a firm cake board for support during assembly. Selecting the correct cake pan size guarantees even baking.
Always line your pan with parchment paper for a clean release every time. With these essentials, your homemade project will come together smoothly.
Preparing and baking your cake layers
Achieving light, even layers is a crucial step that sets the stage for your stunning final creation. This phase focuses on proper technique to ensure your baked good turns out fluffy and level.
Mixing techniques and oven tips for even baking
First, always preheat oven to the temperature specified in your cake recipe. Anthea recommends 180°C (355°F). Tap your filled cake pan gently on the counter to release air bubbles for a uniform texture.
When mixing your batter in a large bowl, avoid overworking the flour. Erin Dooner suggests scalding the milk first. This step helps improve the rise of your cake layers.
If your cakes dome while baking, use a serrated knife to level them once cool. This is a vital step for a flat surface. Watch the time closely for a chocolate version, as it may bake faster.
Let your baked layers cool completely in the pan. Never attempt to cut cake layers while they are warm. Following these instructions guarantees a perfect base for your project.
Shaping your cake into a beautiful heart
With a few careful cuts, you can turn simple circles into a beloved shape. This part of the process is both fun and rewarding.

You will transform your baked rounds into a romantic icon. Follow these straightforward steps for a perfect result.
Simple carving methods to transform round layers
Begin by placing your cooled layer on a firm surface. Many bakers, like Anthea, use the blunt side of a knife to score the dessert into quarters.
This light marking guides your next moves. It helps visualize where to make the final cuts.
Take a sharp serrated knife to carve the rounded top sections. Carefully remove small segments to form the distinctive curves of the heart shape.
Always keep your blade clean during this work. A clean edge ensures smooth sides for your shaped cake.
Support your creation on a sturdy cake board. This base keeps everything stable while you apply your buttercream.
After assembling the pieces, spread a thin crumb coat over the entire surface. Chill your project for at least fifteen minutes.
This step locks in crumbs and creates a smooth foundation for your final frosting layer. Your beautiful heart shaped cake is now ready for decoration.
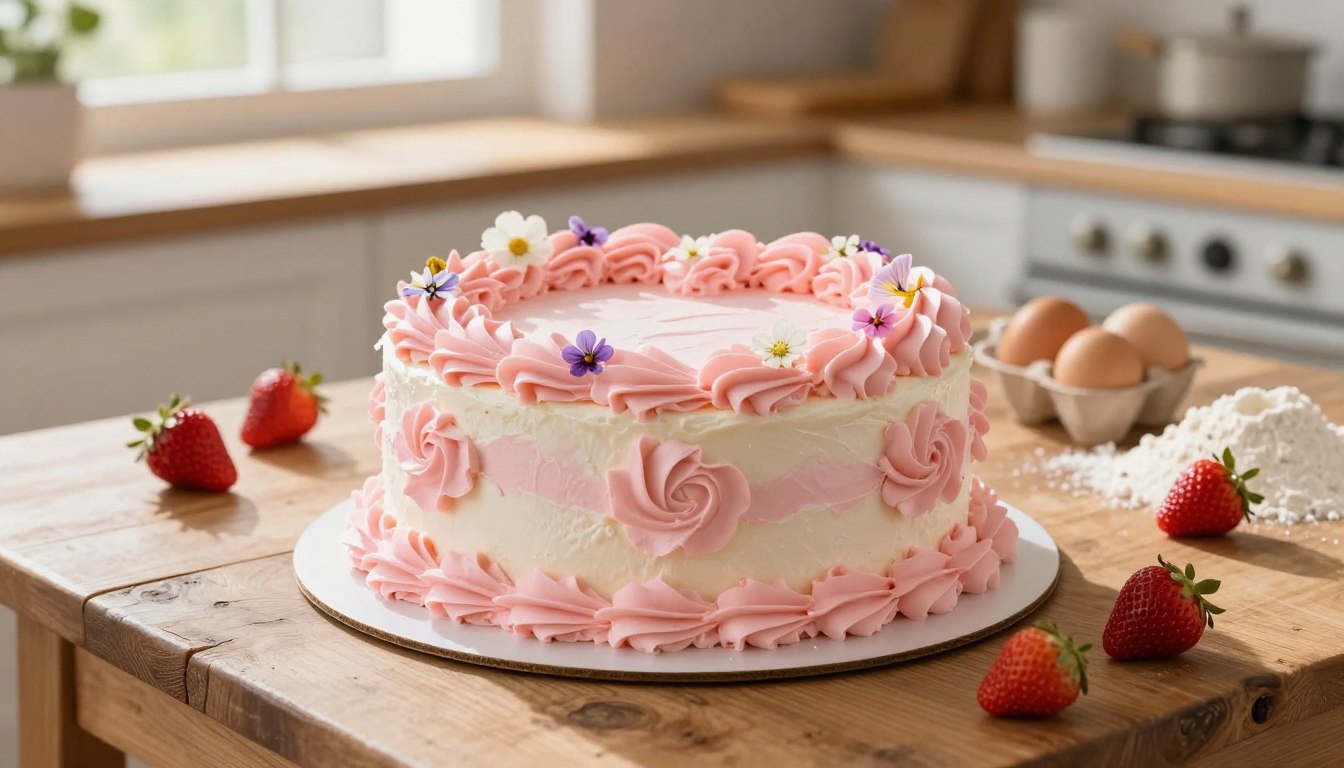
Frosting, Filling, and decorative piping ideas
A perfectly piped border can elevate your creation from charming to absolutely stunning. This is your chance to add personal flair.
Your decorations bring the whole project together. Focus on smooth application and fun details.
Achieving the perfect buttercream consistency
The right texture is everything for piping. Your buttercream must be stiff enough to hold a shape.
Beat it in a large bowl until it’s very smooth. If it’s too soft, chill it for a few minutes.
If it’s too stiff, add a tiny splash of milk or cream. Test a small amount in your bag first.
Creative piping techniques for shell borders and heart accents
Use a piping bag fitted with a star tip for classic borders. Define the edges of your heart shape with a shell design.
First, apply a thin layer of frosting to the sides cake. Use an icing smoother for a clean finish.
For a filling like raspberry jam, pipe a dam of buttercream around each layer. This keeps the jam contained neatly.
Sugar & Sparrow uses specific tips for vintage looks. Practice your piping on a board before decorating.
| Tip Number | Best For | Decorative Effect |
|---|---|---|
| Wilton 4B | Large Shell Borders | Creates bold, classic outlines. |
| Wilton 32 | Small Shells & Details | Adds delicate texture and accents. |
| Wilton 102 | Ruffle Garlands | Produces soft, romantic floral looks. |
Spend some time getting comfortable with each tip. Your vanilla buttercream is the perfect canvas.
With these piping ideas, your dessert will be a beautiful masterpiece.
Variations for special diets and occasions
With a few smart swaps, you can make a dessert that suits various preferences. This approach ensures everyone at your table feels included. Your beautiful creation can be both stunning and accommodating.

Modern baking ingredients make adaptation simple. You do not need to compromise on flavor or texture.
Vegan, gluten free, and other adaptable options
For a vegan version, follow expert advice. Anthea’s berry recipe uses dairy-free milk and oil instead of butter and eggs. This swap works perfectly for your buttercream and frosting too.
Choose a high quality vegan butter for your icing. Your filling can be fresh fruit or homemade jam.
Gluten free needs are also easy to meet. Erin Dooner recommends King Arthur Flour Gluten free Measure for Measure Flour. This one to one blend keeps your baked good moist and fluffy.
Even a rich chocolate version can be dairy-free. Use plant based milk and a neutral oil in the batter. Always follow the specific instructions for your chosen diet.
This careful step guarantees success every time. Your heart cake will be a delicious triumph for all.
heart cake recipe easy step by step assembly guide
Now comes the moment to assemble your masterpiece into its final, stunning form. This phase brings all your prepared components together on a firm cake board.
Secure each baked cake layer with a dab of buttercream glue. This creates a stable foundation for your beautiful design.
Layering, filling, and final touches
Follow expert advice for a professional result. Sugar & Sparrow suggests using your piping bag to add buttercream as adhesive.
This “glue” helps adhere the rounded segments to the main body. It also fills any gaps between the cake layers.
Your structure will hold its iconic heart shape perfectly. Next, apply a thin crumb coat over the entire surface.
Anthea recommends chilling the project for twenty to thirty minutes after this coat. This ensures the frosting is firm before the final layer.
The next step involves smoothing the top cake surface and sides. Use an angled spatula for a clean, polished finish.
| Step | Key Tool | Time Needed | Pro Tip |
|---|---|---|---|
| Secure Base | Cake Board | 5 minutes | Use buttercream “glue” for stability. |
| Apply Filling | Piping Bag | 10 minutes | Pipe a dam to contain jam or cream. |
| Crumb Coat | Angled Spatula | 15 minutes | Chill for at least 20 minutes after. |
| Final Decoration | Piping Tips | Variable | Add fresh berries just before serving. |
On the big day, you can add final decorations. Fresh berries or delicate piped accents make your heart shaped cake spectacular.
These instructions ensure your homemade treat looks incredible. Enjoy the rewarding process of creating a centerpiece everyone will love.
Conclusion
What began as a simple baking project has transformed into a stunning edible work of art. By following the steps in this guide, you’ve crafted a beautiful cake that looks professionally made. This homemade creation is a wonderful way to show your love and creativity for any special occasion.
Remember, practice makes perfect, especially with piping borders and writing messages. Your skills will improve each time you decorate. Whether you chose a classic vanilla or a rich chocolate flavor, your cake is sure to be the highlight of the celebration.
Creating this centerpiece is a rewarding experience. It brings joy to both the baker and the guests. We hope this guide has inspired you to get into the kitchen and start baking your own delicious and stunning masterpiece today!
Your email will not be published publicly.