
Easy baklava cheesecake recipe for sweet dessert lovers
Did you know that a single homemade creation can become the most talked about dish at any gathering? A stunning fusion of two iconic treats sparked a major trend after wowing a whole birthday party.
This legendary sweet was first crafted by a passionate home baker. She made it for her father in law’s special celebration, and the response was incredible.
The magic lies in the perfect balance. A tangy, creamy filling cuts through the intense sweetness of honey drenched, nutty layers. You get the best of both worlds in every single bite.
This guide is designed for anyone who loves to bake impressive treats. It saves you time in the kitchen while delivering a complex flavor profile that satisfies every sweet tooth.
Whether you’re hosting a holiday dinner or a casual get together, this stunning centerpiece will make your event memorable. Your guests will be asking for this baklava cheesecake recipe for years to come.
Introduction: a decadent fusion of classics
What happens when two of the world’s most beloved sweets decide to share a pan? You get a stunning single dessert. A rich, creamy layer rests perfectly on a traditional, crispy, and buttery baklava base.
This creation delivers an incredible experience with every spoonful. The creamy filling scoops up delightful, flaky bits from the crust below.
An unexpected dessert combination
The magic is in the balance of flavors. A tangy cream cheese filling cuts beautifully through the sugary, nutty layers of phyllo pastry.
It tastes like a luxury item from a high end restaurant. Many people feel such indulgent treats are out of reach, but you can make this at home.
Why this recipe stands out
You enjoy the best of both worlds without baking two separate, time consuming desserts. The contrast between textures is truly addictive.
Crispy, buttery phyllo meets a smooth, velvety filling. This fusion is a guaranteed showstopper for any special occasion.
Gathering your ingredients and equipment
Having your tools and components ready transforms a complex dessert into a manageable, enjoyable task. A little prep work upfront makes the assembly process flow smoothly.
Essential Ingredients for a perfect balance
Start with the phyllo dough. You’ll need about 20 sheets for a standard version. Let it thaw slowly in your fridge for several hours before you begin.
For the nut mixture, a classic combo of walnuts and pistachios works beautifully. You can swap in pecans if you prefer. Your cream cheese must be at room temperature. Cold bricks will create lumps, preventing a truly smooth filling.
Choosing the right pan and tools
The right springform pan is non negotiable. Its removable sides let you release your creation without damage. A 6 inch springform pan is ideal for a tall, impressive result.
Don’t forget a good pastry brush. You’ll use it to apply melted butter between each delicate phyllo layer. With these key ingredients and tools assembled, you’re set for success.
Preparing the baklava crust
Before the creamy filling can shine, you need to build a sturdy, flavorful platform from phyllo and nuts. This foundation provides the essential crunch and rich taste. Two simple prep steps make all the difference.
Toasting nuts for enhanced flavor
Raw nuts are fine, but toasted ones are fantastic. Heating them wakes up their natural oils. This step adds a deeper, crunchier element to every bite.
Spread your walnuts and pistachios on a flat sheet pan. Toast them at 350°F for 5 to 10 minutes. Let them cool completely before chopping.
Working with phyllo sheets
This delicate dough dries out incredibly fast. Always keep your stack covered with a slightly damp towel. It prevents the phyllo sheets from cracking as you work.
Lay one sheet in your pan and brush it generously with melted butter. Rotate the next sheet slightly clockwise. This builds the crust up the sides.
Don’t panic if a sheet tears. Just overlap the pieces and butter them together. It will bake up perfectly. Finally, trim any excess dough hanging over the pan’s edge.
| Challenge | Cause | Quick fix |
|---|---|---|
| Drying Out & Cracking | Exposure to air | Keep stack under a damp cloth |
| Tearing During Handling | Delicate, thin dough | Overlap pieces; butter seals them |
| Uneven Butter Coverage | Rushing the process | Use a pastry brush, rotate each sheet |
| Excess Dough Overhang | Not trimming after layering | Trim with scissors for easy pan release |
How to make the baklava cheesecake recipe
Bringing together the crispy crust and creamy center is where the real magic happens. Your active prep will take about 40 minutes. Focus on these two phases for a flawless result.
Layering the phyllo and nut mixture
Start with your prepared springform pan. Place one sheet of dough inside. Brush it generously with melted butter.
Rotate the next sheet slightly. Repeat this process until you’ve used about 20 sheets. This builds a sturdy base that climbs the sides.
Sprinkle your toasted nuts between every few layers. Once assembled, you can score the top into wedges. This helps the syrup soak in later.

Mixing the creamy cheesecake filling
Grab a large bowl. Add 452 grams of softened cream cheese. Pour in sugar and a splash of vanilla.
Beat everything until perfectly smooth. Scrape the sides to catch any lumps. Add two large eggs, one at a time.
Mix just until combined. For an ultra smooth texture, pour the filling through a fine sieve. Now it’s ready to pour over your crust.
| Component | Core actions | Pro tip |
|---|---|---|
| Baklava Crust | Layer phyllo, butter, nuts; score top | Keep dough covered to prevent drying |
| Cheesecake Filling | Beat cream cheese, sugar, eggs; sieve | Add eggs slowly to avoid too much air |
Mastering toom temperature and timing
Achieving a professional texture at home depends heavily on one often overlooked step: ingredient preparation. The warmth of your components directly impacts the final consistency and structure of your dessert.
The importance of toom temperature ingredients
Your cream cheese, eggs, and sour cream must be at room temperature before you mix them. Cold ingredients resist blending, which can create a lumpy, uneven batter.
When these ingredients are warm, they emulsify much more easily. This creates a perfectly smooth, homogenous mixture. It’s the secret to a flawless, crack free finish after baking.
If you forget to take your cream cheese out, don’t rush. Let it sit on the counter for about an hour. This brings it to the ideal temperature for baking.
| Ingredient | Ideal State | Key benefit |
|---|---|---|
| Cream Cheese | Soft, spreadable | Blends smoothly, no lumps |
| Eggs | No longer cold to touch | Incorporates evenly for stable structure |
| Sour cream | Pourable consistency | Adds moisture without curdling |
| Butter (for crust) | Soft but not melted | Easy to brush between phyllo layers |
Proper temperature management ensures the chemical reaction between the eggs and cheese works correctly. This gives you that coveted, creamy consistency every time.
Flavor variations and customization ideas
One of the best aspects of this fusion is how easily you can tailor it to match your flavor preferences. The classic version is fantastic, but your personal twist can make it unforgettable.
Feel free to experiment with the components. This approach lets you highlight your favorite tastes.
Swapping nuts and spices
The mixture of nuts is a perfect place to start. While pistachios and walnuts are traditional, almonds or pecans work beautifully too.
Choose based on what you love or what’s in your pantry. Toasting them always enhances their flavor.
For a warm, aromatic quality, add a teaspoon of ground cinnamon or cardamom to your chopped nuts. This spice blend defines traditional Middle Eastern styles.

- A beautiful dessert deserves a beautiful presentation. The Angora Brands Gold Cake Stand Set makes any table look elegant in seconds. This 6 piece set is perfect for weddings, birthdays, or simply treating yourself.
- Don’t miss our hummingbird cake recipe, cherry pie mini tarts and red velvet cake chocolate.
You can even use brown sugar with the nuts for a deeper, molasses like note in the crust.
Integrating citrus and honey accents
Honey is the star of the syrup, adding wonderful depth and sweetness. For an authentic Turkish touch, consider a drop of orange blossom or rose water to the honey glaze.
To balance that rich honey, add a bright, refreshing finish. Incorporate fresh lemon juice and zest directly into your creamy filling.
This lemon accent cuts through the richness perfectly. A little lemon zest can transform the entire profile.
Remember, your butter should be properly melted for the phyllo layers. The quality of your honey and sugar truly shapes the final taste.
Baking tips for a crispy, creamy finish
Achieving that ideal contrast between crisp and creamy hinges on your oven technique. The right heat and timing lock in texture while preventing common issues.
Always place your springform pan on a rimmed baking sheet before it goes in the oven. This catches any butter that might leak during the bake.
Recognizing the perfect ‘Jiggle’ in the center
Bake your creation at 325°F for about 65 to 70 minutes. You will know it’s done when the edges look set.
The very center should have a slight, gentle movement when you nudge the pan. This jiggle means the filling will set perfectly as it cools.
How to avoid common baking pitfalls
Avoid overbaking. Too much heat can cause cracks and make the phyllo crust overly dark.
If the pastry browns too quickly, loosely tent the top with foil for the final 15 minutes. Once out of the oven, pour your honey syrup over the hot crust immediately.
| Phase | Key sign | What to do |
|---|---|---|
| Start | Preheated oven at 325°F | Place springform pan on rimmed sheet |
| Mid Point | Phyllo edges turning golden | Tent with foil if browning too fast |
| Finish | Edges set, center jiggles slightly | Remove from oven; pour syrup |
Serving suggestions and storage ideas
Knowing how to serve and store your creation ensures every slice is perfect. This stunning dessert yields twelve generous portions. Each one is a rich, satisfying treat.
Proper handling from the moment it leaves the oven guarantees the best experience. Follow these simple ideas to make your presentation shine.
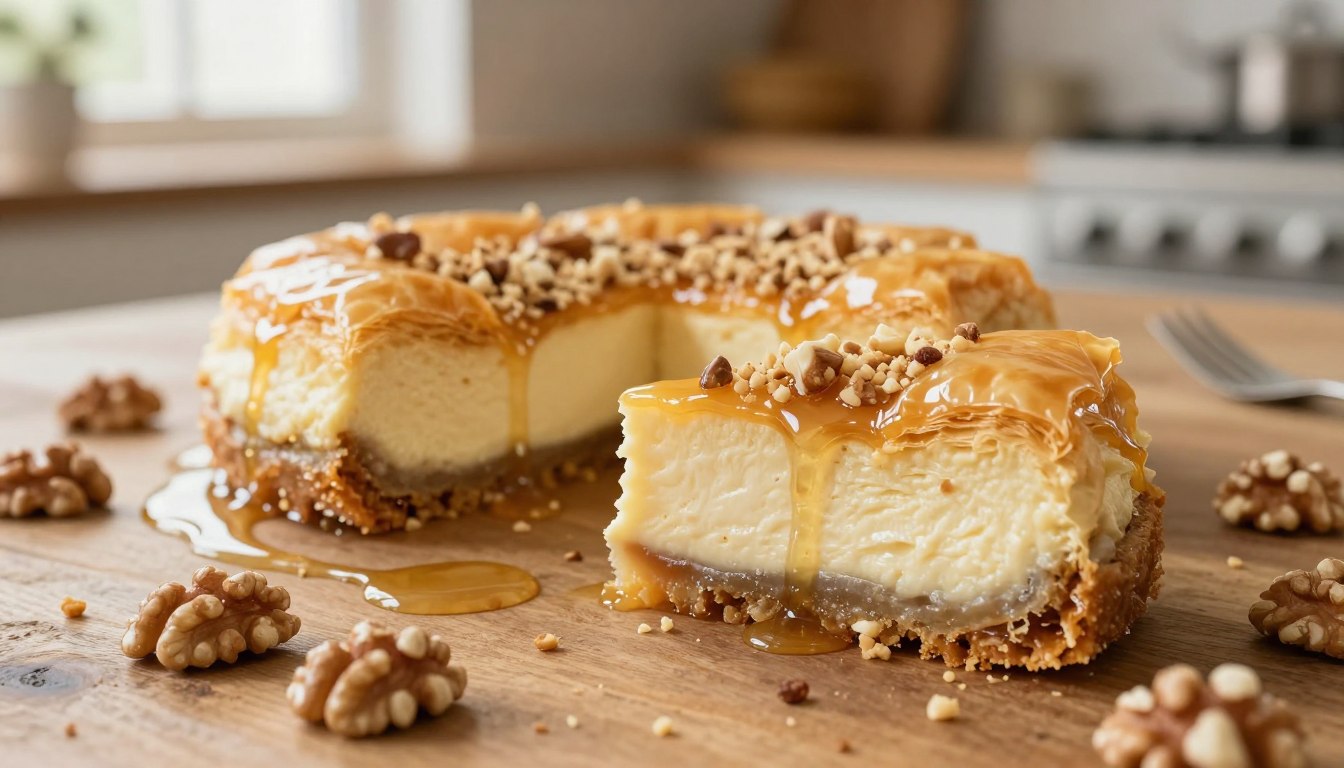
Creative garnishing to elevate your dessert
A few final touches transform your plate into a masterpiece. Right before serving, add a final flourish.
Sprinkle finely chopped nuts over the top for extra crunch. A light, artistic drizzle of warm honey adds shine and sweetness.

You could also add a dollop of lightly whipped cream on the side. This balances the dense, sweet layers beautifully.
Best practices for chilling and storing leftovers
Patience is key for the ideal texture. Let your baklava creation cool completely on the counter first.
Then, transfer it to the fridge. Chill for at least six hours, or overnight for best results.
For clean cuts, run your knife under hot water. Wipe it dry between each slice.
Store any leftovers in an airtight container in the fridge. They will stay fresh and delicious for up to five days. This recipe is a fantastic make ahead option for any celebration.
Conclusion
Your journey into the world of fusion desserts culminates in this spectacular creation. You have successfully merged the crisp, nutty layers of a classic baklava with a smooth, tangy cheesecake filling. This balance is a true testament to your baking skills.
By following the detailed steps, you can now prepare this impressive sweet for any gathering. Your guests will be delighted by the complex flavors and stunning presentation. Remember, the secret lies in using high quality components and allowing proper chilling time.
Whether you added a hint of rose water or kept it traditional, this dish offers a canvas for your creativity. Each variation makes it uniquely yours.
We hope every slice brings joy to your table. May this become a cherished part of your holiday traditions for years to come.
Your email will not be published publicly.