
Easy lemon cheesecake recipe to brighten your dessert table
Did you know that citrus desserts are among the most searched for treats in the United States every spring? This vibrant flavor captures the fresh energy of the season perfectly.
Creating a stunning centerpiece for your table doesn’t require professional skills. Natasha Kravchuk notes this dessert yields twelve generous slices. The total time is under ten hours, with most of it being hands off chilling.
This lemon cheesecake delivers the rich, dense creaminess of a classic New York style dessert. It’s beautifully balanced with a bright, tangy citrus filling. The contrast between the sweet, buttery crust and the zesty interior is truly irresistible.
Whether you’re new to baking or a seasoned pro, this project is designed to be approachable. The steps are straightforward, leading to a professional-looking result. Each slice offers a smooth, velvety texture and a refreshing burst of flavor.
It makes an elegant addition to any holiday table, especially Easter. You’ll impress your guests with a treat that balances richness with a light, airy finish.
Overview: A bright twist on classic cheesecake
What happens when you merge the creamy indulgence of a New York-style dessert with the vibrant punch of a citrus bar? You get a delightful hybrid that has home bakers everywhere giving rave reviews.
Why lemon shines in cheesecakes
The natural acidity in citrus performs a little magic. It cuts through the inherent richness of the creamy filling. This creates a beautifully balanced treat that feels both luxurious and refreshing.
Betty, a home baker, awarded this creation five stars. She loved its light, fluffy consistency and the perfect amount of tangy zest. It avoids the heaviness some desserts have, offering a sophisticated flavor profile.
Key features of this dessert include:
- A satisfying structure from a classic base, paired with a zesty, citrus-forward filling.
- A texture praised for being airy and smooth, not dense.
- The sophisticated interplay between sweet and tangy elements that appeals to many.
This fusion maintains all the comforting qualities you love. Yet it delivers a uniquely bright and refreshing experience for your table.
Gather your ingredients and tools
Setting up your workspace with the right items ensures a smooth process from crust to filling. Having everything measured and within reach prevents mid recipe scrambling. This preparation is your first step toward a flawless dessert.
Essential ingredients for the perfect balance
Quality components are the heart of this creation. You will need four full fat cream cheese blocks. They must be at room temperature for a perfectly smooth blend.
Five large eggs and granulated sugar provide structure and sweetness. Real vanilla extract and a pinch of salt enhance the overall flavor profile. Do not underestimate their importance.
Fresh citrus zest and juice deliver the signature bright, tangy note. This element cuts through the richness beautifully. Always use fruit that feels heavy for its size.
| Ingredient | Quantity/Purpose | Impact on Final Dessert |
|---|---|---|
| Cream Cheese | Four 8 oz blocks, room temp | Creates the dense, creamy base texture. |
| Fresh Citrus | Zest & juice from 2-3 fruits | Provides the vibrant, tangy flavor signature. |
| Eggs & Sugar | 5 large eggs, 1 1/4 cups sugar | Gives structure, sets the filling, and balances tartness. |
Recommended kitchen equipment
A 9-inch springform pan is non negotiable. As Natasha Kravchuk advises, it guarantees clean release after chilling. This protects your dessert’s structural integrity.
A stand mixer or electric hand mixer is vital. It properly aerates the batter for that light, airy texture. You also need a sturdy roasting pan for the water bath.
Other helpful tools include a microplane for zesting and a fine-mesh strainer. They help you achieve a perfectly smooth, lump-free filling. With these items ready, you’re set to begin.
Creating a perfect graham cracker crust
Before the creamy filling can shine, you need a crisp, buttery crust that won’t get soggy. This foundation is more than just a base. It provides a delightful textural contrast and acts as a protective barrier between your dessert and the pan.
Combining crumbs, butter, and sugar
Start with 1 ¾ cups of fine graham cracker crumbs. Add six tablespoons of melted unsalted butter and two tablespoons of granulated sugar. Mix everything until it resembles damp, coarse sand.
This consistency is key. It ensures the cracker crust will hold together firmly. Press the mixture into the bottom and slightly up the sides of your 9 inch springform pan.
Baking and cooling the crust
Preheat your oven to 350°F. Bake the empty crust for exactly 8 minutes. This crucial step sets the structure and prevents sogginess from the heavy filling later.
Let the baked crust cool completely to room temperature. Use a flat bottomed measuring cup to pack the crumbs evenly. This creates a truly uniform thickness for a secure foundation.
Lemon cheesecake recipe: classic and zesty filling
Crafting the filling is where the magic happens, transforming simple ingredients into a velvety masterpiece. This centerpiece balances rich creaminess with a bright, tangy punch.

- Bake the perfect cheesecake every time with this 9 inch leakproof springform pan. Made from high quality 304 stainless steel, it features a removable bottom for easy release and a silicone protector that makes water bath baking completely worry free no more soggy crusts. The set includes 50 pieces of parchment paper and is dishwasher safe for effortless cleanup. Ideal for cheesecakes, quiches, tortes, and layered desserts.
- If you liked this, you might love trying our Banana Bread Muffins, Strawberry Desserts, or philadelphia cheesecake next.
Infusing lemon zest and juice
Fresh zest and juice provide the necessary acidity. They cut through the richness of the base beautifully.
This infusion creates a sophisticated flavor profile. It avoids heaviness and offers a refreshing experience.
Achieving a creamy texture with room temperature ingredients
Natasha Kravchuk advises beating the cream cheese and sugar for five minutes on Medium high speed. This ensures a completely smooth texture.
Using room temperature components is the secret to a Lump free mixture. Add eggs one at a time on low speed. This prevents excess air and helps avoid cracks.
Scrape down the sides of the bowl frequently. A small amount of sour cream enhances tanginess and contributes to the creamy texture.
The final step involves pouring the batter over the cooled crust. Now your dessert is ready for the water bath.
Mastering the water bath technique
Achieving a flawless, crack free finish for your citrus dessert hinges on one crucial step. The water bath uses gentle, surrounding heat to cook the filling evenly. It prevents the edges from setting too quickly while the center remains underdone.
Wrapping your pan for a seamless bake
Your first task is to create a waterproof seal for your springform pan. Take two sheets of Extra wide, heavy duty aluminum foil. Wrap them securely around the bottom and up the sides of the pan.
This barrier stops water from seeping into the crust during baking. Place the wrapped pan inside a larger roasting pan. Now, pour about one inch of very hot water into the outer pan.
The water bath provides a humid environment inside your oven. This moisture is essential for preventing unsightly cracks on the surface of your cheesecake. It acts as an insulator for consistent temperature.
Preheat your oven to 450°F. Bake at this high temperature for 15 minutes. Then, reduce the heat to 225°F without opening the door.
Continue baking for 60 to 65 minutes. The center should have a slight wobble when you gently shake the pan. This indicates a perfectly set, creamy texture.
Once baking is done, turn off the oven. Leave the door slightly ajar for about an hour. Letting it cool gradually inside further prevents any stress cracks.
Mixing and baking tips for a smooth finish
A few simple techniques during mixing and baking can elevate your creation from good to exceptional. The goal is a velvety, uniform texture without lumps or cracks.

The importance of room temperature Ingredients
This is the non-negotiable first step. Your cream cheese, eggs, and sour cream must be at room temperature. This allows them to emulsify smoothly, creating a lump-free batter.
If your ingredients are cold, you’ll overwork the batter trying to blend them. This can incorporate too much air and lead to a puffy, cracked top after cooling.
For perfect mixing, use your stand mixer on medium speed. Beat the cream cheese and sugar for a full five minutes. Scrape down the bowl thoroughly after each addition.
As Camila Hurst recommends, an in-oven thermometer is a valuable tool. It verifies your oven maintains the correct temperature throughout the long bake time.
- Always scrape the bowl to integrate any unmixed cream cheese.
- Add eggs on low speed and mix just until combined to avoid excess air.
- The gentle heat from the water bath is key for a smooth, level top.
Proper technique makes the difference between a dense, professional-grade dessert and one with an uneven texture.
No bake variations for a quick dessert option
When you’re short on time but crave a creamy dessert, a no bake version offers a fantastic solution. It delivers the same bright, tangy flavor without any oven time.
Exploring a mousse like texture
This method creates a light, airy texture. You fold whipped heavy cream into a smooth mixture of room temperature cream cheese and sugar.
The result is a delightful, mousse like consistency. Fresh citrus juice and zest provide the essential vibrant flavor profile.
Your graham cracker crust needs no baking either. Simply press the crumbs into your pan and chill it in the freezer to firm up quickly.
Patience is key for setting. The dessert must refrigerate for at least 6-8 hours. This allows the cream cheese and heavy cream to firm up naturally without gelatin.
Serve it straight from the refrigerator for the best slice. This keeps the texture perfectly intact.
| Feature | No bake variation | Classic baked version |
|---|---|---|
| Primary Texture | Light, mousse like | Dense, creamy |
| Oven Time Required | None | About 1.5 hours |
| Key Setting Agent | Chilled cream cheese & cream | Eggs & slow baking |
| Total Active Time | 20-30 minutes | 30-40 minutes |
| Best For | Quick prep, warm days | Traditional, firm structure |
Creative toppings and decoration ideas
Your masterpiece deserves a crowning touch that enhances both its flavor and visual appeal. The right decorations transform a simple dessert into a stunning centerpiece.
These finishing ideas are easy to execute. They add professional flair suitable for any special occasion.
Enhancing with lemon curd and whipped cream
Spreading a layer of lemon curd over the top adds a tart, sweet contrast. It cuts through the rich filling beautifully.
You can use homemade or store bought curd. A generous layer across the entire surface works best.
Piping sweetened whipped cream around the edges frames the dessert. It adds a delicate, airy texture that complements the dense center.

For the best results, add the whipped cream topping just before serving. This keeps it light and prevents deflating.
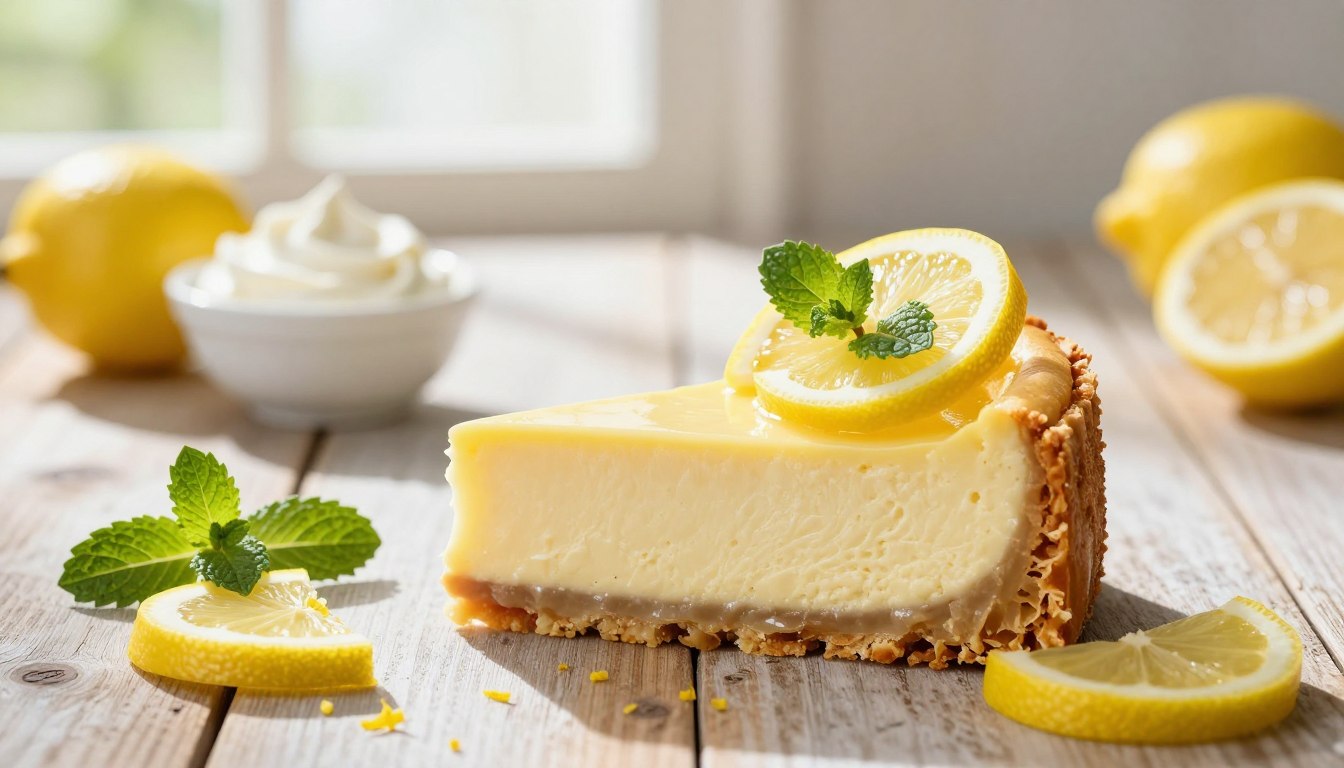
Garnishing with fresh lemon slices and zest
Fresh lemon zest sprinkled over the lemon curd provides a vibrant color pop. It also offers an extra burst of citrus aroma.
Thinly sliced lemons arranged in the center create a beautiful, professional garnish. This highlights the primary flavor profile elegantly.
The combination of glossy curd, white cream, and yellow zest creates a stunning visual contrast. It makes your dessert look bakery-quality.
| Topping Component | Primary Purpose | Best Application Timing |
|---|---|---|
| Lemon Curd | Adds intense tart-sweet flavor layer | After chilling, before final garnish |
| Whipped Cream | Provides light texture & visual framing | Immediately before serving |
| Fresh Zest & Slices | Enhances aroma, color, and presentation | As the final step before serving |
Serving suggestions and storage guidelines
The true test of a well made dessert comes when it’s time to slice, serve, and save the leftovers. Proper technique here protects your hard work and keeps every bite delightful.
Perfect serving practices for optimal enjoyment
For flawlessly clean slices, use a thin bladed knife. Dip it into a tall glass of hot water and wipe it dry before each cut.
This method glides through the dense filling without sticking. It gives you beautiful, professional-looking portions.
Serve your creation straight from the refrigerator for the best texture. If you’ve added a lemon curd or whipped cream topping, do so just before serving.
This keeps the curd bright and the cream perfectly fluffy. Avoid leaving it out at room temperature for more than an hour.
Tips for refrigerating, freezing, and thawing
For short term storage, cover the pan tightly. You can use plastic wrap or a reusable lid.
It will stay fresh in the refrigerator for 3 to 4 days. The stable structure from the water bath helps it hold its shape.
To freeze for up to three months, wrap it securely. First use plastic wrap, then a layer of heavy duty foil.
This double barrier prevents freezer burn. Thaw it slowly overnight in the refrigerator to preserve the delicate texture.
Never thaw it on the counter. The gentle, cold temperature change is key.
Conclusion
With this guide, you can confidently create a show-stopping dessert that’s both rich and refreshingly bright. Mastering the graham cracker crust and the water bath technique ensures your creation has a professional-quality structure and a supremely creamy texture.
Adding a layer of tangy lemon curd and a dollop of fresh whipped cream transforms it into a truly stunning centerpiece. A final sprinkle of bright zest highlights that signature citrus flavor.
Remember, using room temperature ingredients and following the cooling steps are key. They prevent cracks and give you that perfect, velvety filling everyone loves.
Whether you choose the classic baked method or a quicker no bake version, this cheesecake is a versatile favorite. You can store leftovers in the refrigerator or freezer, securely wrapped in plastic wrap, to enjoy its delicious flavor for days to come.
Your email will not be published publicly.