
Blueberry mini tarts recipe : Elegant, Creamy & stunning
Did you know that over 80% of Americans enjoy desserts regularly? This statistic highlights just how important sweet treats are in our lives. Among these delights, a standout is the classic dessert featuring a buttery crust filled with vibrant fruit.
You can easily impress your guests with a delightful creation that Erin Dooner perfected for home bakers. This specific dessert is designed to be the highlight of any gathering, providing a sweet and buttery experience that everyone will love.
Whether you are hosting a formal dinner or a casual picnic, this delightful treat offers a versatile way to serve seasonal fruit. The combination of a crisp pastry shell and a vibrant filling creates a truly memorable flavor profile.
By following simple steps, you can master the art of making professional quality tarts right in your own kitchen today.
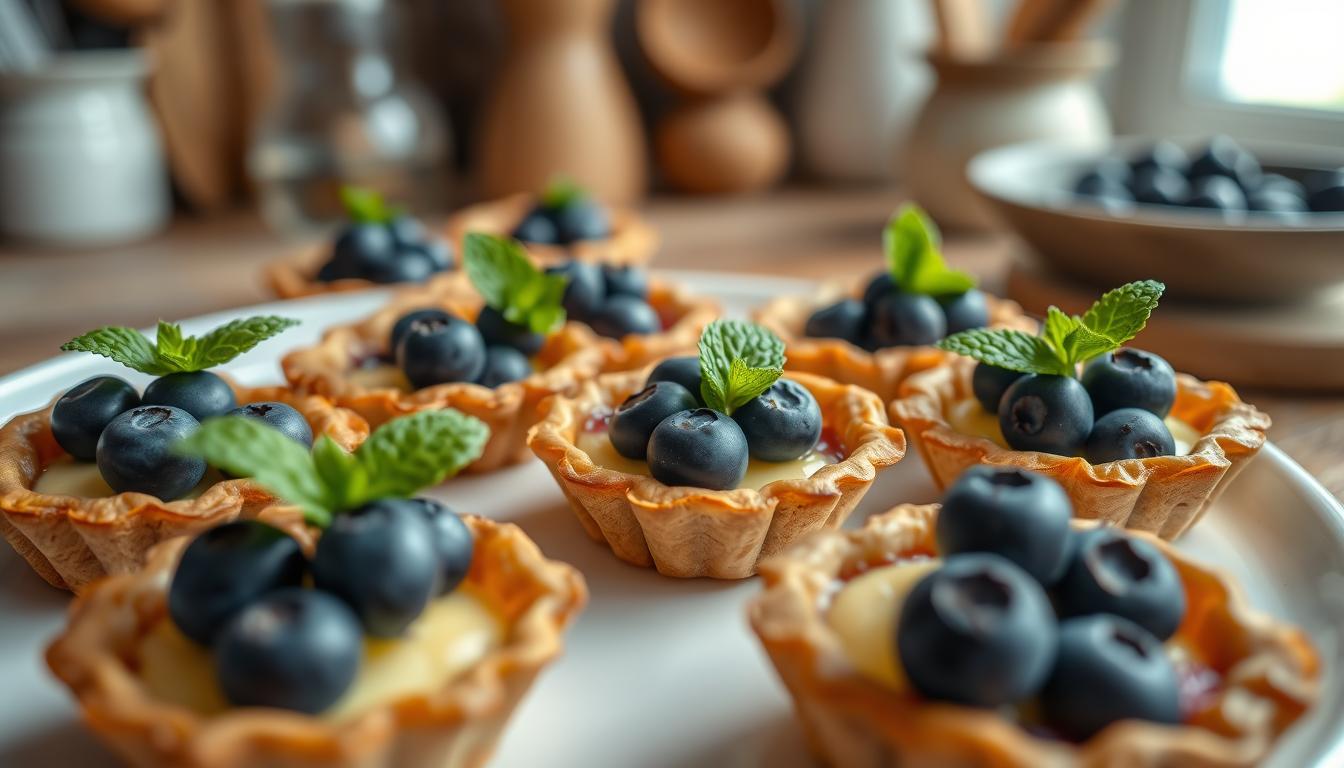
These blueberry mini tarts are the ultimate French inspired elegant dessert incredibly buttery, creamy and bursting with fresh blueberry flavor in every single bite! For more creative blueberry dessert inspiration, Allrecipes showcases an incredible collection of fruit tart variations loved by home bakers worldwide. For more stunning tart recipes, explore our elegant Cherry pie mini tarts: bite sized perfection and our delicate French Pastry Recipes Guide both absolutely divine!
Introduction to your blueberry mini tarts experience
Creating delightful desserts can be an enjoyable adventure. Mini tarts offer a perfect way to showcase your baking skills while impressing your guests. These little wonders not only taste fantastic but also add elegance to any gathering.
What makes this particular dessert stand out? The harmonious blend of fresh fruit and a rich, buttery crust is a winning combination. Many bakers, inspired by the mention of a blueberry tart in Sarah J. Maas’s book, Queen of Shadows, have embraced the joy of crafting their own versions.
These small treats are ideal for various occasions. You can serve them at parties or enjoy them during intimate family gatherings. The individual portions allow for easy serving, making them a favorite among hosts.
Additionally, the versatility of these tarts lets you use seasonal ingredients. This ability to adapt while maintaining a sophisticated presentation makes them a beloved choice for dessert lovers.
| Feature | Benefit |
|---|---|
| Individual Portions | Perfect for gatherings |
| Rich Crust | Holds shape well |
| Seasonal Ingredients | Showcases fresh flavors |
| Elegant Presentation | Enhances dessert tables |
Gathering essential ingredients and tools
In the realm of culinary delights, desserts hold a special place in American hearts. To create your own stunning pastries, gathering the right ingredients and tools is essential. This ensures that your creations turn out perfectly every time.
Must Have Ingredients for the Tart Dough: Start with high quality all purpose flour and 113 grams of cold unsalted butter. These are the foundation for a stable tart dough. Using the right equipment is also crucial.
Key Components for a Tasty Filling: For the filling, you can use fresh or frozen fruit. This will create a delicious sauce that elevates your delightful tarts. Erin Dooner recommends using Wilton Perfect Result 4.75-inch tart pans, which are durable and last for years.
- Ensure your tart pans are in good condition, as Erin has successfully used hers for over 10 years.
- Gathering ingredients beforehand helps maintain the cold temperature of the butter, which is vital for a flaky crust.
| Ingredient | Amount | Purpose |
|---|---|---|
| All Purpose Flour | 1 ½ cups | Base for the dough |
| Cold Unsalted Butter | 113 grams | Creates a flaky texture |
| Fresh/Frozen Fruit | 2 cups | Filling base |
| Wilton Tart Pans | 6 pans | Even baking and easy release |

Step by step guide to preparing the tart dough
The joy of baking begins with understanding how to prepare the perfect dough. Start by gathering your ingredients and tools. This will make the process smoother and more enjoyable.
Begin by whisking your flour and salt together in a bowl. Then, cut in the cold butter until the mixture resembles coarse breadcrumbs. This specific crust recipe is adapted from the experts at King Arthur Flour, ensuring a professional and delicious result.
Next, gently work the dough with your hands to bring it together. Be careful not to overwork it, as this can lead to a tough texture. Chilling the dough for at least one hour is crucial. This step makes it easier to handle and press into your tart pans.
Proper preparation of the tart dough is the secret to preventing a soggy base. This way, you can create the perfect foundation for your filling, leading to delightful tarts that everyone will love.
Crafting the perfect tart shell
Crafting desserts is an art that can bring joy to both the maker and the eater. A well made tart shell is essential for creating delicious desserts. Follow these steps to ensure your shells are perfect every time.
Start by rolling your dough to a thickness of 2mm, or 1/16 inch. This thickness helps the shells bake evenly and stay crisp. When you press dough into your pans, aim for an even thickness throughout to guarantee a consistent bake.
Using a small offset spatula can help you line the tart shells effectively. This tool ensures the dough adheres perfectly to the sides. To avoid crumbly or soggy bases, dock the bottom of the tart shells with a fork before baking.
- If the dough becomes too soft while you work, place it back in the fridge for a few minutes to firm up.
- Carefully trim the excess dough from the top of the tart pans. This creates a clean, professional edge that looks beautiful once baked.

Creating a luscious blueberry filling
A delightful filling can transform simple pastries into extraordinary treats. The key to a great filling lies in balancing flavors and achieving the right consistency. Let’s explore how to create a luscious filling that will elevate your dessert.
Simmering and thickening the blueberry sauce
Start by combining 1.5 cups of blueberries with sugar and water in a saucepan. Bring the mixture to a simmer to create a rich sauce. This step is crucial for developing the flavor.
- After the sauce thickens, stir in 1/2 teaspoon of vanilla extract for aromatic depth.
- To achieve the perfect consistency, add a cornstarch slurry to the simmering filling.
- Be gentle when stirring to keep the blueberries whole for visual appeal.
Balancing flavors with lemon and extracts
Enhance the natural sweetness by adding a touch of lemon juice or zest. This will highlight the vibrant flavors of the fresh fruit filling. A well balanced filling will ensure that each bite is bursting with flavor.
Assembling your blueberry mini tartlets
Bringing your delightful tartlets together is an exciting part of the baking process. This is where all your hard work pays off. As you prepare to fill your tart shells, keep in mind a few essential tips to ensure a beautiful presentation.
Filling the pre baked tart shells evenly
Once your shells have cooled, it’s time to fill them. Distribute about 5 tablespoons of the luscious blueberry mixture into each shell. This generous amount ensures a satisfying bite without overflowing the edges.
Using a piping bag for a mousse layer or a spoon for the fruit filling can help you achieve a clean, professional look. This technique will impress your guests and elevate the overall appearance of your dessert.
Layering techniques for visual appeal
To add a bit of flair, consider topping the filling with extra fresh fruit. This not only enhances the visual appeal but also adds a burst of flavor. Remember to let the filling cool slightly before adding it to the tartlets, as steaming hot filling can soften the crisp pastry shell.
Finally, gently level the filling with an offset spatula. This will ensure your mini tarts look uniform and ready for any final decorative touches you might want to add.

Baking tips for the best texture and flavor
The secret to perfect pastries lies in mastering the baking process. Proper techniques can significantly enhance the flavor and texture of your creations. Here are some essential tips to ensure your tarts turn out beautifully every time.
Preheating the oven and setting the baking time
Start by preheating your oven to 375°F. This step is crucial as it helps the pastry set quickly, maintaining a crisp texture. Placing a baking sheet in the lower third of the oven will also help the crusts brown perfectly.
- Always preheat the oven before placing your tarts inside to ensure optimal results.
- Using a hot baking sheet helps the bottom of the crust brown evenly, preventing soggy spots.
Rotating tarts for perfect browning
During baking, rotating the tarts halfway through the time ensures that every side receives equal heat. This results in a beautiful golden brown finish.
- Keep a close eye on the oven in the final minutes, as these small pastries can brown quickly.
- Once the edges are nicely browned, remove the baking sheet and let the tarts cool completely on a wire rack before serving.
Storing, freezing, and serving suggestions
Proper storage can enhance the longevity and taste of your delightful pastries. Knowing how to store and serve your desserts can elevate your baking experience. Here are some essential tips to keep your creations fresh and delicious.
Best practices for freezing dough and tarts
You can store your baked shells in an airtight container at room temperature for up to 3 days, keeping them ready for filling. If you have extra dough, you can freeze it for up to 3 months, allowing you to make mini blueberry tarts whenever you desire. Always ensure your tarts cool completely before placing them in a container to prevent condensation from ruining the crisp pastry texture.
How to serve for freshness and taste
Serving these tarts after they have chilled for at least 4 hours allows the flavors to meld, making them taste even better. The recipe is flexible enough that you can make 48 tarts at a time or simply store the components for a smaller batch. With these tips, your delightful pastries will be a hit at any gathering!
| Storage Method | Duration | Notes |
|---|---|---|
| Baked Shells | Up to 3 days | Store in an airtight container at room temperature. |
| Extra Dough | Up to 3 months | Wrap well before freezing to prevent freezer burn. |
| Chilled Tarts | At least 4 hours | Enhances flavor melding for better taste. |

Blueberry mini tarts recipe – customization tricks and variations
Exploring different variations of your favorite desserts can lead to delightful surprises. You can easily adapt this creation to suit various dietary needs and preferences. Here are some ideas to customize your delightful tarts:
- For a gluten free option, use King Arthur Flour Gluten free Measure for Measure Flour for the pastry shell.
- Add a touch of lemon extract or zest to brighten the flavor of your fresh blueberries.
- For a vegan twist, substitute the butter in the crust with coconut oil, though the texture may vary.
- Consider using maple syrup instead of sugar in your blueberry filling for a unique sweetness.
- Using parchment paper when rolling out your dough can make transferring circles into tart pans much easier.
These simple tweaks can make your tarts even more delightful and cater to your guests’ preferences. Don’t hesitate to experiment with flavors and textures!
| Customization | Ingredient | Benefit |
|---|---|---|
| Gluten Free | King Arthur Flour | Suitable for gluten sensitive individuals |
| Vegan | Coconut Oil | Maintains a similar texture without dairy |
| Natural Sweetness | Maple Syrup | Enhances flavor with less refined sugar |
Final reflections on your delightful mini tart journey
Creating delightful pastries is an art that anyone can master with practice. You have successfully navigated the process of crafting a professional grade dessert, from mixing the dough to simmering the perfect fruit filling. These little wonders are a testament to how simple ingredients like flour, butter, and fresh blueberries can be transformed into something truly special.
Remember, practice makes perfect. Each time you bake, you will grow more confident in your pastry making skills. Whether you shared these treats with friends or enjoyed them alone, you have mastered a recipe perfect for any occasion.
We hope you continue to explore variations, perhaps adding a touch of lemon cream or experimenting with seasonal fruits in your future baking adventures. Thank you for joining us on this journey to create delightful pastries, and we look forward to seeing your delicious results!
Your email will not be published publicly.