
How to make white chocolate Raspberry cake at home
Did you know a single slice of this luxurious dessert can contain over 800 calories? That’s the indulgent reality behind Olivia’s popular version, which serves sixteen. But don’t let that number scare you creating this masterpiece in your own kitchen is entirely possible and incredibly rewarding.
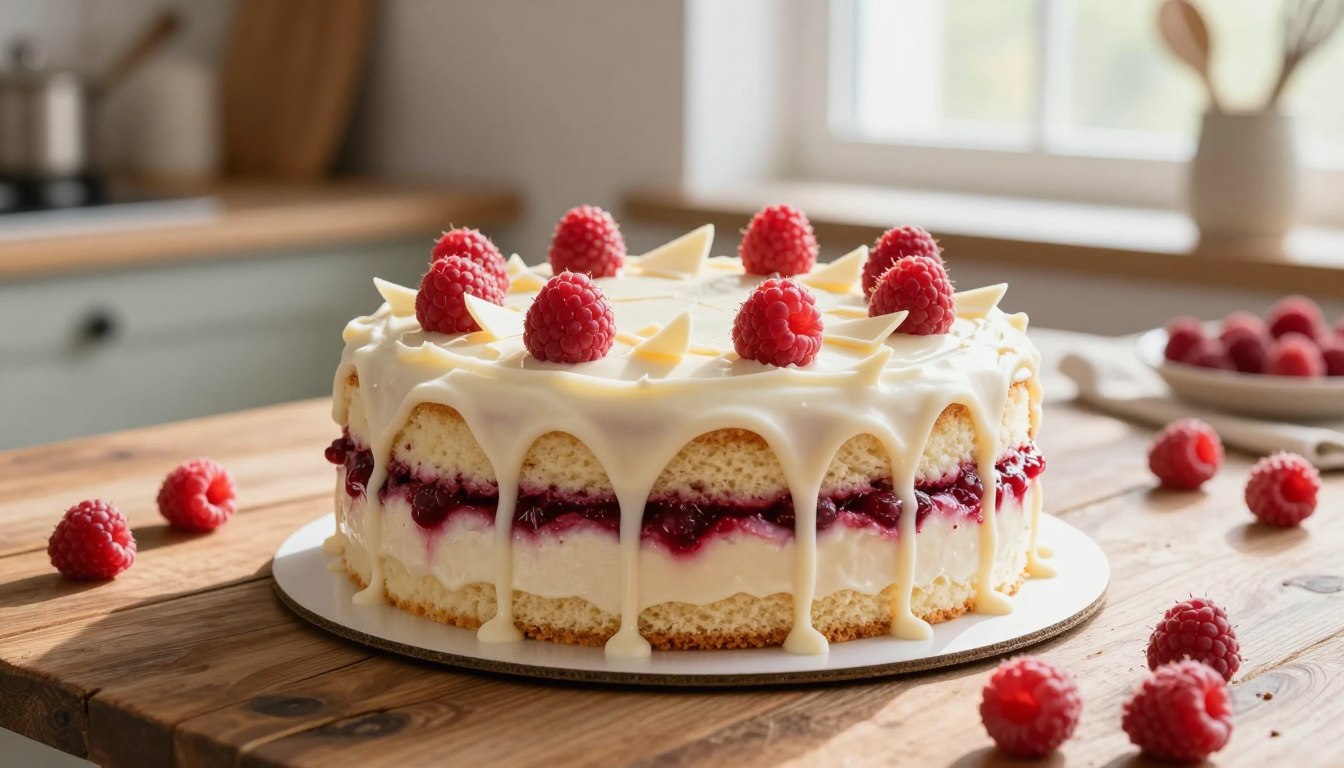
Renowned bakers like Christina Marsigliese describe it as a dream, featuring soft vanilla layers enveloped in silky ganache. The magic lies in the perfect balance. Tart, fresh berries cut through the rich, creamy sweetness of the white chocolate for a sophisticated flavor profile.
This guide is designed for everyone, from first time bakers to seasoned pros. You’ll follow clear, expert techniques to ensure your time in the kitchen is well spent. The process, which can take around four to five hours, results in a stunning centerpiece.
By focusing on high quality ingredients, your homemade creation will rival any professional bakery’s offering. Get ready to impress at your next family gathering or special celebration with this unforgettable recipe.
Introduction and inspiration
Creating a show stopping treat often begins with a spark of inspiration from your community. Olivia’s popular version was born from a specific request in her Facebook Group. This shows how a great idea can come from simply listening to fellow bakers.
Discovering the magic of white chocolate and raspberries
Christina Marsigliese highlights that red fruit and creamy confection create a magical combination. The tartness of fresh berries cuts beautifully through the rich sweetness. This balance ensures the dessert is sophisticated, not cloying.
You will find this pairing feels special and luxurious. The moist vanilla layers provide a perfect base for the vibrant fruit filling.
Occasion ideas and why you’ll love this recipe
The bright pop of red makes this an ideal choice for festive moments. Think Christmas celebrations, birthdays, or elegant dinner parties. Using seasonal summer berries maximizes flavor and color.
You will love this recipe because it delivers impressive results without being overly complex. Planning your menu ahead of time, like the character Bree, makes holiday preparation smoother. Every bite is designed to delight your guests.
Ingredients and essential equipment
Your journey to a delightful white chocolate raspberry creation begins with a well stocked pantry and the proper tools. Using high quality components ensures your final product tastes exceptional. This recipe relies on precise measurements and fresh items.
Key ingredients for a delicious cake
Professional bakers emphasize specific items for the best outcome. Christina Marsigliese recommends fresh sunflower oil for a clean, neutral taste in the batter. Kelsie advises using 10 tablespoons of unsalted butter and 6 ounces of finely chopped white chocolate for rich layers.
| Ingredient | Amount | Key Function |
|---|---|---|
| All purpose flour | 1 3/4 cups | Provides structure |
| Baking powder | 1 1/4 tsp | Helps rise |
| Unsalted butter | 10 tbsp | Adds richness and moisture |
| White chocolate | 6 oz | Imparts creamy sweetness |
| Vanilla extract | 1 tsp | Enhances flavor |

- RFAQK 100pcs Cake Pan Sets for Baking + Cake Decorating Supplies Complete baking kit including 3 non stick springform pans (4, 7, 9 inches), icing tips, cake leveler, and eBook. Leak proof design perfect for cheesecake. Multi functional and easy to clean.
- Love this recipe? You’ll also enjoy our Rosette Cake, Baklava Cheesecake, and pumpkin spice bundt cake with box mix
Must have baking tools and tips
You should have a reliable stand mixer or electric hand mixer. This tool beats butter and sugar to a pale, fluffy consistency. Always use a large mixing bowl for dry ingredients.
Ensure your milk and sour cream are at room temperature. This helps the batter emulsify correctly. Having 8-inch round pans and parchment paper saves time.
Preparing the cake batter
Mastering the batter is the first crucial step toward a perfect homemade white chocolate raspberry creation. Expert bakers like Christina Marsigliese and Kelsie share their proven methods to ensure your recipe succeeds.
Combining dry and wet ingredients
Begin by sifting your flour, baking powder, and salt into a medium bowl. This guarantees even distribution and prevents lumps. In a separate bowl, beat the butter, oil, sugar, and vanilla extract for two full minutes.
Christina Marsigliese insists on this time to achieve a pale, fluffy mixture. Next, incorporate your eggs and sour cream slowly into the butter blend. This gradual addition creates a stable emulsion.
You should then alternate adding the dry ingredients and milk, starting and ending with the flour blend. This method maintains the structure of your chocolate raspberry cake.
Techniques for a light and moist batter
One key tip is to avoid overmixing once the flour is added. Overworking the batter can lead to a dense texture instead of a light one. For the final touch, beat everything on high speed for just five seconds.
If you’re using a shortcut, Kelsie’s method combines a box mix with instant white chocolate pudding and sour cream. This creates a thick, flavorful base. Always ensure your dairy ingredients are at room temperature.
Gently fold fresh raspberries in at the very end. This prevents them from breaking apart and staining the batter too much. Your patience here ensures a beautiful, moist result.
Creating the raspberry filling
Achieving the right consistency for your fruit filling ensures a stable layered dessert. This component provides a tart contrast to the sweet frosting. Follow these tips for a perfect result every time.
Fresh versus frozen raspberries
Your berry choice matters. Expert baker Christina Marsigliese prefers fresh fruit for the cake batter. She notes frozen berries can leach excess moisture during baking.
For the filling itself, frozen work great. Kelsie’s delicious method uses two cups of frozen raspberries. They break down easily when cooked.
| Berry Type | Best Used For | Key Consideration |
|---|---|---|
| Fresh Raspberries | Cake Batter | Prevents soggy layers |
| Frozen Raspberries | Cooked Filling | Cook down completely |
Cooking the filling to perfection
Start by simmering your berries with sugar and lemon juice. Kelsie uses a quarter cup of sugar and two tablespoons of lemon juice. Stir the mixture over medium heat.
Next, add two tablespoons of cornstarch. Cook until it thickens enough to coat a spoon. This step is crucial for a spreadable compote.
Scrape the hot filling into a small bowl. Refrigerate it until completely cool. You can make this part up to two days ahead.
Always let the compote cool before using it between layers. This prevents the frosting from sliding. The tartness creates a necessary flavor balance in your final chocolate raspberry cake.
Crafting the silky white chocolate ganache frosting
Silky ganache or fluffy buttercream the choice of frosting defines the final character of your layered treat. This component adds a rich, creamy contrast to the tart berry filling. Mastering its texture is key for a stunning finish.
Melting white chocolate and achieving smooth texture
Christina Marsigliese creates a silky ganache by pouring half a cup of simmering cream over chopped white chocolate. Let it stand for two full minutes. Then, whisk the combination until it’s completely smooth before cooling for five minutes.
If you prefer a microwave, use 50% power in 15 second intervals. This prevents scorching. For a fluffy buttercream, Kelsie beats room temperature butter until light and creamy.
She then incorporates melted white chocolate. If your buttercream looks curdled, simply keep mixing. Chilling it for twenty minutes before re whipping can also help.
After your ganache base cools, whip it with an electric mixer on medium speed. This creates a cloud like, pipeable consistency. For extra flavor, add a scraped vanilla bean to the cream before heating.
The final texture should be thick and spreadable. This makes decorating your cooled layers a simple, enjoyable step in your recipe.
Baking your white chocolate raspberry cake
Monitoring your layers in the oven ensures a light, tender crumb in every slice. This step transforms your prepared batter into the sturdy foundation for your assembled dessert.
How to monitor doneness and texture
Christina Marsigliese bakes her layers at 350°F for 25 to 30 minutes. She checks for doneness by inserting a skewer into the center. It should come out clean.
Kelsie bakes hers for 24 to 28 minutes. She notes a thick mixture can result in a slightly concave top. Don’t worry. You can trim it later.

The layers will only turn a light golden color. Rely on the springy feel when gently pressed. This is a better indicator than color for perfect texture.
Tips for even baking and optimal moisture
Always preheat your oven. Line your pans with parchment paper to prevent sticking. For an even surface, use an offset spatula to smooth the batter before baking.
Rotate your pans halfway through the cooking time. This counteracts any hot spots. Let the layers cool in their pans for 20 minutes first.
Then, transfer them to a wire rack. Avoid overbaking. It dries out the crumb. Moisture comes from ingredients like milk, eggs, and sour cream.
| Goal | Action | Result |
|---|---|---|
| Even Baking | Rotate pans, preheat oven | Uniform rise and color |
| Prevent Sticking | Use parchment paper liners | Clean release from pan |
| Optimal Moisture | Cool in pan, avoid overbaking | Tender, soft crumb |
Assembling and layering your cake
A stable, straight dessert relies on careful layering techniques during assembly. This stage has two key parts: securing the flavorful filling and applying the final decorative touches.
Filling and layering with raspberry jam and frosting
First, use a pro trick to keep your filling neat. Pipe a thick wall of frosting around the edge of your bottom layer. This creates a dam.
Spread your berry compote evenly inside this border. For a delicious interior, consider using a generous amount of fresh fruit and jam. One popular method incorporates six tablespoons of jam and hundreds of grams of fresh berries.
Carefully place your next layer on top. Ensure the layers are perfectly aligned so your finished creation stands straight.
Decorating tips for an impressive finish
Now, apply a thin crumb coat of frosting to the entire dessert. Use a large offset spatula to smooth the sides. You can create a semi-naked look or a fully frosted finish.
For the top, try a rustic design. Dollop small spoonfuls of jam and swirl them gently into the frosting. Garnish with fresh berries and a few sprigs of thyme for a pop of color.
Before whipping your final batch of frosting, ensure your mixer’s whisk attachment is clean. This guarantees the best texture for piping or smoothing.
Troubleshooting common baking issues
Solving common baking problems ensures your final creation is as beautiful as it is delicious. Even small missteps can affect your dessert’s texture and stability.

Preventing a dense or crumbly cake
If your layers are too soft, Kelsie suggests chilling them before trimming. This prevents crumbling and gives you clean edges.
Christina Marsigliese explains that extra fat doesn’t add moisture. Only liquids like milk or eggs can do that. For a light texture, ensure your baking powder is fresh.
Always measure your flour correctly. Spoon it into your bowl and level it off. This avoids a dry, dense batter.
Check your oven temperature with a thermometer. An accurate 350°F ensures even baking. Avoid over mixing once you add the dry ingredients.
For meringue based frosting, keep egg whites completely free of yolk. If the mixture looks soupy, chill the bowl for twenty minutes. Then re whip it at medium speed.
Tips for storage and serving
Knowing how to store and serve your masterpiece ensures every slice is as good as the first. Proper care keeps the flavors vibrant and the texture perfect for your guests.
Proper Storage Techniques for Freshness
You can keep leftovers covered at room temperature for a couple of days. If your kitchen is warm, consider another option.
Christina Marsigliese advises refrigeration for desserts made a day ahead. This is because of the fresh fruit inside. It prevents spoilage.
For longer storage, freezing works best. Kelsie suggests a smart method. Place individual slices on a baking sheet for 30 minutes. This sets the frosting. Then wrap them tightly.
Presentation and Serving Suggestions
Show off your creation on a beautiful stand. Garnish the top with extra berries and herbs. This adds a pop of color.
Use a sharp knife for clean cuts. Dip it in hot water and wipe it clean between slices. Your layers will look neat.
Always bring a refrigerated dessert to room temperature for about 30 minutes before serving. This softens the frosting and enhances the taste.
Share generous portions with friends and family. Enjoying your hard work together is the sweetest part of any recipe.
Conclusion
Baking this elegant dessert at home is a fulfilling project that ends with a spectacular centerpiece. By following the tips from bakers like Christina Marsigliese, you master the white chocolate raspberry balance. The tart fruit cuts beautifully through the creamy sweetness.
Remember, the secret to a moist cake lies in your liquid ingredients and proper mixing. It’s not just about extra fat. Also, the quality of your white chocolate deeply affects the final, luxurious flavor.
Don’t feel rushed during assembly. Your patience with each layer creates a beautiful, professional look. We hope this guide inspires you to try this recipe.
Share your stunning creation at your next gathering. Enjoy every bite of your rewarding and special homemade triumph.
Your email will not be published publicly.