
Best oreo mug cake recipe for a quick sweet treat
Did you know that a simple, two ingredient TikTok trend changed how millions satisfy a sudden craving? That viral phenomenon has now been perfected into a flawless single serving dessert you can make anytime.
Imagine having a warm, incredibly decadent treat ready in less than five minutes. This improved creation delivers that reality. It uses your standard microwave and basic pantry items for a result that feels like magic.
You get the rich, familiar taste of cookies and cream in a soft, fluffy form. It’s the perfect solution for busy weeknights, study breaks, or any moment you need a personal pick me up. There’s no oven required and zero leftover waste.
This guide will show you the easy method. You’ll transform a few simple ingredients into a professional quality microwave delight right in your kitchen. Let’s get started.
Introduction to this delicious dessert
What if you could create a bakery quality treat in your microwave using just four common ingredients? This isn’t a fantasy. Mish from The Buttery Fairytale dedicated extensive testing to perfect this method.
Her goal was a soft, tender, and moist crumb every single time. Many similar creations turn out rubbery or oddly dense. This specific formula avoids those common pitfalls.
You only need standard pantry staples. The process is incredibly simple. You mix everything directly in one microwave safe mug.
That means less cleanup for you. In just a couple of minutes, you’ll have a warm, decadent cookies and cream delight. It’s the ultimate solution for instant chocolatey gratification.
This refined recipe ensures a perfect balance of flavor without a strange consistency. Join the many home bakers who love this satisfying single serving dessert.
Why you’ll love this sweet treat
Imagine sinking your spoon into a warm, fluffy creation that tastes like your favorite cookies and cream. This single serving delight offers more than just incredible flavor.
It delivers convenience and satisfaction in every bite. You get a professional quality result with minimal effort.
The allure of cookies and cream
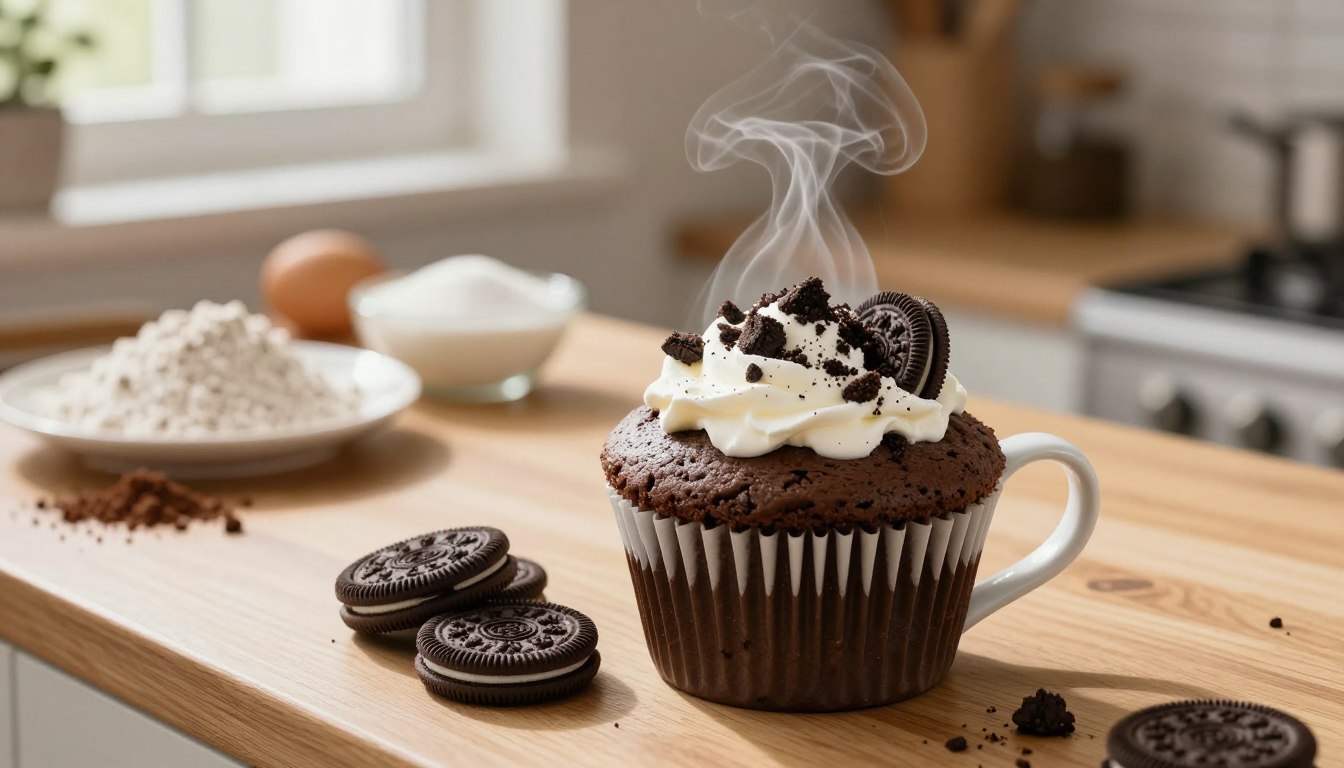
Five original Oreo cookies are crushed into the batter. This creates that classic cookies and cream flavor profile you love.
Each mouthful bursts with rich, chocolatey goodness. The cream filling melts into the mixture during cooking.

- Get the Cake Slice Mug on Amazon now fun, practical, and perfect for your Oreo mug cakes!
- If you liked this, you might love trying our Best yellow cake mix recipes, How to make white chocolate Raspberry cake at home, or Blackberry velvet cake recipe perfect for any occasion next.
You experience a perfect balance in every spoonful. The texture stays tender and moist, never rubbery.
Quick, easy, and satisfying
This treat uses only four basic pantry ingredients. You don’t need special shopping trips or complex equipment.
Everything mixes directly in your microwave-safe mug. In just a couple of minutes, your dessert is ready.
Cleanup involves simply rinsing one container. The process is so simple that even kids can help safely.
For the best experience, enjoy your creation immediately. The warmth and freshness make it truly special.
| Feature | This Treat | Typical Dessert |
|---|---|---|
| Prep Time | Under 5 minutes | 30+ minutes |
| Ingredients | 4 simple items | 8+ specialized items |
| Cleanup | One mug | Multiple bowls & tools |
| Texture | Consistently tender | Often uneven |
This mug cake becomes your go to for sudden cravings. It’s perfect for cozy nights or quick sweet fixes.
You’ll appreciate how the recipe consistently delivers excellent results. The microwave method ensures you never wait long.
Mastering the oreo mug cake recipe
To avoid a dense or rubbery outcome, you must respect the science behind these simple items. Success hinges on knowing what each one does.
Essential ingredients and their roles
All purpose flour builds the structure so your treat can rise and hold its shape. Just one tablespoon is needed.
Baking powder is non negotiable. It reacts to the microwave’s heat, creating a light and airy texture.
Whole milk is best for a moist, tender crumb. The fat and proteins contribute to a rich final product.
Unsweetened cocoa powder deepens the chocolate flavor. Caster sugar helps achieve a fluffier result than granulated might.
Always use proper measuring spoons. Eyeballing amounts is a common cause of texture problems.
| Core Ingredient | Primary Function | Key Tip for Success |
|---|---|---|
| All-Purpose Flour | Provides structural foundation | Measure exactly 1 tbsp |
| Baking Powder | Creates rise & fluffy texture | Use 1/2 tsp, ensure it’s fresh |
| Whole Milk | Adds moisture & tenderizes | For best crumb, don’t skimp |
| Cocoa Powder | Enhances chocolate flavor | Use unsweetened, high-quality |
Substitutions and customizations
You can easily make this a non dairy dessert. Swap the cow’s milk for an equal amount of soy or almond milk.
If you only have granulated sugar, it will work. The texture might be slightly less fine, but still delicious.
For extra indulgence, fold a tablespoon of chocolate or caramel chips into the batter before cooking. This adds wonderful pockets of melted goodness.
Step by step preparation guide
The secret to a flawless microwave dessert lies in two critical phases: mixing and heating. Follow this sequence for a tender, perfectly cooked result every time.
Mixing the batter smoothly
Begin with five cookies and your milk in a microwave safe container. Use a fork to mash them thoroughly.
Stir for a full sixty seconds. This ensures the cookies dissolve completely into a smooth, even base.
Add your dry ingredients next. Mix gently just until combined. Overmixing can develop gluten and create a tough texture.
Microwaving to perfection
Place your container on the outer edge of the rotating plate. This promotes even heating and avoids hotspots.
Set your cooking time for one minute at 1100 watts. This is the standard power for this method.
If the top still looks wet after the cycle, add heat in 10 second increments. Stop when the surface looks just set.
Let it rest for a moment before eating. This allows the heat to distribute, creating a soft, moist interior.
| Microwave Wattage | Recommended Time | Adjustment Needed |
|---|---|---|
| 1100 Watts (Standard) | 1 minute | None |
| 900-1000 Watts | 1 minute | Add 5-10 seconds if needed |
| 700-800 Watts | 1 minute | Add 10-15 seconds |
Serve your warm creation with a scoop of vanilla ice cream. The contrast of temperatures and flavors is incredible.
Tips for optimizing texture and consistency
The difference between a fluffy delight and a disappointing treat often comes down to simple adjustments. Your microwave creation’s texture is the most important part of the experience. A few key practices will guarantee a soft, moist result every single time.
Overcooking is the top reason for a rubbery or hard single serving treat. Make sure you stick to the recommended cooking time. Even a few extra seconds can turn a moist dessert into a dry one.
Using a wide, microwave safe container is essential. This provides more surface area for the heat to penetrate evenly. It also prevents messy overflow during the cooking process.
If your creation feels too dense, double check your baking powder amount. This ingredient is crucial for a proper rise. Also, stir your batter thoroughly to eliminate any dry flour pockets.
Avoid the temptation to double the method in one vessel. This leads to uneven cooking and a spill. For high powered microwaves, reduce the time by 5-10 seconds to prevent tough edges.
Remember, your personal dessert will continue to set slightly as it cools. It’s perfectly fine if the top looks just a little bit moist when it comes out. This ensures a tender, perfect consistency when you take your first spoonful.
Creative variations and toppings ideas
Unlock a world of flavor possibilities by customizing your warm, single serving treat with fun add ins. This is where your personal dessert becomes a unique creation.
You can transform the basic formula into something new every time. A few simple tweaks make it feel special.

Enhancing with chocolate chips and caramel
For extra indulgence, fold a tablespoon of chocolate chips into the batter. They melt into gooey pockets during cooking.
Caramel chips work just as wonderfully. Top your warm creation with a drizzle of rich caramel sauce.
Add a scoop of cold vanilla ice cream. The hot and cold contrast is incredible.
Exploring fun add ins
Fresh berries add a bright, tart note. Try a few raspberries mixed into the batter before heating.
A dollop of whipped cream balances the intense chocolate flavor. Sprinkle crushed cookies on top for crunch.
You can even experiment with different cookie flavors. Peanut butter or mint varieties create a fun spin.
- Mix in white chocolate chips for a sweeter twist.
- Top with a splash of cold milk for a classic pairing.
- Add a pinch of sea salt to enhance the caramel’s richness.
These ideas take your microwave creation from simple to spectacular. Enjoy making it your own!
Essential tools and measuring tips
Your choice of kitchenware can make or break your quick dessert before you even start mixing. The right tools guarantee a perfect texture and prevent messy kitchen disasters.
Success hinges on two simple but non negotiable items. You need a proper container and accurate measuring spoons.
Choosing the right microwave Safe Mug
Always select a vessel with a capacity of at least 350 mL or 12.5 oz. This gives the batter plenty of room to rise without spilling over.
A wide mouthed shape is generally better than a tall, skinny one. It allows the microwave’s energy to reach the center more effectively for even cooking.
Before you begin, make sure your container is clean and dry. Any residue can affect how your creation rises.
Check the bottom for a label confirming it’s microwave safe. Avoid thin materials or any with metal trim.
| Feature | Ideal Mug | Problematic Mug |
|---|---|---|
| Capacity | At least 350 mL (12.5 oz) | Less than 300 mL |
| Shape | Wide, open mouth | Tall and narrow |
| Material | Ceramic or thick glass | Thin porcelain or metal trimmed |
| Result | Even cooking, no spillover | Uneven heat, likely overflow |
Using standard measuring spoons is the most critical step for consistent success. Eyeballing flour or baking powder is a common cause of texture failure.
Keep a dedicated set in your kitchen to follow the formula accurately. This simple habit ensures your five minute treat turns out perfectly every time.
Quick serving and enjoyment suggestions
Serving your freshly made creation correctly is just as important as the cooking process itself. The texture is at its absolute peak right out of the microwave.
Enjoy it immediately while it’s still warm and soft. Waiting can cause it to harden and become chewy.
Pairing with ice cream and milk
For a balanced dessert experience, add a cold element. A scoop of vanilla ice cream on top is a classic choice.
The hot and cold contrast is incredibly delicious. It also adds a rich, creamy flavor that complements the chocolate.

A simple glass of cold milk is another perfect partner. It echoes the classic way we enjoy sandwich cookies.
This pairing cuts the richness and makes each bite more enjoyable. You can also dust the top with powdered sugar for a pretty finish.
| Serving Option | Effect | Best For |
|---|---|---|
| Vanilla Ice Cream | Hot/cold contrast, creamy richness | Indulgent, dessert-like experience |
| Cold Milk | Cuts sweetness, classic pairing | Quick, satisfying snack |
| Powdered Sugar Dusting | Visual appeal, subtle sweetness | Hosting or special presentation |
Avoid storing your treat for later. The moisture evaporates quickly, leading to a tough texture. Serve and savor it within minutes for the best results.
Conclusion
With this guide, you now hold the key to transforming basic pantry items into a consistently perfect single-serving delight. This method is your ultimate solution for a quick and satisfying dessert ready in just a couple of minutes.
By following the simple steps, you create a moist, flavorful treat that rivals traditional baked goods. Careful measuring and monitoring your microwave ensure a soft, tender texture every single time.
We hope you enjoy making this your own with fun toppings. Share the easy recipe with friends who love a delicious, portion controlled indulgence. Thank you for exploring this simple path to sweet satisfaction!
Your email will not be published publicly.