
Delicious Pistachio Cake: A Moist and Flavorful Treat
Remember the last time you needed a showstopping dessert? You wanted something that would make your guests’ eyes light up. A homemade creation that looked stunning and tasted even better.
That exact feeling inspired this recipe. It transforms simple baking staples into something extraordinary. The secret lies in using a generous amount of finely ground nuts.
We use 125 grams of them for a deep, authentic flavor you can’t get from extracts alone. Every bite delivers a rich, gourmet experience. The soft, tender crumb is a testament to careful recipe development.
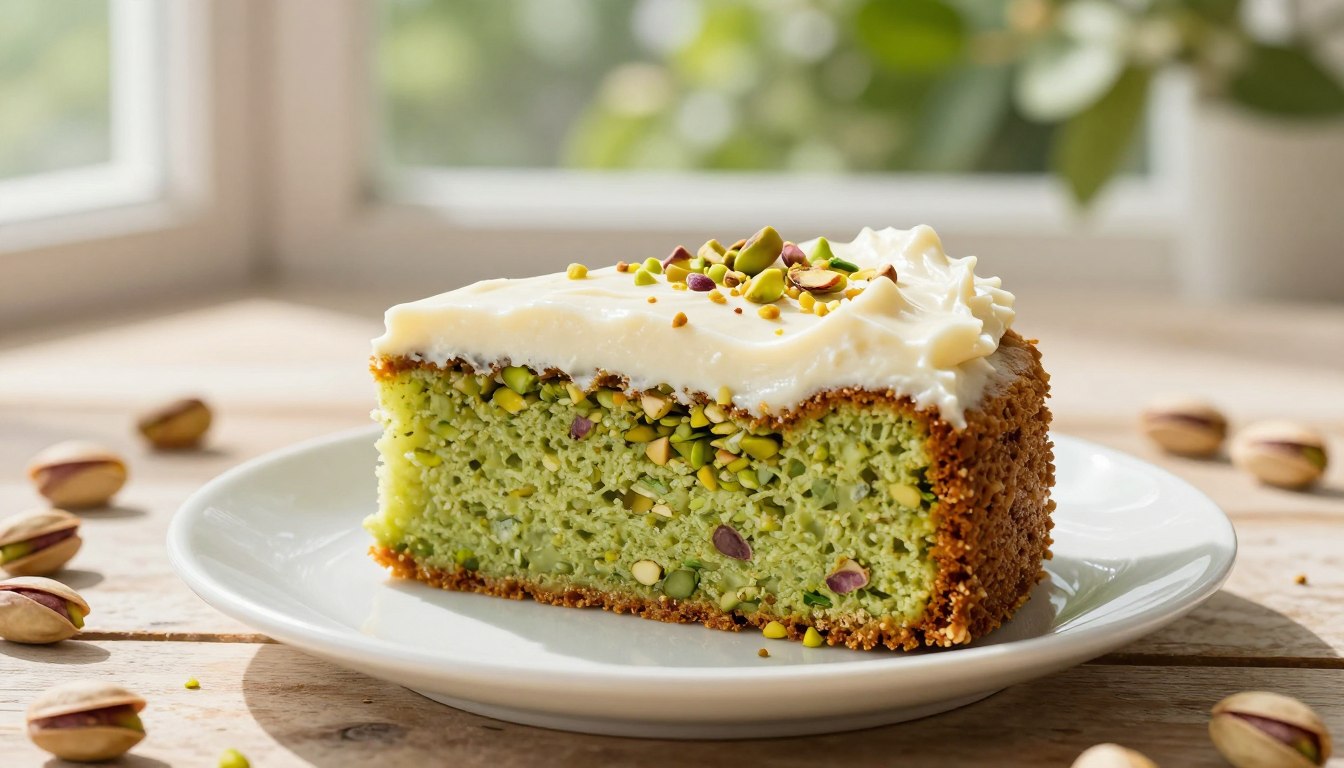
The magic doesn’t stop there. A special stabilized cream cheese whip crowns the dessert. It stays fluffy for days, offering a tangy contrast to the earthy notes.
Using room temperature ingredients like butter and eggs is crucial. This simple step ensures your batter rises perfectly in the oven. You’ll achieve a light and airy texture that’s simply divine.
This guide will walk you through each step. You’ll learn how to combine flour, sugar, and vanilla to highlight the natural nuttiness. Get ready to bake a moist, flavorful layer dessert that wins every time.
Introduction to the Irresistible Pistachio Cake
There’s a special kind of joy in baking with ingredients that feel like a treat themselves. This creation turns that feeling into a stunning, flavorful dessert perfect for your next celebration.
Why You’ll Love This Recipe
You get a genuine, sophisticated nutty flavor because we use real, ground nuts instead of artificial pudding mix. In North America, these are seen as a premium ingredient, making your dessert a fancy choice for any birthday or holiday.
We refined this formula so it stays wonderfully moist for days. Your batter will come together quickly in one bowl. This means less time preparing and more time enjoying your reliable, year-round favorite.
The Nutty Appeal of Pistachios
A small amount of almond extract boosts the natural aroma without overpowering it. You can skip the artificial green food coloring found in store mixes for a natural look, or add a drop if you prefer a vibrant hue.
The magic lies in the balance. The right amounts of sugar and flour prevent a dense texture. With quality ingredients like fresh butter and vanilla, every slice has a consistent, perfect crumb your family will adore.
Essential Ingredients for a Pistachio Cake Masterpiece
Quality ingredients transform a simple recipe into a memorable masterpiece. Each component has a specific job. Your careful selection ensures a perfect rise and flavor.

- Decorate your Pistachio Cake with this 9 piece reusable piping set 6 stainless steel tips, cotton bags, coupler & cleaner. Easy to use, eco friendly
- Don’t miss our almond flour chocolate cake,Try our earl grey lavender cake and strawberry icebox cake.
Dry Ingredients and Their Roles
The dry mix forms the backbone of your dessert. All purpose flour gives it a sturdy yet tender crumb. It supports the weight of ground nuts beautifully.
Leavening agents are crucial. Baking powder creates a light, airy texture. Remember, baking soda is three times stronger than baking powder. Measure it with precision for the best rise.
Using unsalted pistachios lets you control the salt level. This keeps the final taste balanced. Always whisk these elements in a large bowl to prevent clumps.
| Ingredient | Primary Role | Pro Tip |
|---|---|---|
| All-purpose flour | Structure | Provides a sturdy base for nuts |
| Baking powder | Leavening | Creates an airy texture |
| Baking soda | Powerful rise | Use precisely; 3x stronger than powder |
| Sugar | Sweetness & tenderness | Measure by cup for perfect balance |
| Salt | Flavor enhancer | Control with unsalted nuts |
Wet Ingredients that Enhance Moisture
Wet components bring everything together. Room-temperature butter creams perfectly with sugar. This step creates a light, airy base for your batter.
Pure vanilla extract adds a warm, aromatic note. Combined with other liquids, it guarantees a moist crumb that stays soft for days. Your layers will be incredibly tender.
Mastering the Pistachio Preparation Process
Before a single cup of flour is measured, the key to unlocking deep, aromatic flavor is in the nuts themselves. This step is the most critical for building a rich foundation.
Toasting and Grinding Unsalted Pistachios
Start by toasting your unsalted pistachios. Spread them on a baking sheet and heat for about 12 minutes. This simple act releases hidden natural oils and boosts the nutty profile significantly.
A food processor is your best friend here. Use it to grind the warm nuts into a fine, sand-like powder. Be careful not to over-process, or you might end up with a paste instead.
Breaking Up Clumps for Optimal Texture
Once ground, take a moment to break up any clumps with your fingers. This ensures every bit blends seamlessly into your dry mix later.
Set this powder aside. When you’re ready, it will combine perfectly with the flour and other dry ingredients. This careful prep guarantees a smooth batter and a light, consistent crumb in your final dessert.
Creating the Perfect Batter: Tips & Techniques
Gentle folding and careful scraping are the secrets to a perfect rise. How you combine your wet and dry elements defines the final texture. Your goal is a light, airy mixture that bakes up fluffy and tender.

Mixing Methods to Prevent Overworking
You must mix only until the ingredients are just combined. Overworking the mixture deflates precious air bubbles. This can lead to a dense, tough result nobody wants.
Scraping down the sides of your bowl is a vital step. Use a spatula to incorporate every last streak of flour. This ensures a uniform batter for even baking.
For the best control, use a gentle hand-mixing method. It’s safer than an electric beater. You reduce the risk of developing too much gluten from the flour.
If you desire a vibrant hue, add a few drops of green food coloring now. Do this during the final folds. It won’t affect your batter’s delicate structure.
Any small lumps from your ground nuts will dissolve during baking. Be patient and trust the process. Your patience is the key to a successful dessert.
| Technique | Purpose | Common Mistake |
|---|---|---|
| Mix Until Just Combined | Preserves air bubbles for a light texture | Overmixing, which makes the batter dense |
| Scrape Bowl Sides | Ensures full ingredient incorporation | Leaving dry flour streaks in the mixture |
| Hand-Mixing | Provides gentle control to prevent toughness | Using high-speed electric beaters |
| Add Coloring Late | Achieves color without harming structure | Adding it too early with wet ingredients |
Pistachio Cake Flavor and Texture Tips
The secret to a fluffy, non-domed layer lies in the precise balance of baking powder and soda. These two leaveners work together to give your dessert a light, airy texture. Understanding their roles is the first step to baking success.
Balancing Baking Powder and Baking Soda
Baking powder provides an initial rise when mixed with wet ingredients. Baking soda needs acidity to activate and gives a second boost in the oven. Using both prevents a peaked top and ensures an even crumb.
Always measure these powders precisely. An expired leavening agent will result in a flat, dense result. Check the date on your containers before you start.
Using Yogurt for a Moist Crumb
Yogurt adds necessary acidity that kicks baking soda into action. This reaction creates tiny air bubbles for a superior rise. Your layers will be incredibly tender and moist.
Full-fat yogurt contributes richness that milk cannot match. Bring all dairy ingredients to room temperature. Cold items can make your batter too dense.
| Technique | Why It Works | Pro Tip |
|---|---|---|
| Balance Both Leaveners | Prevents doming and ensures an even rise | Use baking powder for initial lift, soda for oven spring |
| Incorporate Room Temp Yogurt | Acidity activates soda; warmth promotes a light batter | Full-fat varieties add extra moisture and richness |
| Check Leavener Freshness | Expired powder or soda won’t produce enough gas | Test soda by adding to vinegar—it should fizz vigorously |
| Prepare Pans Properly | Ensures easy release and even cooling | Line with parchment paper and cool on a wire rack |
A touch of almond extract can enhance the nutty profile without overwhelming it. The tangy cream cheese frosting will offer a delightful contrast to each flavorful bite.
Baking Secrets for a Fluffy and Moist Cake
The final transformation from batter to masterpiece happens inside your oven, where heat works its magic. This stage turns your careful prep into a tall, tender dessert. A few professional techniques guarantee success every single time.

Oven Settings, Pan Preparation, and Timing
You must start with a properly preheated oven set to 350°F. This consistent heat is crucial for an even rise. Line your pans with parchment paper for a foolproof release later.
Rotate the pans halfway through the baking time. This simple move ensures every layer browns perfectly, without dark spots. Set a timer and monitor the final minutes closely.
The true test of doneness is a clean skewer. Insert it into the center of your creation. If it comes out clean, your layers are perfectly set and ready to cool.
Use a food processor for your dry ingredients. This ensures a uniform texture, which is key for a fluffy crumb. Let the baked cakes cool completely on a wire rack.
Trimming the top of each layer with a serrated knife creates a flat surface. This makes stacking much easier for a professional finish. The harmony between baking powder, soda, and oven heat creates an impressive, airy result.
Following these steps yields a beautiful, delicious treat. Your cream cheese frosting will adhere perfectly to cool layers. Every detail, from parchment to timing, is a secret to a memorable dessert.
Creative Frosting and Decoration Ideas
The final flourish of your baking project is where artistry meets flavor. Your decorative choices turn a delicious dessert into a stunning centerpiece.
This stage lets you express your personal style. Every swirl and sprinkle adds visual appeal.
Homemade Cream Cheese Whip Frosting
You can achieve a light, fluffy consistency by beating your cream cheese frosting for two full minutes. This stabilized whip holds its shape beautifully for days.
Use a small offset spatula for smooth application. It gives you perfect control over the final look.
| Decoration Element | Tool Needed | Pro Tip |
|---|---|---|
| Cream Cheese Frosting | Electric Mixer | Beat for 2 minutes on medium speed for maximum fluffiness |
| Pistachio Sprinkles | Food Processor | Pulse nuts briefly for evenly chopped pieces |
| Swirl Design | Offset Spatula | Create elegant peaks by twisting your wrist gently |
Decorative Pistachio Toppings and Swirls
Sprinkle finely ground pistachios along the sides for a professional, elegant touch. This adds a pop of color and reinforces the nutty flavor profile.
You can easily customize your creation. Add fresh fruit or a drizzle of honey for extra flair.
Keep the decorated dessert refrigerated. The cream cheese base stays fresh and stable for up to one week.
Conclusion
With the final swirl of frosting applied, you’ve transformed simple ingredients into a celebration-worthy masterpiece. You now hold the secrets to a moist, flavorful dessert that impresses everyone.
Mastering the balance of baking powder and baking soda ensures a perfect rise. Your layers will be light and airy every time.
Remember, the quality of your pistachios and careful attention during baking make this recipe unique. Using room-temperature butter and sugar creates a tender crumb.
We hope you enjoy the entire process, from grinding to applying the cream cheese frosting. Whether it’s a birthday or a simple craving, this treat fits any occasion.
Share your beautiful creations with others who love fine baking. With these tips, you’re well on your way to becoming a master of this classic, satisfying recipe.
Your email will not be published publicly.