
Easy hand pie recipe for delicious homemade treats
Did you know that in one popular baking blog, apple hand pies outrank classic chocolate chip cookies as the most requested treat? The author of Moments of Sugar calls them their number one bake. This fact might surprise you, but it highlights the special magic of these portable pastries.
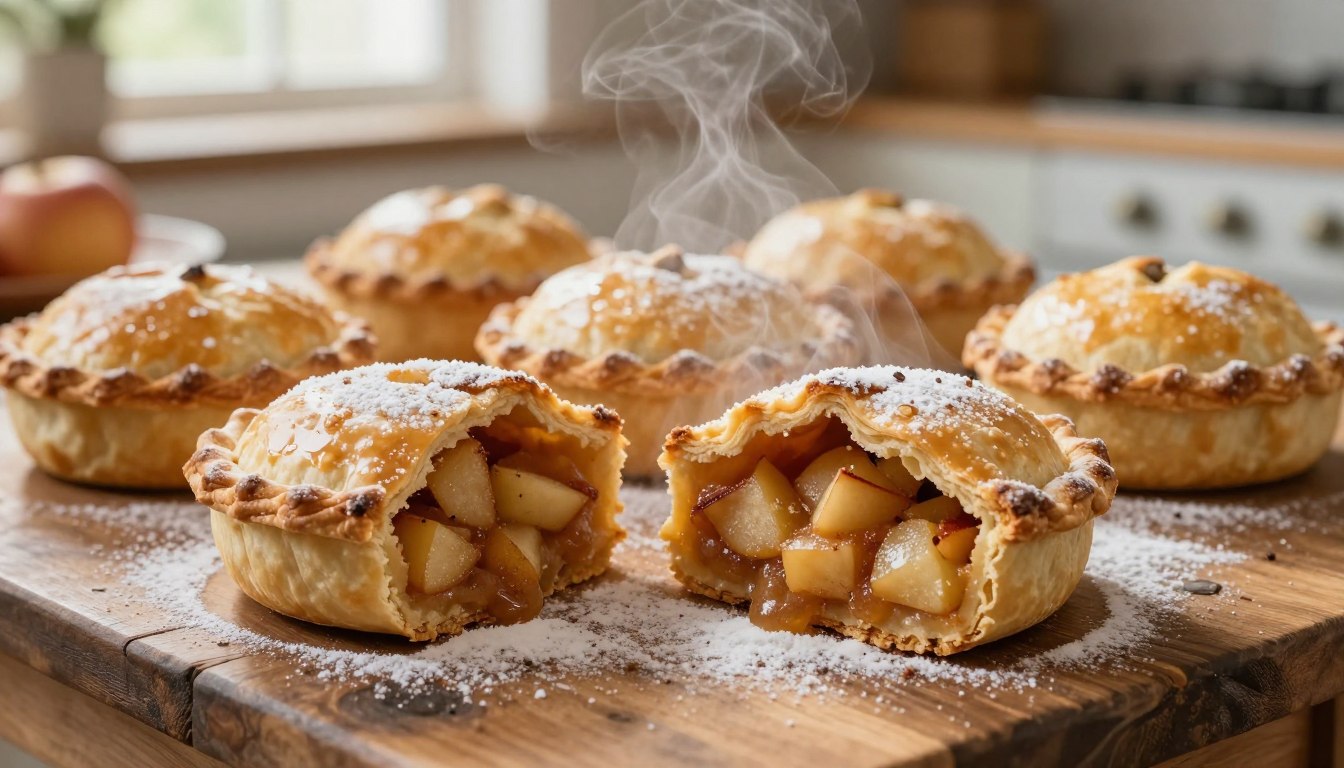
They offer a wonderful, golden brown crust wrapped around a sweet, spiced center. Every single bite delivers a perfect balance. You get a magical pastry to filling ratio that makes eating them a memorable experience.
Best of all, this guide is designed for everyone. Whether you are a beginner or an expert, the steps are simple. You will work with a flaky dough and a flavorful apple mixture. The process is straightforward and rewarding.
You can easily prepare these delights for any occasion. They require no plates or utensils, making them ideal for a busy day. Share them with family and friends, and watch how quickly they disappear.
- Complete bread machine guide: master techniques, troubleshoot failures, create bakery quality loaves. Save $5 per loaf!
Overview of the easy hand pie recipe
Many bakers discover a passion for creating desserts after being inspired by beautiful images, just like the author of Moments of Sugar. This overview explains why this particular formula is so beloved and what makes the final product special.

- 6 Pack Hand Pie Molds – Dough presser pocket pie molds for baking. Cut, fill, and seal hand pies in one press. Set of 6, BPA free plastic. Perfect for sweet or savory hand pies, picnics, lunch boxes, and parties. Easy to use and clean
- Banana Bread Muffins & Easy Breadfruit Recipes – Two quick and tasty homemade treats. Moist banana bread muffins perfect every time + versatile breadfruit recipes for crispy fries, hearty stews, and more. Easy meals for any day.
Why you’ll love this treat
The magic is in the contrast. You get a super flaky and tender crust that shatters beautifully. It wraps around a warm, spiced center bursting with autumn flavors.
This balance creates the perfect portable pastry. Each bite delivers a fantastic filling to crust ratio. It’s a self contained delight that needs no plate.
People adore these because they feel gourmet. The author shares that multiple tasters have called them the best they’ve ever had. You can easily impress your guests with a homemade dessert that looks and tastes professional.
Mastering the dough hydration is a rewarding journey. It transforms simple ingredients into a buttery, golden brown vessel. The process is straightforward, and the delicious results are your ultimate reward.
Ingredients and tools for your hand pie recipe
The foundation of a fantastic portable pastry lies in two simple categories: quality ingredients and the right tools. Having everything ready makes the process enjoyable and successful.

Essential ingredients
You will need common baking staples. Gather all purpose flour, granulated sugar, and a pinch of salt for the dry mix.
For the wet ingredients, use very cold unsalted butter and ice water. A Southern style formula uses 1.5 cups of plain flour and 1.5 sticks of cold butter. This creates a super flaky texture.
Your filling needs fresh fruit. A mix of tart and sweet apples gives the best flavor. See the table below for a guide.
| Apple Type | Flavor Profile | Best For |
|---|---|---|
| Granny Smith | Tart and firm | Structure and tang |
| Honeycrisp | Sweet and juicy | Natural sweetness |
| Gala | Mild and sweet | A softer, sweeter filling |
Must have equipment and baking tips
Good tools make everything easier. You should have a food scale for accuracy. A bench scraper helps handle the dough.
Also, grab a rolling pin and a pastry brush for the egg wash. Line your pan with parchment paper to prevent sticking.
Your most important tip is temperature. Always keep your butter cold. Use ice water when mixing. This ensures a tender, flaky crust that bakes up golden brown.
Preparing and rolling out the pie dough
Mastering the dough’s texture is the key to achieving that sought after flaky crust. This step transforms your simple mixture into a workable pastry. Paying attention here ensures your final treats are tender and delicious.

Proper handling makes all the difference. You want to keep everything cool for the best results.
Tips for a flaky and tender crust
Work quickly to prevent the butter from warming up. This is the secret to a light, layered texture. If the fat melts early, your pastry will become dense.
Always use a well floured surface. Rotate the mass every few rolls with your rolling pin. This prevents sticking and promotes even thickness.
Chill your cut pieces in the freezer as you go. This maintains the ideal firmness. You can even split the process over two days for convenience.
Getting the dough thickness just right
Aim for an exact 1/8 inch measurement. This ensures even baking and a delicate bite. Too thick, and the crust may be doughy; too thin, and it could tear.
Use a ruler or the guides on your pin to check. Gently roll from the center outward. Your goal is a consistent sheet ready for filling.
Assembling and filling your hand pies
Bringing your pastry together is the most creative and satisfying step in the entire process. You get to see your components become a complete, delicious package.
Choosing your sweet or savory filling
Your center can be anything from spiced apple to seasoned beef. For a sweet version, spoon about 1 1/2 tablespoons of cooled fruit mixture into the middle of each dough square.
Ingrid Beer’s savory formula yields eight individual portions. It uses 5 inch squares of store bought puff pastry. This size is perfect for a hearty meal.
Techniques for sealing and venting
First, brush the edges with an egg wash. This creates a glue like layer for a tight, leak proof bond. Then, place the top piece over the filling.
Press the edges together firmly. Use a fork to crimp them shut. This classic method seals the contents and adds a lovely decorative touch.
Finally, cut small slits into the top. These vents allow steam to escape during cooking. Without them, your pastry might burst open in the heat.
Baking your hand pie recipe to perfection
Achieving that perfect, flaky finish depends entirely on your oven’s settings. This final step locks in all the wonderful flavors and creates that signature, crisp texture everyone loves.
Optimal oven settings and baking time
Preheat your appliance thoroughly for the best results. Two fantastic methods exist, depending on your desired crust style.
The table below shows the key differences.
| Method | Oven Temperature | Bake Time | Key Characteristic |
|---|---|---|---|
| Apple Pastry Method | 425°F | 23-27 minutes | Deeply golden brown, sturdy crust |
| Southern-Style Method | 375°F | 20-30 minutes | Crispy and super flaky texture |
Before baking, brush each pastry with an egg wash. A sprinkle of coarse sugar adds a delightful crunch.
Always use a large baking sheet lined with parchment paper. This prevents sticking and allows for easy cleanup.
Let your treats cool on a wire rack for at least 10 minutes. The filling inside is extremely hot right out of the oven. This rest period makes them safe and even more delicious.
Creative variations and serving ideas
Once you master the basic technique, a world of flavor possibilities opens up for your portable treats. This flexibility lets you tailor your baking to any event or taste preference.
Exploring diverse flavor combinations
Do not limit yourself to sweet fruit fillings. A hearty savory version is a fantastic option. You can use seasoned ground beef with potatoes and carrots.
Ingrid Beer notes this type of savory pie contains about 690 calories each. For a different protein, try ground lamb, pork, or turkey. Meatless crumbles work well for a vegetarian meal.
For sweet pastries, add a simple glaze after cooling. Mix confectioners sugar with a little milk. Drizzle it over the top for extra sweetness.
Presentation, storage, and serving suggestions
These individual delights are perfect for sharing. Serve your savory creations with a fresh green salad. Creamy mashed potatoes also make a comforting side.
Store any leftovers properly. An airtight container at room temperature is ideal. For the best texture, reheat them in a toaster oven.
This method keeps the crust crisp. Your treats will taste freshly baked for days.
Conclusion
You now have all the knowledge needed to bake delightful, portable treats that will brighten any day.
Mastering this method allows you to create versatile hand pies for any season. Whether you love a classic spiced apple center or a hearty savory version, these delights are sure to impress.
Remember, the secret lies in keeping your dough cold and your filling completely cooled before assembly. This ensures a flaky, tender crust every time.
By following these simple steps, you can confidently produce professional quality pastries. They will amaze your friends and family at every gathering.
We hope you enjoy the entire rewarding process. Share your creative twists on social media and inspire others!
Your email will not be published publicly.