
Simple coconut poke cake recipe everyone will love
Did you know that over 60% of home bakers turn to a simple box mix when they need a crowd pleasing dessert? This fact highlights a universal truth: everyone loves a delicious treat that doesn’t require a grueling process.
Author Cathy Pollak has created the perfect solution for this very desire. Her famous creation is a chilled, creamy delight that feels homemade. It’s designed to be the star of any family gathering or party.
You start with a basic white cake mix. With a few clever additions, it transforms into a moist, tropical inspired masterpiece. The effort in your kitchen is minimal, but the result is spectacular.
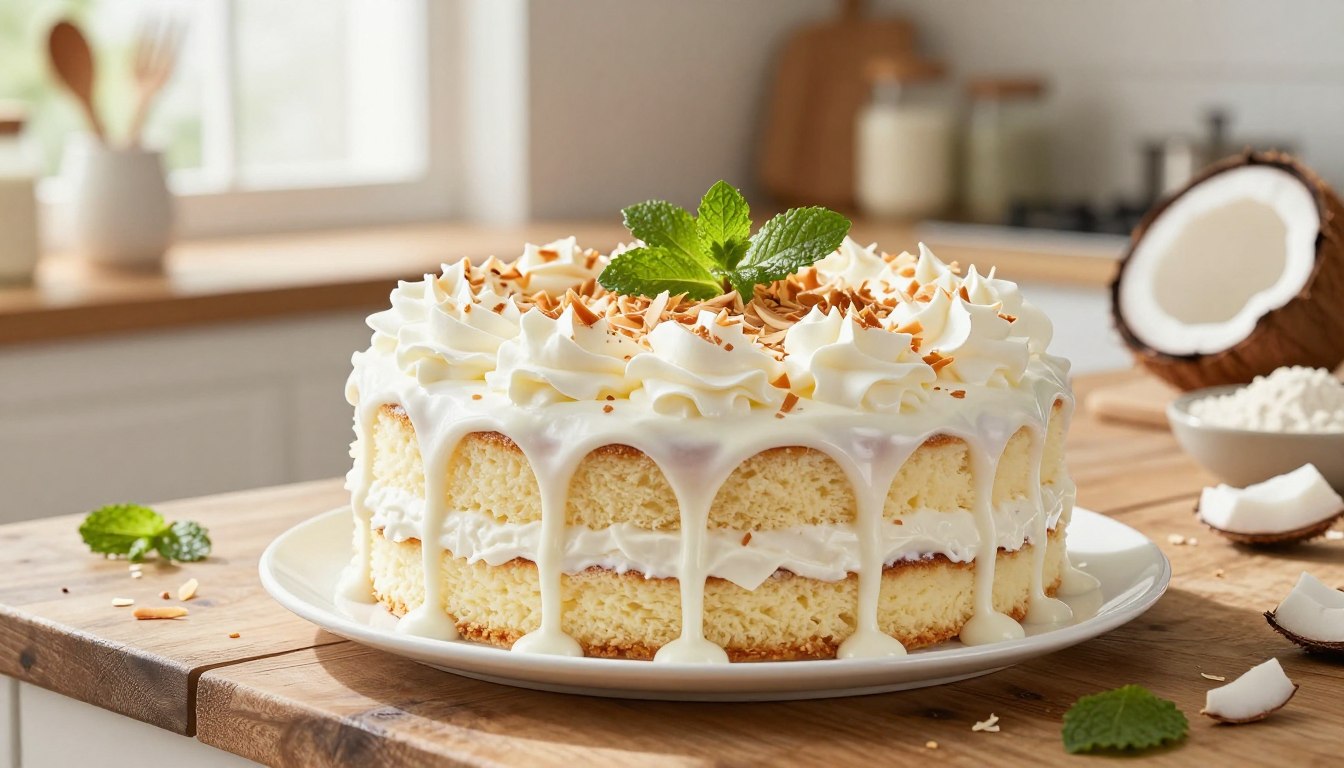
This dessert is incredibly popular for good reason. It combines a tender crumb with a rich, sweet filling that sinks deep into every slice. Every single bite offers a refreshing tropical experience.
This post is your ultimate guide to making that standout treat. You’ll learn the essential techniques for a perfect result. Your final creation will be ready to impress at your next potluck or special celebration.
Tropical beginnings: an introduction to your coconut poke cake
Imagine a dessert that captures the essence of a tropical getaway in every bite. You sink your teeth into a cloud of sweet, creamy bliss. The flavor profile is light and refreshing, a welcome change from heavier treats.
Many home bakers find this specific creation superior. The rich filling settles deep into the tender crumb. This creates a consistently creamy texture throughout the entire dish.
What Makes This Recipe Special
This method is special because it starts with a convenient boxed mix. The result is a perfectly moist sponge. It acts as the ideal vessel for luxurious, creamy fillings.
The secret lies in how the liquid mixture permeates the warm base. This ensures every single slice is infused with flavor. Your effort is minimal, but the outcome feels decadently homemade.
A brief look at the coconut influence
The tropical influence comes from key additions like coconut extract and shredded coconut. These elements elevate a simple base into a sophisticated, island-inspired treat. It’s this unique, refreshing taste that sets it apart from ordinary vanilla or chocolate options.
Understanding this role helps you appreciate why it’s a beloved staple for dessert lovers. It brings a taste of the tropics right to your family table.
Key ingredients for a perfect coconut cake
Your journey to a delicious, Island inspired delight begins with gathering a few key pantry staples. The right components ensure your dessert has the perfect balance of moisture, flavor, and texture.
White cake mix and coconut extract
A standard 15.25 oz box of white cake mix is your foundation. This provides a consistent, tender crumb that can absorb the creamy filling without becoming soggy.
Adding coconut extract is a crucial step. It infuses the entire white cake with a deep, aromatic flavor that perfectly complements the topping.
Cream of coconut, sweetened condensed milk, and shredded coconut
The rich filling comes from two main ingredients. Cream of coconut, like Coco Lopez or Goya brand, is thick and sweet. It’s different from standard coconut milk.
Sweetened condensed milk mixes with it to create a luscious syrup. This settles into the poked holes. Finally, shredded coconut adds a wonderful textural crunch on top.
| Ingredient Group | Key Components | Primary Role | Pro Tip |
|---|---|---|---|
| Foundation & Flavor | White Cake Mix, Coconut Extract | Provides structure and bakes a moist sponge infused with tropical taste. | Use a high quality mix for the best crumb that holds up to soaking. |
| The Creamy Filling & Topping | Cream of Coconut, Sweetened Condensed Milk, Shredded Coconut | Creates a rich, sweet liquid filling and adds a contrasting crunchy texture. | Always buy “cream of coconut” for thickness, not “coconut milk.” Toast the shredded coconut for extra flavor. |
Essential equipment for your baking adventure
Your baking adventure becomes effortless when you have the essential gear assembled on your counter. The right tools ensure your dessert turns out perfectly every single time.

Let’s look at the key items you’ll need for this project. They are simple but make a huge difference in your final result.
Baking Dish, Baking Sheet, and Mixing Bowls
A sturdy 9×13 inch baking dish is non negotiable. This specific size gives your creation the correct depth for even baking and proper soaking.
You will also need a flat baking sheet. It’s perfect for toasting shredded coconut to a golden brown.
Have a few mixing bowls ready. Use separate ones for your batter and your creamy filling mixture. This keeps your prep organized and clean.
Tools for poking and spreading the filling
The handle of a wooden spoon is your best friend here. It creates uniform holes that are just the right size for the filling to settle deep inside.
For the final layer, a soft silicone spatula is highly recommended. It spreads the whipped topping smoothly without disturbing the soaked layers underneath.
| Equipment | Primary Purpose | Pro Tip |
|---|---|---|
| 9×13 inch Baking Dish | Provides the ideal vessel for baking and soaking the dessert evenly. | Use a light-colored metal or glass dish to prevent over browning. |
| Wooden Spoon Handle | Creates perfect, consistent holes for the rich filling to penetrate the cake. | Press straight down and twist slightly for clean openings. |
| Silicone Spatula | Allows for gentle, even spreading of the final topping. | Dip the spatula in warm water for an ultra smooth finish. |
Step by step baking instructions
Your path to a perfectly moist and creamy dessert begins with preheating your oven. Following these clear steps guarantees a stunning result with minimal effort.
Preparing the cake batter and baking it right
First, preheat your oven to 350°F. Prepare your box mix with the required eggs, water, and oil as directed.
Pour the batter into a greased 9×13-inch pan. Your baking time is typically 28 to 30 minutes. A toothpick inserted into the center should comes clean when it’s done.
Poking holes and incorporating the coconut mixture
Remove the pan from the oven while it’s still warm. Use a wooden spoon handle to poke holes evenly across the entire surface.
Whisk the cream of coconut and sweetened condensed milk into a smooth mixture. Pour this rich filling slowly over the warm base, letting it settle deep into the holes.
Topping with whipped topped and toasted coconut
Let the dessert cool completely. Then, spread a generous layer of whipped topping evenly across the top.
For the shredded coconut, toast it on a baking sheet for 2 to 4 minutes. Watch it constantly to achieve a golden color without burning. Sprinkle this toasted crunch over the whipped topping for the perfect finish.
Mastering moisture: Achieving the ideal cake texture
Your final creation’s success hinges on two critical steps: proper soaking and adequate chilling. These processes work together to create that signature, irresistible texture everyone loves.
Soaking the cake for maximum flavor
When you pour the creamy mixture over the warm base, the liquid seeps deep into the holes. This ensures every single bite is infused with rich, sweet flavor.
The interaction between the warm sponge and the cool filling is magical. It creates a unique, creamy consistency that defines a great poke cake.
The importance of chilling time
After soaking, patience is your best tool. A minimum of four hours in the refrigerator is required for the filling to fully settle.
This resting period allows the moisture to distribute evenly throughout the crumb. The texture improves dramatically, becoming uniformly moist.
For the best experience, let it chill overnight. The flavors meld perfectly, and the whipped topping firms up. Your dessert will be cool and refreshing when served.
Expert tips for the best coconut poke cake recipe
Elevate your dessert game with a few expert techniques. These professional tips will perfect your final recipe.
Ingredient substitutions and flavor boosters
For the filling, always choose cream of coconut over regular milk. It provides necessary sweetness and thickness.
Prefer a richer flavor? Yellow cake mix can substitute for white. The visual contrast will be less stark.
Finding the dessert too sweet? Unsweetened flakes balance the flavors nicely.
Customize easily with a splash of vanilla extract or a hint of rum flavoring.

- Instant Coconut Cream Pudding Mix – The essential duo for authentic coconut poke cake. The coconut pudding soaks deep into the poked holes, creating that signature creamy texture. The Dream Whip, mixed with coconut extract, makes a fluffy coconut topping.
- Yellow Cake Mix Recipes & White Chocolate Raspberry Cake – Two easy homemade cakes for any occasion. Quick and delicious treats using yellow cake mix + an elegant white chocolate raspberry cake that’s simpler than you think. Perfect for birthdays, holidays, or weekend baking.
Avoiding common baking pitfalls
Let the baked base cool slightly before poking holes. Doing this while steaming hot can tear the crumb.
Keep a close eye on shredded coconut while toasting. It can burn in seconds if left unattended.
Creative variations and flavor twists
One of the joys of this beloved dessert is its incredible adaptability. You can easily tailor it to match different tastes or special occasions.
A few simple swaps or additions create a whole new experience. This keeps your treat exciting for everyone at the table.
Optional add ins like maraschino cherries
Maraschino cherries offer a classic, vibrant garnish. They add a sweet, fruity contrast to the tropical profile.
For a more decadent version, fold crushed pineapple into the filling. This creates a delicious pineapple coconut twist.
Remember to add fresh fruit right before serving. This prevents juices from bleeding into the whipped layer.
Adapting for different dietary needs
You can accommodate various dietary needs with smart substitutions. Look for a high quality gluten free white mix.
It provides a texture similar to traditional versions. For a dairy free option, use a plant based whipped topping.
Experiment with different extracts like almond or lime. This gives your creation a unique, personalized profile.
| Variation Type | Key Addition/Change | Pro Tip |
|---|---|---|
| Fruity Garnish | Maraschino Cherries | Add just before serving to maintain color and prevent sogginess. |
| Tropical Twist | Crushed Pineapple in Filling | Use well drained canned pineapple to avoid excess liquid. |
| Gluten Free | Gluten Free Cake Mix | Choose a mix known for a moist, tender crumb. |
| Dairy-Free | Non Dairy Whipped Topping | Ensure it’s thoroughly chilled before spreading for best results. |
| Flavor Swap | Almond or Lime Extract | Start with 1/2 teaspoon to taste, as extracts are potent. |
Flavor pairings and presentation ideas
An eye catching presentation can transform your homemade dessert into a show stopping centerpiece. The right pairings and styling make every slice irresistible.
Plating tips for an eye catching dessert
Serving your poke cake chilled is crucial. It maintains structural integrity and keeps the creamy filling perfectly set. Always use a sharp knife, cleaned between cuts.
This ensures clean slices that showcase beautiful layers. Your guests will admire the visual appeal before they even take a bite.
Present your creation on a decorative platter. Highlight the golden toasted coconut and bright red cherries. For an elegant touch, add a dollop of extra whipped cream.
A sprinkle of fresh lime zest adds brightness. You can dust the plate with powdered sugar before placing the slice of cake.
This creates a beautiful, professional look. For parties, cut into bite sized squares. Guests can enjoy them easily while mingling.
This dessert is best served cold. The temperature contrast makes it refreshing and delightful.
Storing, freezing, and leftover strategies
A few smart steps after baking keep your creamy dessert perfect for future enjoyment. Proper storage ensures every slice tastes as good as the first.

You have two excellent options for preserving your treat. Both methods lock in moisture and flavor effectively.
Refrigeration techniques for long lasting freshness
For short-term storage, your refrigerator is the best place. Use an airtight container to maintain ideal texture.
Your dessert will stay fresh for 4 to 5 days. The flavors actually improve as they meld together during this time.
Always cover the dish tightly with plastic wrap first. This prevents it from absorbing any odors from other fridge items.
How to freeze and reheat your cake
Freezing extends your enjoyment for up to 3 months. Wrap the base tightly in plastic, then add a layer of aluminum foil.
For easiest wrapping, freeze it before adding the whipped topping and toasted coconut. Thaw it slowly in your refrigerator overnight when ready to serve.
This gentle process preserves the perfect texture. Avoid leaving it at room temperature for long periods.
| Method | Best For | Duration | Key Steps | Pro Tip |
|---|---|---|---|---|
| Refrigeration | Enjoying within a week | 4 to 5 days | Store in an airtight container; cover with plastic wrap. | Flavors deepen and improve over the first couple of days. |
| Freezing | Long term storage | Up to 3 months | Wrap tightly in plastic + foil; thaw overnight in fridge. | Freeze before adding the final whipped topping layer for best results. |
Balancing nutritional insights and sweetness
Knowing the nutritional profile helps you savor each bite mindfully. This allows you to enjoy your dessert fully while being aware of what you’re eating.
Understanding caloric content and serving sizes
A single portion of this delightful treat contains about 446 calories. This information is useful when planning your meals for the day.
The standard serving is based on a 138-gram slice. This size provides a satisfying taste experience without being too large.
Each piece also has roughly 23.2 grams of fat. A significant part of this fat comes from rich ingredients like sweetened condensed milk.
You can manage your daily intake by enjoying this cake in moderation. It’s a decadent option perfect for special occasions.
To balance the sweetness, consider using unsweetened shredded coconut. This simple swap helps reduce the overall sugar content.
Remember, the fat and calories are part of what makes this poke cake so delicious. Enjoying it thoughtfully is the key to a happy balance.
Additional pointers for a flawless poke cake experience
The difference between a good result and a great one often lies in these last few details. Perfecting the final elements guarantees your dessert has outstanding texture and balanced flavor.
Enhancing texture with proper toasting
Toasting your shredded coconut is a simple step with a big payoff. Spread it on a parchment lined baking sheet.
Heat your oven to 325°F. This lower temperature allows for an even, golden-brown color without burning the delicate flakes.
Always keep a close eye on it. It can turn from perfect to burnt in mere seconds. The resulting crunch elevates the entire dish.
Final touches for perfect sweetness
Your filling mixture must be smooth and pourable. Whisk the cream of coconut and sweetened condensed milk together thoroughly.
If it appears too thick, warm it slightly. This ensures it penetrates every hole deeply for maximum flavor.
Is your cake not absorbing the filling well? Check that your holes are spaced evenly and deep enough. For smaller, more numerous holes, try a skewer or a drinking straw instead of a spoon handle.
These final adjustments make sure every bite of your cake from the mix is perfectly soaked with the sweet cream and milk mixture.
Conclusion
Bringing a taste of the tropics to your table has never been simpler or more satisfying. This delightful dessert combines a tender, moist cake with a rich, creamy filling. It’s the perfect finish for any family dinner or festive potluck.
By following the straightforward steps in this recipe, you create a professional quality treat. The secret lies in selecting premium cream of coconut and allowing proper chilling time. This ensures a perfectly soaked poke cake every time.
Whether you garnish with bright cherries or keep it classic with toasted coconut, this cake is sure to become a household favorite. We hope you enjoy making and sharing this refreshing creation with friends and family.
Your email will not be published publicly.