
Homemade Strawberry Mille Feuille: A Decadent Treat
Picture your last big family BBQ. The sun is setting, laughter fills the air, and then comes the moment everyone secretly waits for: dessert. For over twenty years, one particular sweet has claimed that honored spot on our table.
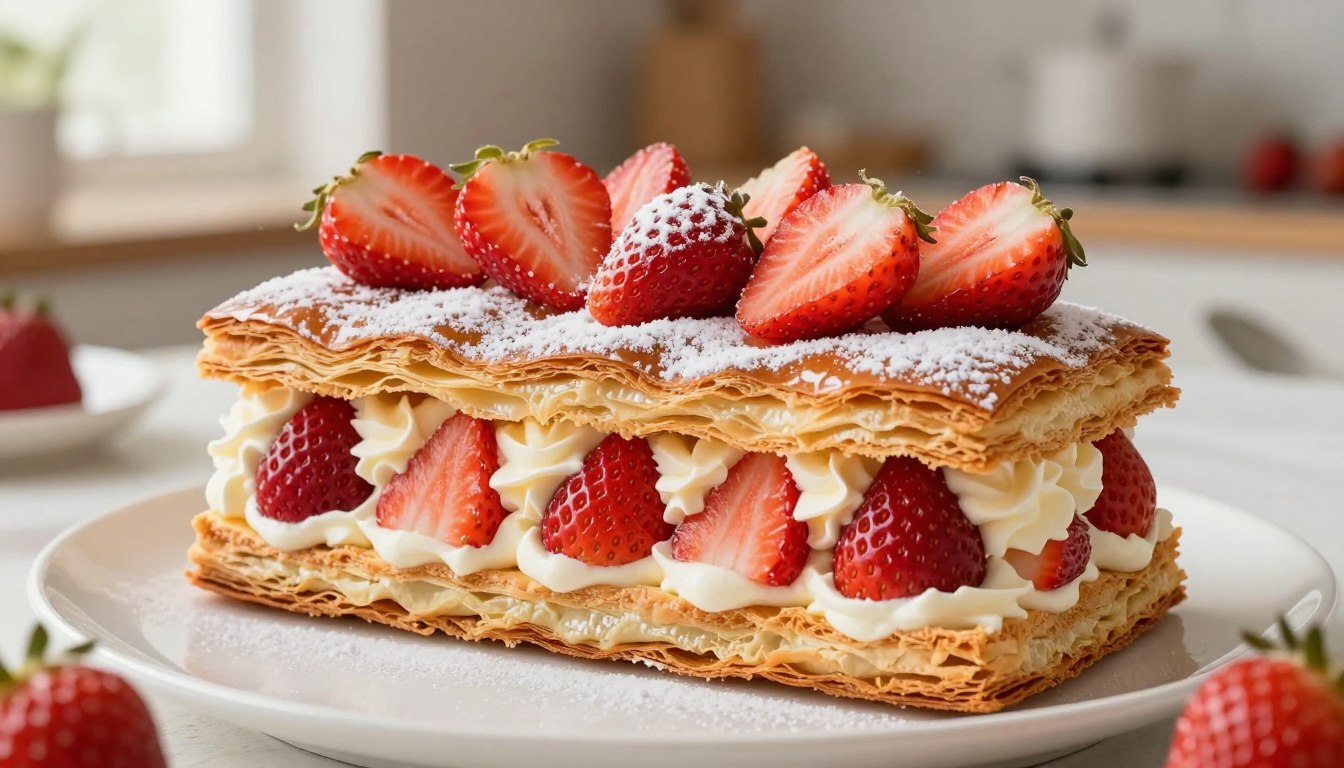
That showstopper is a layered masterpiece of impossibly flaky puff pastry and velvety cream. It’s crowned with fresh, ruby-red strawberries. The best part? One generous portion has just 275 kcal. It feels indulgent without the guilt.
This classic French dessert might look like it came from a fancy bakery. But the truth is, you can make it at home. This recipe (Strawberry Mille Feuille) breaks it down into simple, foolproof steps.
You’ll be amazed at how easy it is to create such an impressive pastry. It’s perfect for treating your loved ones to something truly special.
This strawberry mille feuille represents French pâtisserie at its finest crispy puff pastry layers alternating with luscious vanilla pastry cream and fresh strawberries create an unforgettable dessert experience. The classic technique behind this impressive pastry has earned it a place among the top 10 classic French dessert recipes from France that every baker should master. Whether you call it mille feuille, Napoleon, or vanilla slice, this elegant dessert delivers bakery quality results that impress at any gathering.
Introduction to Strawberry Mille Feuille
French for ‘a thousand leaves,’ the name alone promises a textural experience that is both sophisticated and utterly delightful. This iconic dessert is celebrated for its delicate, flaky architecture.
It’s a masterpiece built from simple components. You layer crisp puff pastry with rich, velvety fillings.

What Makes This Dessert So Special?
The magic is in the contrast. Every bite offers a satisfying crunch from the baked pastry. It immediately gives way to the smooth, cool cream.
This balance is what makes the recipe a favorite. You can easily adapt other recipes by using different fruits. Try raspberries or peaches when they’re in season.
The vibrant red of fresh strawberries makes it perfect for summer parties. It’s also a romantic choice for a special dinner.
Success starts with your ingredients. Good butter and fresh milk create the best flavor. That’s why this treat remains a beloved classic.
Gathering Your Ingredients and Tools
Before you even think about turning on the oven, taking a few minutes to organize your kitchen will make the whole process smooth and enjoyable.
Essential Ingredients
Having the right ingredients measured and ready is your first step to success. This recipe is designed for a standard 35cm x 23cm puff pastry sheet, which weighs about 320 grams and makes 10 individual servings.
| Ingredient | Quantity / Purpose | Key Note |
|---|---|---|
| Puff Pastry | 1 sheet (320g) | Provides the flaky, crisp layers. |
| Full-Fat Milk & Unsalted Butter | For the cream | Creates a rich, velvety filling. |
| Egg Yolks & Granulated Sugar | For the cream mixture | Whisk until pale for smooth consistency. |
| Pure Vanilla Extract | 1 teaspoon | Adds essential flavor depth. |
Don’t forget the fresh fruit for topping! Vibrant berries add the perfect finish.
Required Kitchen Tools
You’ll need a few standard items. A large baking sheet lined with parchment paper is non-negotiable for even baking.
Have a sharp knife, a mixing bowl, a whisk, and a fork ready. The fork is for pricking the pastry before it goes in the oven.
Always unroll puff pastry on a lightly floured surface. This prevents sticking and tearing. Having everything set up before you start is the best tip for any baker.

The secret to a perfect Strawberry Mille Feuille? A flawless lattice top.
Stop weaving dough by hand. This Stainless Steel Lattice Roller Cutter creates uniform diamond patterns in seconds – just roll and bake. Your puff pastry will look like it came from a French patisserie.
Perfect for:
- Strawberry Mille Feuille
- Pies & tarts
- Beef Wellington
- Pizza & bread
Features:
✅ Rust resistant stainless steel blade
✅ Comfortable ergonomic handle
✅ Dishwasher safe
➡️ Check price on Amazon : Click here
- Don’t miss our gluten free lemon drizzle cake,Try our mochi ice cream recipe and strawberry icebox cake.
Strawberry Mille feuille: Step by Step Process
The moment has arrived to transform simple ingredients into an elegant masterpiece. This guide walks you through each stage.

Follow these three key phases to build your dessert. You’ll start with the puff pastry, then make the cream, and finally assemble.
Preparing the Puff Pastry
First, preheat oven to 190°C (375°F). Line a baking sheet with parchment paper.
Unroll your pastry sheet on a lightly floured surface. Cut it into ten equal rectangles.
Place them on the sheet. Bake for 15 to 20 minutes. They should turn a beautiful golden brown.
Then, let cool completely to room temperature. This keeps the layers crisp.
Creating the Creme Diplomat
While the pastry bakes, make the pastry cream. Whisk egg yolks, granulated sugar, and vanilla in a bowl.
Cook this mixture on the stove until thick. Let it cool to cool room temperature.
Then, fold whipped cream into it cream gently. This creates a light, velvety filling.
Assembling the Layers
Once cool, split each pastry rectangle in half with a sharp knife. You now have two layers per piece.
Pipe the cream onto the bottom half. Add fresh strawberries on top.
Place the second pastry piece on top. Finish with a dusting of icing sugar.
| Step | Key Action | Important Detail |
|---|---|---|
| 1. Bake Pastry | Preheat, cut, and bake | 190°C for 15-20 min until golden |
| 2. Make Cream | Whisk, cook, and fold | Cool completely before folding cream |
| 3. Build Dessert | Split, pipe, add fruit, dust | Use a sharp knife for clean layers |
Tips for Perfect Puff Pastry and Creme Diplomat
The secret to an unforgettable layered treat lies in two key elements: the pastry and the cream. Perfecting each ensures your dessert is both visually stunning and delicious.
Baking the Pastry to a Golden Perfection
Always preheat your oven fully. This ensures your puff pastry starts cooking immediately for maximum rise.
Place the pastry sheet on a lined baking sheet. Watch it closely for 15 to 20 minutes. You want a uniform, golden brown color.
Once baked, let cool the pastry completely to room temperature. Any residual heat will soften the crisp layers you worked so hard to create.
Achieving the Right Cream Consistency
Start with a smooth pastry cream. Whisk your egg yolks and sugar thoroughly before adding hot milk. If the chilled pastry cream seems thick, just whisk it in a bowl until smooth again.
For the light diplomat filling, fold whipped cream into the cooled base gently. This preserves the airy texture. Chill this cream before using it. This makes handling much easier.
Using high-quality vanilla transforms the entire recipe. It adds a deep, professional flavor that makes every bite special.
Creative Variations for Your Mille Feuille
Your homemade masterpiece is a perfect canvas for personal creativity and seasonal inspiration. Once you’re comfortable with the classic build, these simple twists let you tailor the dessert to any occasion.
Flavor Substitutions for Seasonal Twists
Don’t be afraid to swap the fruit. Try juicy blueberries, sliced peaches, or even spiced apples. You can also mix chopped pistachios into the cream filling for a delightful crunch.
To save time, make the pastry cream a day ahead. Just store it in the fridge until you’re ready to fold in the whipped cream.
Plating and Garnishing Ideas
For a crisp, flat pastry, use a fork to prick the sheet all over before baking. This prevents uneven puffing in the oven.
A fine sieve gives your dusting of icing sugar a professional, snowy finish. A drizzle of dark chocolate or caramel sauce adds another decadent layer.
While your creations keep for 2-3 days in an airtight container, they are best served soon after assembly. This keeps those delicate layers wonderfully crisp.
Conclusion
With the final layer dusted with icing sugar, you’ve mastered a classic that balances simplicity with stunning results. This recipe lets you create bakery quality pastry right at home. Your puff pastry sheet bakes to a perfect crisp in just 20 minutes.
The rich cream filling pairs beautifully with fresh fruit on top. Remember, the secret lies in quality ingredients like real vanilla. Whether for a family gathering, these individual cakes impress every time.
We hope you enjoy the baking process as much as sharing these treats. Revisit these instructions for a reliable dessert that always delights. It’s a rewarding achievement for any occasion.
Your email will not be published publicly.