
Homemade Vanilla Berry Cake – Easy Recipe
Picture this: your phone pings with a last minute invitation for a weekend barbecue. You instantly volunteer to bring a dessert, but then the panic sets in. What can you make that’s impressive, delicious, and won’t keep you in the kitchen all day?
This is where a reliable, from-scratch formula saves the day. The total time investment is just two hours, and the result is a beautiful layered dessert that serves a crowd. You’ll get twelve perfect slices from a single creation.
It’s the kind of sweet treat that turns a simple gathering into a celebration. The soft, fluffy layers paired with bright, fresh fruit create a stunning centerpiece. Whether it’s for a birthday, a holiday, or just because, this easy recipe delivers a professional look and taste every time.
Introduction and Recipe Inspiration
A legendary grocery store dessert has inspired countless home kitchens to recreate its magic. The popular Berry Chantilly Cake began as a viral sensation from Whole Foods Market.
This favorite has been adored for over ten years. While the original formula was created by a grandmother and sold pre-made, many bakers now prefer the homemade route.
Discovering the Charm of Homemade Cakes
You can achieve a much better flavor profile by preparing this dessert in your own kitchen. Store-bought versions simply can’t compete with the freshness and personal touch you provide.
Many find the homely vibe of a from-scratch creation makes it superior. It turns a simple gathering into something special.
Influences from Berries & Cream Favorites
This specific project is wonderful for anyone looking to master a classic combination. It focuses on pairing a light, fluffy sponge with bright, fresh fruit.
Your finished layer cake will be a stunning centerpiece. It captures the essence of beloved berries and cream favorites in every slice.
Essential Ingredients and Equipment
Before you preheat your oven, a successful baking project starts with gathering the right components. Having your essential ingredients and tools ready streamlines the entire process.

- Decorate your Vanilla Berry Cake with this 9 piece reusable piping set 6 stainless steel tips, cotton bags, coupler & cleaner. Easy to use, eco friendly
- Don’t miss our almond flour chocolate cake,Try our earl grey lavender cake and strawberry icebox cake.
Must Have Ingredients for a Rich Flavor
Your foundation is built with simple pantry staples. You’ll need all-purpose flour, baking powder, and a pinch of salt.
For richness, high-quality vanilla extract and unsalted butter are non-negotiable. Expert baker Julie from Bunsen Burner Bakery notes your butter should be exactly 65°F for perfect texture.
Tools and Equipment for Baking Success
A stand mixer is your best friend for creaming butter and sugar to a pale, fluffy consistency. This ensures a light crumb.
You will need two or three 8-inch cake pans for even layers. Accurate measuring with cups or a kitchen scale guarantees your dessert’s structure.
Mixing and Preparing Your Cake Batter
Achieving a fluffy texture requires a specific method known as reverse creaming. This technique blends your dry ingredients with fat first, creating a uniquely tender crumb.
It’s different from traditional creaming but delivers superior results for a layered dessert.
Mastering the Reverse Creaming Method
Start by combining your flour, baking powder, and salt with softened butter. Use your stand mixer on a low speed for this initial step.
It is important to make sure you scrape the bowl often. This prevents any stubborn lumps of dry ingredients from hiding in your mixture.
Once all items are incorporated, whisk the combined batter for a full two minutes. This incorporates essential air for a light structure.
Tips for a Light and Fluffy Texture
After adding the wet ingredients, increase your mixer to a medium speed. This develops the fine, tender crumb that defines this cake.
Adding a touch of vanilla extract will enhance the overall aroma and flavor of your finished creation. Proper mixing speed is crucial for the perfect consistency.
| Mixing Step | Purpose | Recommended Speed |
|---|---|---|
| Combine dry ingredients & butter | Coats flour particles for a fine, tender crumb | Low |
| Add wet ingredients (milk, eggs) | Binds the batter and begins developing structure | Medium |
| Final whipping (2 minutes) | Incorporate air for a light and fluffy texture | Medium |
Baking Techniques for Soft, Moist Cake Layers
The secret to incredibly soft, moist layers lies in mastering a few key baking techniques. Your attention to detail here ensures a tender crumb and perfect structure every time.

Setting the Right Oven Temperature
Expert baker Ella Gilbert recommends preheating your oven to 350°F/175°C. This specific temperature helps your cake layers rise evenly without doming.
Always place your pans on the center rack for consistent heat distribution. Using room temperature ingredients is also crucial. It prevents the batter from separating, giving you a moist result.
Choosing the Perfect Cake Pans
Light-colored metal cake pans are ideal for gentle, even baking. They promote a golden exterior without over-browning.
After removing your cakes, let them rest in the pans for 15 minutes. Then, transfer each cake layer to a wire rack to cool completely. This step stops the cooking process and locks in moisture.
Your layers must be completely cool before you add any frosting. This prevents melting and keeps your dessert looking beautiful.
Whipping Up the Perfect Mascarpone Chantilly Frosting
The crowning glory of any layered dessert is its frosting, and this mascarpone Chantilly version is both luxurious and surprisingly simple to make. It combines the lightness of whipped cream with the rich tang of mascarpone cheese for a balanced topping.
Creating Stable Whipped Cream
Begin by chilling your bowl and mixer attachments. Pour heavy cream into the cold bowl. Using your stand mixer on medium speed, whisk until soft peaks form.
Gradually add confectioners’ sugar and a splash of vanilla extract. Continue whipping until you achieve firm, stable peaks. A pinch of salt cuts the sweetness and enhances the flavor.
Incorporating Mascarpone for Richness
In a separate bowl, gently stir the mascarpone cheese to soften it. This Italian cream cheese stabilizes the whipped cream, preventing a runny texture.
Use a spatula to fold the whipped cream into the mascarpone. Do this gently to keep the airy texture. Always ensure your tools are clean for a smooth, lump-free cream frosting.
Tips for the Perfect Vanilla Berry Cake
The difference between a good dessert and a great one often lies in the details. These final pointers help you refine flavor, texture, and presentation for a truly standout result.

Balancing Flavors and Moisture
Pay close attention to your fruit compote’s sweetness. It should complement, not overpower, the delicate vanilla sponge. A tart contrast creates a more sophisticated flavor profile.
For a supremely moist crumb, avoid over-baking. Set a timer and check your layers at the 30-minute mark. Removing them promptly prevents a dry texture.
Let your finished creation rest at room temperature for about 20 minutes before slicing. This allows the butter in the cake and frosting to soften slightly. The result is a better, creamier mouthfeel.
Your choice of vanilla extract makes a significant impact. A high-quality, pure extract adds deep, aromatic notes to both the layers and the frosting.
For consistent results every single time, measure your flour by weight instead of using cups. This small change ensures your batter has the perfect ratio for a light and tender crumb.
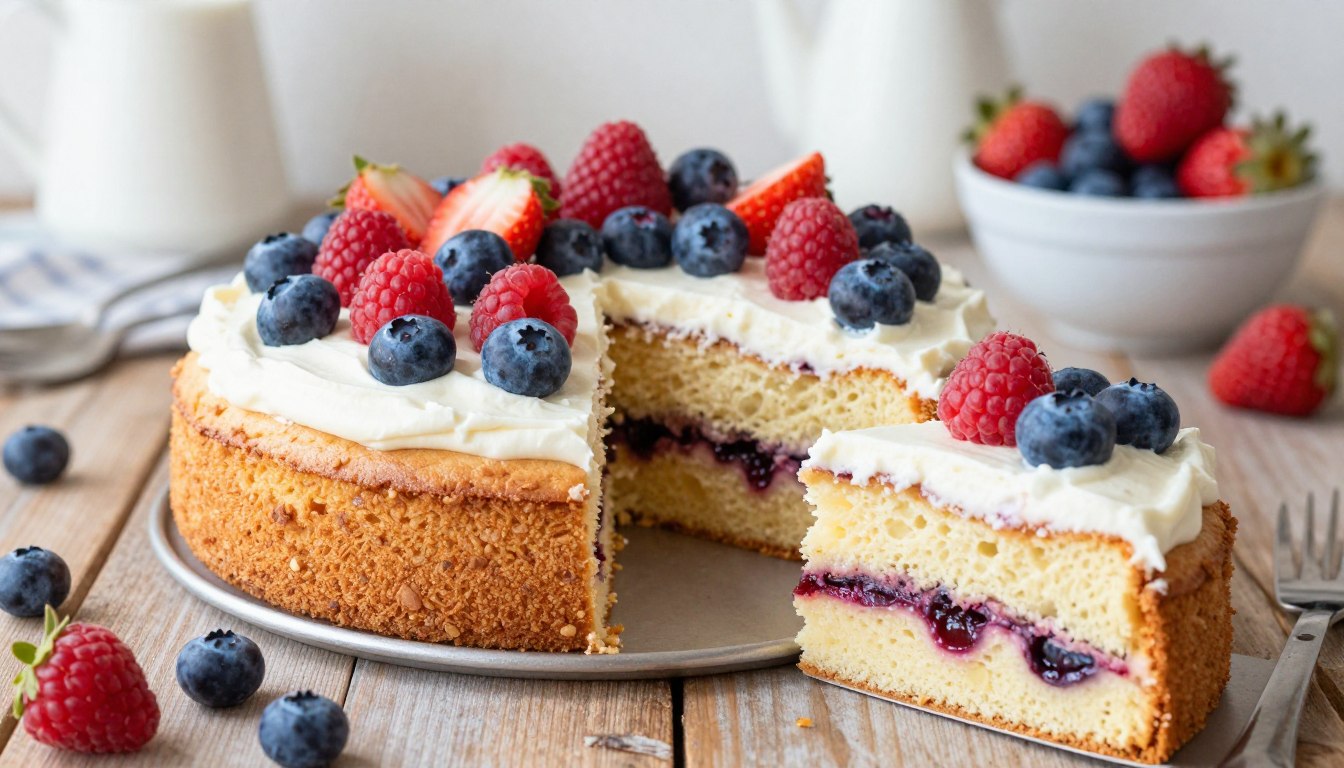
Creative Fruit and Decoration Ideas
Transforming your layered creation into a stunning centerpiece is all about smart fruit choices and artistic decoration. The final touches you add can elevate a simple dessert to something truly special.
Consider these ideas to make your presentation pop.
Choosing Between Fresh and Frozen Berries
You have options when it comes to fruit. Frozen berries work well for compotes because they save time and are often more affordable.
However, fresh fruit is superior for decorating the top of your dessert. It provides vibrant color and a pleasant texture.
If using fresh berries, always wash and dry them thoroughly. This prevents excess moisture from seeping into your frosting.
| Use Case | Fresh Berries | Frozen Berries |
|---|---|---|
| Decoration on Top | Ideal for vibrant color and firm texture | Not recommended; can bleed color and become mushy |
| Fruit Compote/Filling | Can be used but may require cooking | Excellent; already softened, save preparation time |
| General Baking | Best for recipes requiring whole, intact fruit | Perfect for purees, sauces, and mixed batters |
Designing Beautiful Cake Presentations
A simple trick is to pipe a ring of heavy cream around the edge of each layer. This acts as a barrier, keeping your fruit filling neatly contained.
Arrange a variety of berries on top. Think blueberries, raspberries, and strawberries. The mix of colors creates a professional, eye-catching look.
Your dessert will become the centerpiece of any table with these thoughtful details.
Addressing Common Baking Issues
Baking is a science, and sometimes small missteps can lead to less-than-perfect results. Let’s troubleshoot a few frequent problems so your next creation turns out just right.
Troubleshooting Dense or Dry Cake Problems
A dense texture often means the batter wasn’t whisked long enough. You need a full two minutes at medium speed to incorporate enough air.
Dry layers usually come from too much flour or over-baking. Measure your dry ingredients carefully. Always set a timer.
Use a toothpick to test the center. It should come out clean, not wet. This ensures your cake is done without being overdone.
If your dessert sinks, you may have opened the oven door too early. A sudden drop in temperature can collapse the structure.
Proper oven calibration is essential. An inaccurate oven causes uneven baking and sunken layers. Make sure to check yours with a thermometer for reliable results every time.
Storing and Serving Your Homemade Cake
Your beautiful creation deserves proper care to stay fresh and delicious for days. Following a few simple guidelines ensures every slice maintains its perfect texture and flavor.
Best Practices for Refrigeration and Shelf Life
Place your finished dessert in an airtight container inside the refrigerator. This method preserves freshness for three to four days.
If you have exposed slices, press a piece of parchment paper against the cut side. This barrier prevents your baked good from drying out.
Always remember to let your creation sit at room temperature for about fifteen minutes before serving. This allows the butter in the sponge to soften slightly.
Your cake layers can be prepared up to two days in advance. Wrap each cooled layer tightly in plastic wrap after they cool completely.
Because this dessert contains fresh fruit and whipped cream, consume it within the recommended shelf life window. This ensures optimal taste and quality with every bite.
Conclusion
Mastering this recipe empowers you to create a show-stopping treat for any occasion. You now have the skills to build a beautiful layer dessert from scratch. The reverse creaming method and stable frosting technique are yours to use again and again.
Remember, your success hinges on simple, precise steps. Using room temperature ingredients and measuring your flour accurately makes all the difference. These details ensure soft, even layers every time.
Feel free to get creative with your fruit choices. Share your creation at gatherings and enjoy the compliments. You’ve proven that professional-quality baking is achievable right in your own kitchen.
Thank you for following this guide. We hope it brings you many delicious moments and confident bakes.
Your email will not be published publicly.