
Blackberry velvet cake recipe perfect for any occasion
Did you know that a visually stunning dessert can make people perceive its flavor as 30% more intense? This fact isn’t just about looks; it’s about creating a moment of pure delight.
Our dreamy blackberry velvet cake recipe begins with a simple step: preheating your oven to 350°F (175°C). This precise temperature is the secret to a tender, velvety crumb that feels like poetry for your senses.
This dessert is designed to be the star of your table. It turns a quiet dinner into a celebration and makes any gathering feel special. Each slice offers a perfect balance.
You get a rich, buttery texture paired with the fresh, fruity lightness of real blackberry. A hint of lemon zest and vanilla creates a delicate flavor that is simply unforgettable.
The aroma of berries and vanilla will fill your kitchen as it bakes. It promises an experience that is both indulgent and refreshing. This cake is your ticket to creating beautiful memories, one forkful at a time.
Introduction to the blackberry velvet cake
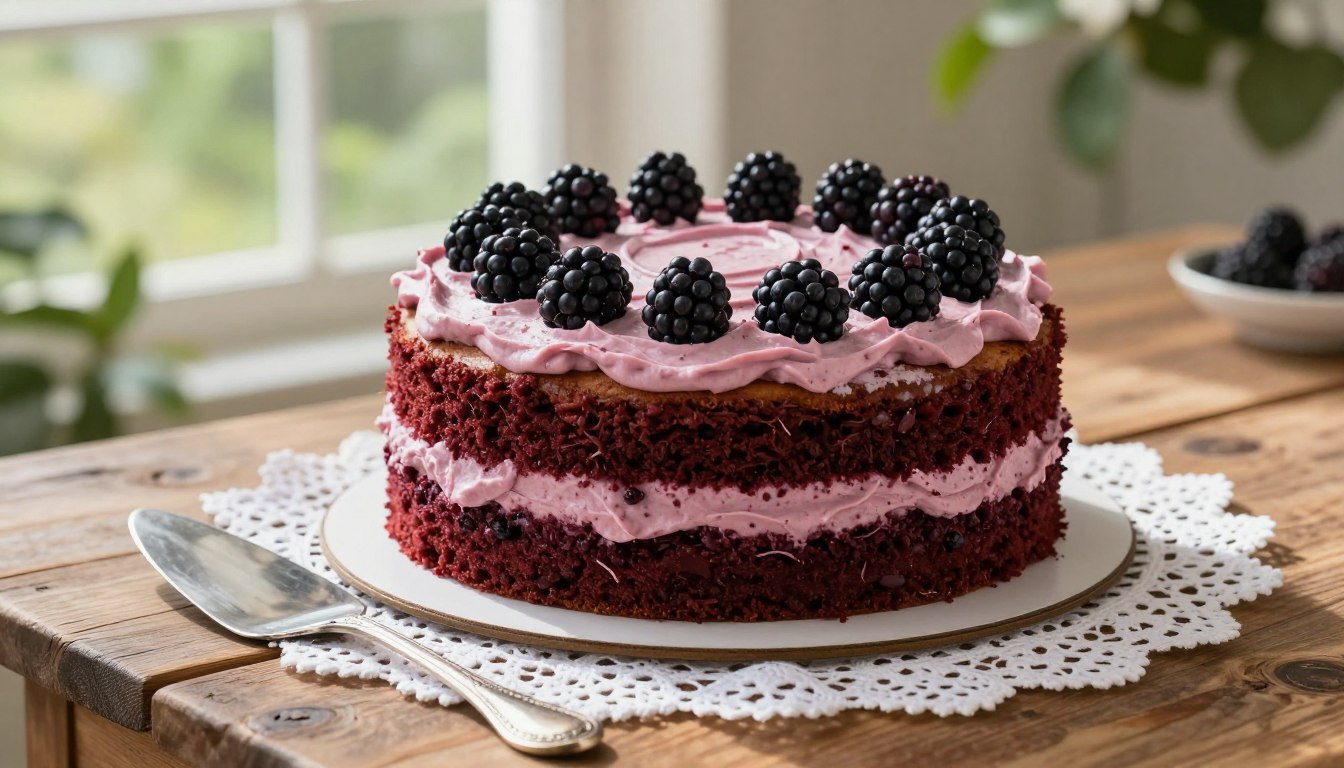
At the heart of this creation is a beautiful contrast: tangy berry ribbons swirled through a tender, buttery crumb. The mashed fruit folds seamlessly into the batter, creating a stunning marbled effect. This visual surprise promises a delightful experience.
Overview of the recipe’s unique charm
Each component serves a purpose. Real berries add a burst of natural sweetness and an unmistakable aroma. The frosting, when whipped, catches the light like soft lilac silk.
This dessert is more than a recipe; it’s a mood of elegant, fruity baking. Every forkful delivers that perfect balance between tangy fruit and creamy frosting. This harmony is the hallmark of its unique appeal.
Why this cake is perfect for any occasion
You can rely on this formula for consistent, bakery-level results. It balances rich texture with refreshing, tangy notes. This makes it ideal for festive gatherings or quiet dinners.
The flavor profile offers a harmonious blend of sweetness and deep fruity essence. Your guests will appreciate the sophisticated yet approachable nature of this treat. It turns any moment into a special celebration.
Gathering essential ingredients
Organizing your supplies before you begin is key to creating a flawless treat. A well-prepared workspace ensures your blackberry velvet cake comes together smoothly and bakes perfectly.
Dry ingredients breakdown
Start with the dry components. You need 2 1/2 cups of all purpose flour for a sturdy yet tender crumb. Add 1 3/4 cups of granulated sugar for sweetness and moisture.
For the perfect rise, include 2 teaspoons of baking powder and 1/2 teaspoon of baking soda. These leaveners work together to give your dessert its light, airy texture.
Fresh fruit and dairy essentials
The dairy elements are crucial. Have 1 cup of buttermilk and 1 cup of unsalted butter ready. Both should be at room temperature for easy mixing and a smooth batter.
Finally, gather 1 1/2 cups of fresh blackberries. These juicy berries create delicious pockets of flavor in every slice. Their natural tartness balances the sweetness beautifully.
Preparing the baking environment
Before a single ingredient is mixed, your oven and pans need to be ready for action. This step is all about setting the stage for success. A well-prepared workspace guarantees your dessert layers bake evenly and release perfectly.

- 4 Pcs Baking Strips Perfect for baking a flat, even blackberry velvet Cake. These absorbent cotton strips wrap around your cake pan to prevent doming and cracking. Ideal for kitchen, bakery, and restaurant use. Get professional results at home.
- Don’t miss our rosette cake, Philadelphia cheesecake no bake and Pistachio cake.
- This recipe is also featured in our complete gluten free cake mix guide : 25 easy recipes for perfect gluten free bakes every time.
Start by turning your oven to 350°F (175°C). Let it heat fully while you work. A stable, hot oven is crucial for that light, tender crumb everyone loves.
Preheat and pan preparation
Next, focus on your two 9 inch round cake pans. Grease the inside surfaces with butter or oil. Then, dust them lightly with flour, tapping out any excess.
For an extra secure release, cut circles of parchment paper to line the bottoms. This simple trick is a baker’s best friend. It protects delicate layers from sticking.
Finally, check your oven rack position. Place it in the center of the oven. This ensures even heat distribution from all sides during the baking process.
| Step | Action | Purpose |
|---|---|---|
| 1. Preheat Oven | Heat to 350°F (175°C) | Ensures a stable temperature for proper rise |
| 2. Grease & Flour | Coat pans with fat, then flour | Creates a non stick barrier for clean release |
| 3. Add Parchment | Line pan bottoms with paper | Provides extra security against sticking |
| 4. Center Rack | Position rack in middle of oven | Promotes even baking and browning |
Taking these few minutes to prepare makes the entire baking journey smoother. Your future self will thank you when those beautiful layers slide out effortlessly.
Crafting the perfect batter
Your mixing method is the most critical factor for achieving that dreamy texture. The right technique creates a light, airy foundation for your dessert.
Mixing techniques for a smooth batter
Start by beating room temperature butter and sugar. You want the mixture pale and fluffy. This step traps air for a tender crumb.
Add your eggs one at a time. Make sure each is fully blended before adding the next. This keeps the emulsion stable.
Now, alternate the dry mix and buttermilk. Begin and end with the dry ingredients. Mix until just combined to avoid toughness.
| Step | Action | Key Tip |
|---|---|---|
| Creaming | Beat butter & sugar until fluffy | This builds the structure |
| Adding Eggs | Incorporate one at a time | Prevents the batter from breaking |
| Alternating Mix | Add dry & wet ingredients in turns | Keeps the batter light |
| Final Fold | Gently incorporate fruit | Preserves the marbled look |
Folding in fresh blackberries
Gently fold mashed fresh blackberries into the batter at the very end. Use a spatula in a sweeping motion.
This creates a beautiful swirl without overmixing. Your mixture should look silky and hold a gentle wave. Now it’s ready for the pans.
Baking the cake layers to perfection
The moment you slide those pans into the oven is where the magic truly begins. Your goal is two layers that bake at the same rate for a uniform height and texture.
Achieving a light and moist crumb
First, divide the batter evenly between your two prepared pans. This simple step is crucial for consistent results. Place them in the center of your preheated oven.
Bake for 30 to 35 minutes. You will know it’s done when a toothpick inserted into the center comes clean. Avoid opening the oven door early, as this can cause the layers to fall.
Let the cake cool in its pans for exactly 10 minutes. This brief rest allows the structure to set firmly. Then, gently turn them out onto wire racks to cool completely.
This careful cooling process is essential. It locks in moisture and creates that signature tender crumb. Rushing this step can lead to a dense texture or broken layers.
Creating the luxurious blackberry frosting
The secret to a memorable cake lies in its frosting rich, creamy, and bursting with real fruit flavor. This final component adds both visual beauty and a delightful tangy sweetness.

Whipping the cream cheese frosting
Start with a smooth, Lump free base. Beat four ounces of cream cheese with room temperature butter until the mixture is light and fluffy.
Gradually add three and a half cups of powdered sugar. Mix it in thoroughly to avoid any graininess. This creates a stable, sweet foundation for your fruit infusion.
Integrating the blackberry reduction
First, simmer one cup of berries over low heat until they break down into a thick jam. Strain this mixture to remove all seeds, leaving a smooth, concentrated puree. Let it cool completely.
Add the cooled reduction to your cream cheese base slowly. This prevents curdling and keeps the texture perfectly smooth. Mix in a teaspoon of vanilla extract and a pinch of salt.
The frosting will turn a beautiful lavender color. For a brighter flavor, you can add a splash of lemon juice. This balances the sweetness with a subtle tang.
| Step | Key Ingredients | Purpose |
|---|---|---|
| 1. Reduce Fruit | 1 cup fresh berries | Creates a concentrated, seedless flavor base |
| 2. Cream Base | Cream cheese, butter | Builds a smooth, rich foundation |
| 3. Sweeten | 3 1/2 cups powdered sugar | Adds structure and sweetness |
| 4. Flavor & Color | Berry reduction, vanilla, salt | Infuses tangy fruit flavor and lavender hue |
Your final frosting should be luxuriously smooth and easily spreadable. It’s now ready to cover your cooled dessert layers perfectly.
Layering and assembling the cake
With your cooled layers and prepared frosting ready, it’s time for the most rewarding step: assembly. This is where your separate components become a stunning, complete dessert.
Techniques for even layering
Place the first cake layer on your serving stand. Spread a generous, even layer of frosting across the entire surface. This acts as both glue and flavor.
Carefully stack the second layer on top. Ensure it is perfectly aligned and level. A centered stack is crucial for a stable, professional-looking creation.
Now, cover the entire dessert with the remaining frosting. Use an offset spatula to create a smooth or textured finish. This tool gives you excellent control.
Creative garnishing ideas
The final touch is all about personal flair. Garnish the top with extra fresh blackberries. Add a few edible flowers or mint leaves for a dreamy, elegant finish.
Finally, refrigerate your assembled masterpiece for at least 30 minutes. This lets the frosting set and the layers firm up. Chilling makes slicing clean and effortless.
Exploring alternative recipe variations
Transforming a standard formula into something unique is a rewarding baking adventure. Your blackberry velvet cake is a wonderful canvas for personal expression. Simple tweaks can create entirely new experiences.
Feel free to experiment with ingredients to match dietary needs or flavor cravings. These adaptations let you serve a stunning dessert for any guest. It’s all about making the recipe work for you.
Adding a cocoa twist
For a deeper, richer tone, introduce cocoa powder. Simply replace a quarter cup of flour with unsweetened cocoa powder. This creates a beautiful contrast with the fruity swirls.
The chocolate note pairs beautifully with the berries. It adds a sophisticated layer to the overall flavor. Your creation will have a wonderfully complex taste.
Gluten free or vegan options
You can easily make this treat plant-based or gluten free. Swap butter for vegan margarine and eggs for flaxseed eggs. Use almond milk instead of buttermilk.
These simple substitutions ensure everyone can enjoy a slice. Your cake will still be moist and delicious. It’s a thoughtful way to accommodate different diets.
| Variation | Key Ingredient Swap | Resulting Profile |
|---|---|---|
| Chocolate Twist | Replace 1/4 cup flour with unsweetened cocoa powder | Richer, deeper tone that complements berries |
| Plant-Based | Vegan margarine, flax eggs, almond milk | Dairy free, egg free delight |
| Citrus Bright | Extra lemon zest & juice in batter | Fresh, tangy kick |
| Floral Frosting | Lavender extract & honey in frosting | Rustic, refined floral note |
Consider a tropical twist by blending coconut cream into the frosting. Garnish with toasted coconut flakes for extra texture. Each variation keeps the signature velvety texture you love.
Tips for moist and tender cake layers
For bakers seeking a consistently soft crumb, mastering ingredient temperature is non-negotiable. This fundamental step ensures your batter emulsifies perfectly for a uniform bake.

The importance of room temperature ingredients
You must ensure that your butter, eggs, and buttermilk are all at room temperature before mixing. Cold components can cause the fat to seize, leading to a dense, tough crumb.
Using room temperature ingredients allows them to blend smoothly. This creates a stable emulsion that traps air, giving you that velvety, melt in your mouth texture.
Plan ahead by taking your butter and eggs from the fridge at least two hours before you start. This simple habit significantly improves your dessert’s quality.
Room temperature buttermilk helps leavening agents react properly. This ensures your blackberry velvet cake rises to its full, tender potential every time.
Serving suggestions and presentation ideas
Presentation is the art that elevates a great recipe into a show-stopping masterpiece. Your final touches turn a delicious bake into the highlight of any table.
These simple yet effective ideas ensure your creation is both beautiful and delicious. They make every slice feel like a special celebration.
Pairing with sides and beverages
First, let your dessert rest at room temperature for about 15 minutes before serving. This allows the flavors to fully bloom and the texture to soften perfectly.
Pair a slice with a warm cup of herbal tea or a scoop of coconut ice cream. The contrast between warm, cool, sweet, and creamy is truly dreamy.
Elegant decorating tips
For a stunning visual, use gradient frosting shades to create a beautiful ombré effect. This technique makes your dessert a breathtaking centerpiece for any party.
Garnish with a few fresh blackberries, delicate mint leaves, or even edible gold leaf. These final touches add a professional and elegant finish.
| Element | Suggestion | Resulting Experience |
|---|---|---|
| Temperature | Let sit 15 mins before serving | Enhanced buttery richness and flavor bloom |
| Beverage Pairing | Warm herbal tea | Creates a comforting, balanced bite |
| Side Pairing | Coconut ice cream scoop | Adds a cool, creamy contrast |
| Visual Design | Ombré frosting technique | Transforms it into a stunning centerpiece |
| Final Garnish | Mint leaves & edible gold | Adds a touch of bakery level elegance |
Mastering the blackberry velvet cake experience
The true mastery of this recipe lies in the small, consistent habits you build. These practices ensure every bake is as perfect as the last. They transform effort into effortless success.
Essential tips for consistent success
First, always mix your batter only until just combined. Overworking it deflates the air and ruins the soft structure. Gentle folding preserves that dreamy crumb.
Next, whip your butter and cream cheese thoroughly. This incorporates air for a billowy, spreadable frosting. Your layers will be covered in a cloud of flavor.
For storage, use an airtight container in the fridge. It keeps your dessert fresh for up to three days. You can also freeze unfrosted layers for a month.
A kitchen scale is a pro tool for dividing batter evenly. This guarantees your pans bake at the same rate. You get perfectly level layers every time.
Balancing flavors and textures
The final harmony comes from serving. Always let your dessert sit out for about 15 minutes before slicing. This brings it to room temperature.
That gentle warmth softens the butter in the frosting. It restores the melt-in-your-mouth texture you love. The experience becomes truly luxurious.
Balance is key. The tangy fruit reduction should play against the sweet cream cheese. When these elements harmonize, you’ve mastered the creation.
Conclusion
Bringing this delightful dessert to life is a rewarding journey from kitchen to table. You have learned to blend rich, buttery layers with tangy, fresh fruit flavors.
This recipe gives you all the tools for a stunning, bakery-quality result. Following the tips for room temperature ingredients and gentle mixing ensures your success every time.
Whether for a celebration or a simple craving, this blackberry velvet cake is the ultimate choice. We hope you enjoy whisking, folding, and decorating this delicious treat for loved ones.
Remember, the secret lies in quality ingredients and the care you put into assembly. Start your baking journey today and discover your new favorite dreamy dessert.
Your email will not be published publicly.