
Flourless moist chocolate cake : rich, fudgy & easy recipe .
Have you ever tasted a dessert so memorable it sent you on a kitchen quest? That’s exactly what happened to baker Tessa Arias. After a trip to La Jolla, California, she enjoyed a stunning flourless chocolate cake at a local restaurant.
The experience was so inspiring she was determined to recreate it at home. She wanted a version anyone could make. The result is the masterpiece we’re sharing with you today.
This decadent dessert is perfect for any special moment. Think of a quiet date night or a dinner party with friends. Every slice offers an incredible texture. It feels like the best parts of a brownie, a mousse, and a truffle all in one.
You might think such a luxurious treat is hard to make. The truth is, this chocolate cake recipe is wonderfully straightforward. It’s designed to be reliable for bakers of all skill levels.
That’s why it has become a trusted staple for so many home cooks. When you need a guaranteed showstopper, this is the one to turn to.
Introduction & what makes this cake special
When a dessert receives a family seal of approval, you know it’s special. Tessa’s husband, Joe, didn’t hesitate to call this creation a true “Hall of Fame” recipe. It’s the kind of treat that gets requested again and again.
A decadent dessert for any occasion
This elegant sweet is perfect for romantic evenings like Valentine’s Day. It also shines at dinner parties or holiday gatherings. The experience feels luxurious without being too heavy.
You can enjoy a satisfying portion without feeling overwhelmed. It’s a sophisticated choice that pleases a crowd.
The appeal of a flourless recipe
The magic lies in its simple structure. Without traditional wheat flour, it achieves a dense, smooth texture. Eggs and butter provide all the necessary richness and hold.
This means you can happily serve it to friends avoiding gluten. Everyone gets to enjoy the same incredible, fudgy experience. It’s a thoughtful and inclusive baking triumph.
Key ingredients and baking science
The secret to a stunning dessert often lies in the quality and science of its core components. Success depends on understanding what each element brings to the table.
Let’s explore the building blocks that create its signature texture and taste.
Understanding the role of chocolate, butter, and eggs
Your choice of chocolate chips is critical. High quality brands like Ghirardelli deliver a superior flavor profile.
This flourless chocolate dessert relies on butter and eggs for its structure. They create a rich backbone that replaces wheat flour.
You need three whole eggs plus one extra yolk. This provides the necessary lift and density.
Always use room temperature eggs. They blend smoothly for a proper emulsion.

- Decorate your Chocolate Cake with this 9 piece reusable piping set 6 stainless steel tips, cotton bags, coupler & cleaner. Easy to use, eco friendly.
- Don’t miss our hummingbird cake recipe, carrot cake with brown butter frosting and strawberry icebox cake.
- This recipe is also part of our complete gluten free cake mix guide 25 easy recipes for perfect gluten free bakes every time.
The science behind cocoa powder and sugar
Not all cocoa powder is the same. Use Dutch-processed powder for the best results.
It’s treated to raise its pH to a neutral 7 or alkaline 8. This science gives the cake its deep, dark color.
Sugar does more than sweeten. It plays a key role in creating a tender, delicate crumb.
Together, these ingredients work in harmony. They transform simple items into an extraordinary flourless chocolate creation.
Step by step preparation process
The journey to a perfect slice starts with mastering a few key techniques in your own kitchen. Following these steps ensures your dessert turns out dense, smooth, and incredibly satisfying.
Melting chocolate and combining flavors
Begin by placing your chocolate chips and butter in a microwave-safe bowl. Heat them in 30-second increments, stirring between each, until just barely melted. This gentle method prevents burning.
Let this mixture cool slightly. Then, whisk in the sugar, vanilla, and a pinch of salt. Add the whole eggs and extra yolk all at once. Whisk vigorously until the batter is perfectly smooth and glossy.
Mixing, folding, and achieving fudgy perfection
Next, gently fold in the cocoa powder. Use a spatula and broad strokes to maintain the batter’s thick, brownie-like consistency. Overmixing here can deflate your mixture.
In a separate bowl, whip cold heavy cream to medium peaks. Carefully fold this into the chocolate base. This step is crucial for a light yet fudgy texture.
Pour everything into your prepared cake pan. Bake until the center reaches an internal temperature of 200°F. Let it cool completely before serving for the best flavor and structure.
Flourless moist chocolate cake : rich, fudgy & easy recipe in 2026
Let’s break down the total time commitment and oven settings for guaranteed success.
You need to plan for about 7 hours and 5 minutes from start to finish. Most of this is passive chilling. This wait is absolutely worth it for the final texture.
Always preheat your oven to 350°F. Bake the dessert for 25 to 30 minutes. This creates a perfect, fudgy center.

Your choice of butter and eggs makes a huge difference. High-quality ingredients directly boost the final flavor.
This recipe sets the standard for home baking. The table below outlines the key stages.
| Stage | Temperature/Setting | Duration | Key Purpose |
|---|---|---|---|
| Preparation & Mixing | Room Temperature | ~20 minutes | Combine all ingredients smoothly. |
| Baking | 350°F (Preheated) | 25-30 minutes | Set structure, achieve fudgy center. |
| Cooling | Room Temperature | 1-2 hours | Stabilize the cake’s interior. |
| Chilling | Refrigerator | At least 4 hours | Develop firm, sliceable texture. |
You can easily follow these steps in your kitchen. The result is a stunning chocolate cake that rivals any bakery.
Baking tips and common pitfalls
Avoiding common mistakes ensures your baked creation turns out perfectly every time. Small adjustments in your setup and process protect the delicate texture.
Focus on your equipment and patience during cooling. These factors are just as important as mixing your batter correctly.
Avoiding overbaking and ensuring a moist texture
Preventing a dry result is key. Use an instant read thermometer to check the center. It should read exactly 200°F for a soft, set interior.
Your choice of cake pan matters greatly. We recommend a light-colored, 8-inch round pan from a brand like Fat Daddio’s.
It promotes even heat distribution. This prevents the edges from cooking too fast.
- Always line the bottom with parchment paper. Circles with tabs make removal simple and prevent breaks.
- Let the dessert cool completely in the pan. Rushing this step can cause structural damage.
- Never use a dark-colored cake pan. It absorbs more heat and often leads to dry, overbaked edges.
The table below shows how pan color affects your baking outcome.
| Feature | Light Colored Pan | Dark-Colored Pan |
|---|---|---|
| Heat Distribution | Even and gentle | Aggressive, concentrates on edges |
| Edge Browning | Minimal, perfect for this recipe | Excessive, often dry |
| Recommended for This Recipe | Yes (e.g., Fat Daddio’s) | No |
| Ease of Cleaning | Easy, non-stick surfaces available | Can be more difficult |
Following these tips guarantees a moist result with deep chocolate flavor. Your ingredients and effort will shine through in every slice.
Creative serving ideas and toppings
The final flourish on your dessert can transform it from great to unforgettable. A few simple additions elevate each slice into a custom creation.
Enhancing with fresh fruits and powdered sugar
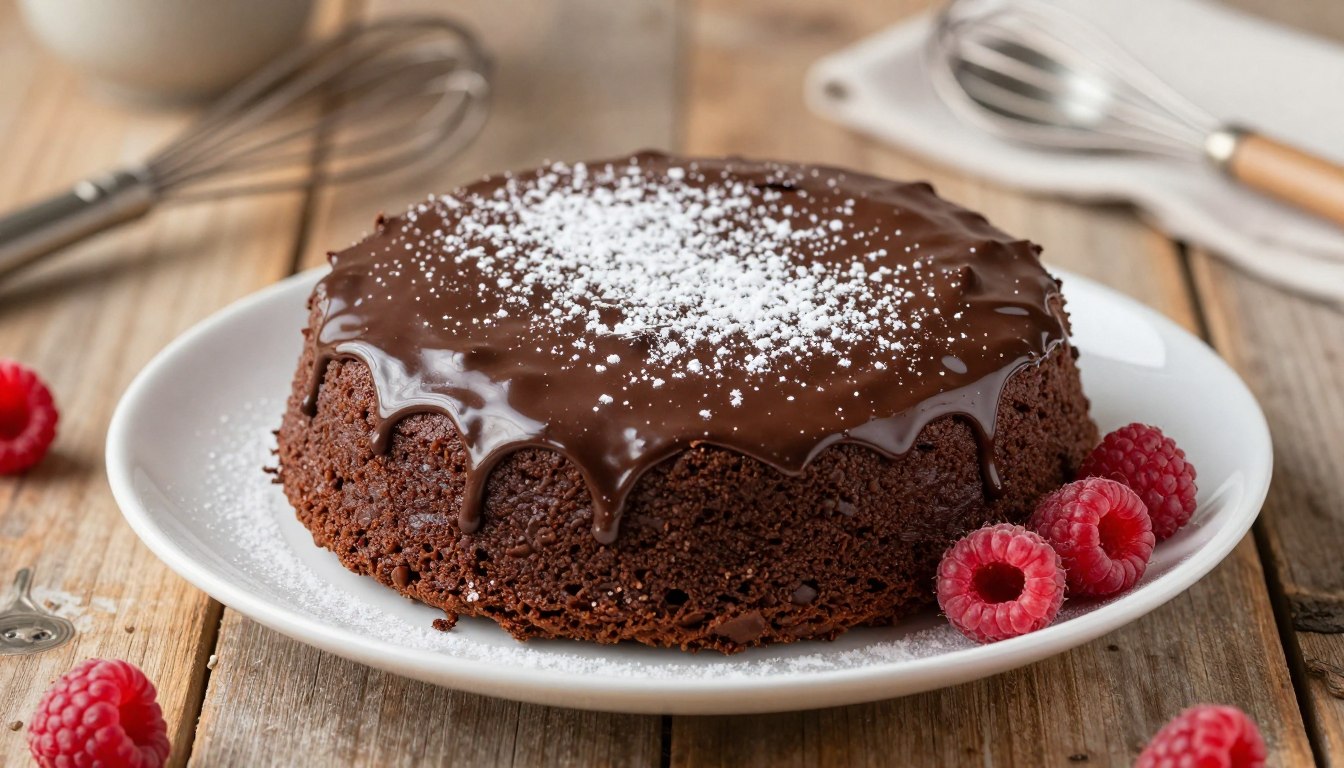
Fresh raspberries provide a tart contrast to the deep, intense flavor. Their bright acidity cuts through the richness beautifully.
A light dusting of powdered sugar over the top creates an elegant, professional finish. It’s perfect for dinner parties.

Adding whipped cream, ice cream, or ganache
For a classic pairing, add a dollop of freshly whipped cream. A scoop of high-quality vanilla ice cream also works wonders.
For ultimate indulgence, drizzle with a silky chocolate ganache. The secret is a 1:1 ratio of chocolate chips to heavy cream.
Warm the liquid and pour it over the chips. Stir until smooth and glossy. Let it cool slightly before pouring over your cake.
Here are a few more tips for serving:
- Use a hot knife for clean, sharp slices.
- Garnish with mint leaves for a pop of color.
- Serve with a side of fresh berries.
Make ahead strategies and storage solutions
Smart storage is the secret to enjoying your decadent creation beyond the day it’s made. Proper preservation locks in the deep flavor and perfect texture of your flourless chocolate cake.
Refrigeration, chilling, and freezing methods
For short-term keeping, place your 8 inch round cake in an airtight container. It will stay fresh in the refrigerator for up to three days. This method is ideal if you baked it ahead for an event.
Need to store it longer? You can freeze this flourless treat for up to two months. Wrap it securely in plastic wrap, then foil. This double layer prevents freezer burn and preserves quality.
Thaw any frozen portion in the fridge overnight. This slow process helps it regain that fudgy consistency. Always serve it chilled for the best experience.
If you prefer a softer bite, let it sit at room temperature for about 15 minutes before slicing. This brief rest enhances the chocolate notes.
Conclusion
You’ve just discovered the blueprint for a dessert that defines indulgence. This flourless chocolate cake delivers a professional, gluten free experience right in your kitchen.
Remember, your final masterpiece relies on the quality of your ingredients. Premium cocoa and fine chocolate chips build an unforgettable flavor.
Top your creation with fresh raspberries, a dollop of cream, or a drizzle of silky ganache. Each option adds a personal, impressive touch.
We hope your baking journey is as rewarding as enjoying every sublime slice. This treat is sure to become a cherished favorite for any occasion.
Your email will not be published publicly.