
Easy pistachio frangipane tart recipe : perfectly elegant
Remember that last dinner party where you wanted to serve something truly special? You likely stared at the store bought options, wishing for a homemade centerpiece that felt both elegant and approachable.
That exact feeling inspired food expert Dikla Levy Frances to create this stunning dessert. Her guide turns what seems complex into a simple, joyful process for your kitchen.
You get a buttery, flaky crust holding a creamy, vibrant green filling. The rich, nutty flavor profile is a surefire way to elevate any celebration, from holidays to casual family gatherings.
We’ll walk you through each step. You’ll discover the simple science behind that perfect, golden brown finish. Let’s begin this delicious baking adventure together.
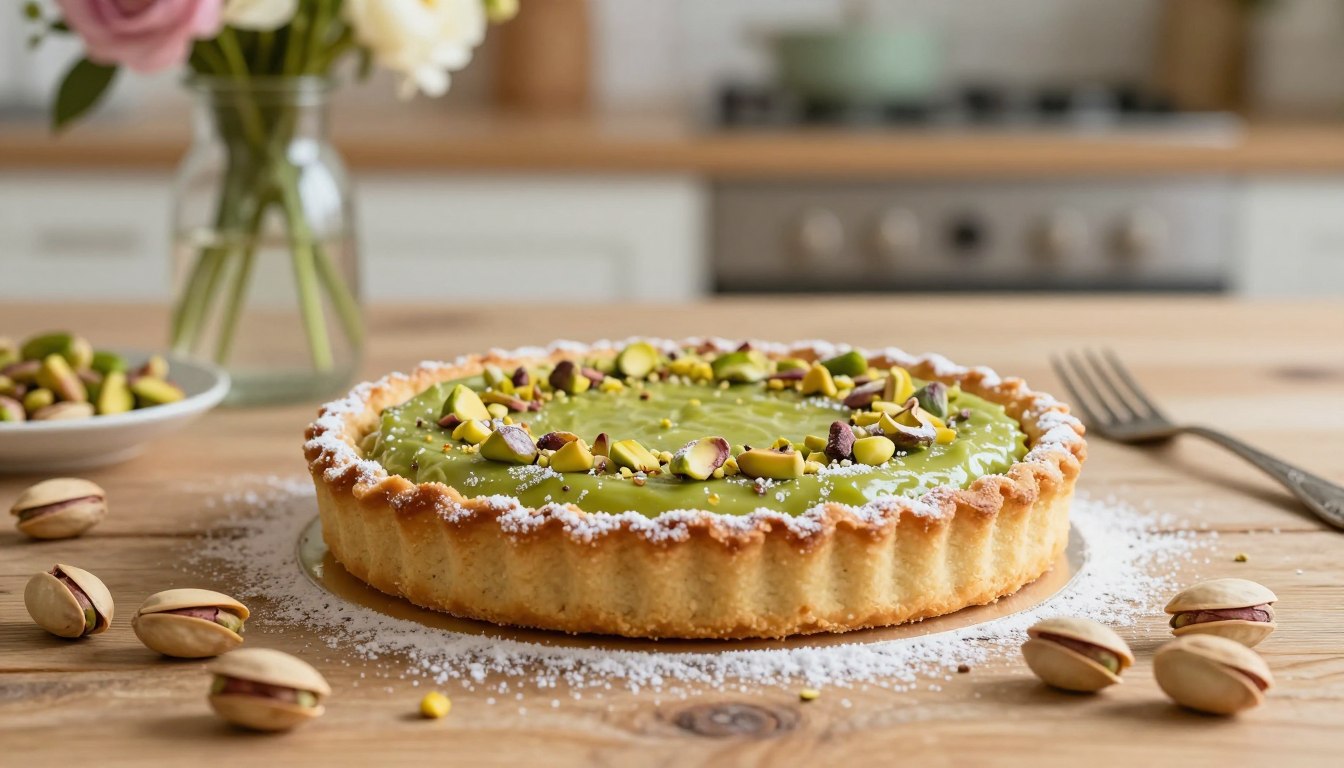
The pistachio frangipane tart elevates the beloved French frangipane tradition with vibrant green pistachios that add both stunning color and sophisticated nutty flavor to the classic almond cream filling. This elegant dessert exemplifies the refined techniques found in top 10 classic French dessert recipes from France, where buttery pâte sucrée meets smooth pistachio cream for a bakery worthy presentation. Following these 6 perfectly elegant steps transforms simple ingredients into an impressive centerpiece that captures the essence of French pastry artistry.
Introduction to your new favorite dessert
A vibrant, nutty centerpiece can transform any gathering into a special occasion. This creation moves beyond the ordinary, offering a taste of something truly exceptional right from your own kitchen.
What makes this tart special
At its heart is a rich, nutty cream filling. It serves as a gourmet upgrade to traditional almond based pastry ideas. The unique frangipane gets its bold character from finely ground pistachio.
This swap creates a distinct and memorable experience. Every bite balances a sophisticated earthiness with just the right sweetness.
How it elevates your dessert table
Your spread gets an instant visual pop from the filling’s beautiful green hue. It looks like a professional showstopper but requires only basic kitchen tools.
The versatile recipe pairs beautifully with fresh fruits or a simple, buttery crust. This elegant tart ensures your dessert table feels curated and complete.
Ingredients and essential tools
Your journey to a stunning dessert starts with a well stocked pantry and a few key tools. Having the right ingredients and equipment ready makes the entire process smooth and enjoyable.

- 11 & 9 inch tart pans + 2 mini pans. Removable bottom, non stick, carbon steel. Perfect for quiche & pie.
- Don’t miss our gluten free lemon drizzle cake,Try our mochi ice cream recipe and strawberry icebox cake.
Detailed ingredient list & substitutions
Begin by gathering high quality unsalted butter, granulated sugar, and all purpose flour. These form the foundation of your crust.
For the signature flavor, you’ll need fresh pistachios. Using roasted nuts is highly recommended. The heat brings their oils to the surface for a deep, complex flavor.
If you need a swap, cornstarch can replace some flour. It helps manage moisture and keeps your shape tidy during baking.
Must have kitchen equipment
A standard 8 or n9 inch tart pan is non negotiable. It ensures even baking and that beautiful, professional shape.
You’ll also need a sturdy mixing bowl for combining your components. For the creamy filling, plan on about 1 ½ to 2 cups of the nutty cream to fill your pan perfectly.
Step by step preparation process
Transforming simple ingredients into an elegant creation is easier than you think with clear guidance. This part breaks the work into two main phases: building the foundation and crafting the star of the show.
Preparing the crust and dough
Begin with your food processor. Pulse the flour, sugar, and salt until the mixture looks like fine sand. This sandy texture is your goal for a tender crust.
If you don’t own a processor, you can mix by hand. Be gentle to avoid overworking the butter. Once formed, wrap the dough tightly and chill it. This rest lets the flour hydrate and prevents shrinking later.
Mixing the nutty filling
Now, use that clean food processor again. First, process the roasted pistachio nuts with sugar and a bit of flour into a fine powder. A smooth powder is key for a creamy texture.
Next, add your eggs one at a time. Let each egg blend in fully before adding the next. This careful process ensures your filling is luxuriously smooth and holds its shape perfectly when baked.
Mastering the pistachio frangipane tart recipe
The secret to a truly memorable treat is a luxuriously smooth and creamy interior. This guide focuses on the specific methods that guarantee a rich and uniform result every single time.

Key techniques for creamy consistency
Start with your butter at room temperature. This allows it to blend seamlessly with the sugar, creating a perfectly smooth base for your nut mixture.
When you add the prepared mixture to the shell, spread it evenly across the bottom. This prevents uneven baking and ensures a uniform texture from edge to center.
The binding power of the eggs is crucial. They create a rich, stable structure that holds its shape beautifully when sliced. If your blend seems too thick, a gentle re whip can restore that airy, light feel.
Mastery comes from understanding how the natural oils from the nuts interact. They combine with the sugar and flour to form that desirable, paste like consistency.
Key baking techniques and helpful hacks
Whether you’re a gadget lover or a hands-on baker, there’s a perfect method for you. Small choices during prep and baking have a huge impact on your final, beautiful result.
Using a food processor vs Hand mixing
Your food processor is a major time saver. You can grind nuts into a fine powder and mix your pastry dough in the same bowl. This clever hack means less cleanup.
If you prefer mixing by hand, ensure your butter is very soft or melted. This helps distribute the fat evenly for a consistent texture.
| Method | Best for | Key tip | Prep time |
|---|---|---|---|
| Food processor | Speed & consistency | Pulse in short bursts | Fast (~5 min) |
| Hand mixing | Control & feel | Use very soft butter | Moderate (~10 min) |
| Whipped ganache (topping) | Luxurious finish | Use a 3:1 ratio of cream to chocolate | Extra 10 min |
Piping techniques and even baking tips
Piping your filling into the shell is a helpful trick. It gives you perfect control and prevents sliding, especially if you’ve added a jam layer.
Always start with a preheated oven at 400°F. This high temperature ensures a crisp crust and a filling that puffs up golden.
Keep a close eye during the final 10 minutes. This watchful step stops the edges from browning too fast before the center sets.
Flavor enhancement and aroma boosters
Think of your filling as a blank canvas, ready for a touch of aromatic magic. A few simple additions can elevate your dessert from delicious to truly extraordinary.
Incorporating vanilla extract and citrus zest
Begin with a teaspoon of vanilla extract. This ingredient adds a warm, complex depth that beautifully complements the nutty base. It enhances the overall aroma without being overpowering.
For a bright, lively contrast, fold in a teaspoon of fresh orange or lemon zest. The citrus cuts through the richness and adds a refreshing layer.
If using almond extract, start with only a quarter teaspoon. Its potent flavor can easily dominate the more delicate, earthy notes.
The combination of vanilla and citrus creates a perfectly balanced profile. Always measure your extract carefully. A small amount of high quality vanilla transforms the entire sensory experience.
Creative pairing and presentation ideas
The final flourish of your dessert is where your personal style truly shines. Thoughtful garnishes and plating turn your homemade creation into a culinary masterpiece.
This is your chance to add color, texture, and a professional finish.
Garnishing with fresh fruits and nuts
Fresh fruits add a vibrant, juicy contrast. Anjou pears are an ideal choice because they hold their shape beautifully during baking.
For a pop of color, try fresh raspberries. As Lindsay Landis, creator of a popular raspberry version, suggests, a sprinkle of chopped pistachios on top adds an elegant, crunchy texture.
- A ring of thinly sliced pears fanned across the top.
- A handful of whole berries scattered for a rustic look.
- A dusting of powdered sugar just before serving.
Plating tips for special occasions
For a clean, sharp slice, chill your finished pastry for a few hours before serving. This sets the filling perfectly.
Place each slice on a clean plate. Add a dollop of whipped cream or a scoop of vanilla ice cream beside it. The cool cream contrasts wonderfully with the warm, rich dessert.
For a truly showstopping look, use a piping tip to add delicate swirls of chocolate ganache on top. This simple trick makes it look like it came from a fancy bakery.
Storage, freezing, and leftover tips
Your beautiful dessert deserves to stay fresh and delicious long after the last slice is served. With a few simple steps, you can preserve its texture and flavor perfectly.

Guidelines for refrigerator and freezer storage
For short term keeping, place any extra nut cream in an airtight container. Store it in the fridge for up to five days. This lets it firm up nicely for later use.
Leftover tart slices also need an airtight container. This locks in moisture for the pistachio filling and keeps the pastry crisp.
Planning ahead? You can freeze the creamy filling for up to two months. First, mound it over plastic wrap. Then, seal it in a freezer-safe container.
When ready to use, thaw the frozen cream in your fridge for 8 to 12 hours. This slow process restores the right consistency.
If your refrigerated filling gets too firm, don’t worry. Let the container sit at room temperature for a few hours. A warm water bath can also soften it gently.
Final thoughts and encouragement
Stepping back to admire your finished creation is a moment of pure pride. Mastering this recipe might take a few hours, but the result is a professional grade tart that will impress everyone.
Remember to process your sugar and pistachio powder until very fine. This ensures the smoothest texture for your filling.
Don’t be discouraged if your first pastry crust needs a few extra minutes on a floured surface. A little patience with the sugar and dough pays off.
By carefully measuring your ingredients, you’re well on your way to expertise. We encourage you to experiment with different fruit pairings alongside the pistachio filling.
The versatility of this tart allows for endless creativity in your kitchen. Your next recipe adventure is just a few minutes away!
Conclusion
You’ve now mastered a dessert that balances homemade charm with gourmet flair. This rewarding recipe brings simple ingredients together into a sophisticated pastry. With just a few minutes of prep and a little patience, you achieve a professional result.
Enjoy the process of rolling the dough on your floured surface. Watch the pistachio filling puff into a golden masterpiece. A fine, ground powder is key for that creamy texture.
Whether you serve this elegant tart within a couple of hours or save it, it stays delicious. Thank you for following our guide. We can’t wait to see your custom creations.
Your email will not be published publicly.