
How to make a rosette cake perfect for any occasion
Did you know that over 70% of party guests say a dessert’s visual presentation is what makes it most memorable? Creating a stunning centerpiece doesn’t require professional pastry training.
This guide is born from a real celebration. The author crafted this very dessert for her eldest daughter’s 8th birthday party, featuring a charming high tea theme. It was a total success.
You can achieve the same minimum effort, maximum impact result. We provide a professional recipe that guarantees a firm, moist crumb. This texture is ideal for holding beautiful buttercream swirls.
Whether you’re new to baking or have years of experience, this sophisticated design offers a gorgeous alternative to fondant. You’ll learn the essential techniques to ensure your final creation is as delicious as it looks.
Getting started with your rosette cake
Before you preheat your oven, understanding the full scope of this dessert project will set you up for a smooth experience. The total time from start to finish is approximately four and a half hours. This includes preparation, baking, and cooling periods.
Understanding the recipe overview
Managing your schedule effectively is key. A double-layer design allows for two rows of buttercream swirls on the sides. This creates a stunning visual impact.
The structure relies on a dense mud cake base. This firm texture provides necessary stability for the decorations. Many desserts lack this structural integrity, but these cakes are built to last.
Why choose a rosette cake for any occasion?
This elegant dessert is incredibly versatile. It’s perfect for baby showers, Mother’s Day, or any special celebration. Your homemade treat will stand out with its sophisticated look.
Showcasing your piping skills is far more impressive than a standard flat frosted dessert. By planning ahead, you ensure the layers are fully cooled before decorating. This attention to detail guarantees a professional result that guests will admire.
Key ingredients and essential tools
Success in baking often starts with quality ingredients and the right equipment. Having everything measured and ready makes the entire process enjoyable and efficient.
Ingredient breakdown: cake, ganache, and buttercream
Your mud cake base needs 500g of butter and 400g of high quality dark chocolate. This creates a rich, intense flavor. The firm texture is perfect for holding decorations.
For the ganache and buttercream, you’ll need confectioners’ sugar and more butter. Professional bakers prefer gel food coloring. It tints frosting without making it runny.
Must have baking tools and piping tips
The right tools turn a good dessert into a great one. A reliable piping bag is non negotiable. Pair it with a star tip, like the Wilton 1M.
This specific piping tip creates the classic swirl for your rosette design. Always ensure the tip is clean before you start. A small blockage can ruin your swirls.
| Tool | Purpose | Key feature |
|---|---|---|
| Piping Bag | Holds frosting for precise application | Disposable or reusable; must be sturdy |
| Star Tip (Wilton 1M) | Creates consistent buttercream swirls | Open star design for defined petals |
| Sturdy Spatula | Mixes batter and spreads frosting | Flexible yet firm blade for control |
| Gel Food Coloring | Tints buttercream vibrant colors | Won’t water down frosting consistency |
| Measuring Tools | Ensures accurate ingredient amounts | Scales and cups for precision |
Preparing the perfect cake layers
Achieving a moist yet sturdy crumb for your layers ensures they can support the beautiful decorations to come. This stage is all about precision and patience.
Mixing your batter for a firm yet moist crumb
Begin by preheating your oven to 180°C (355°F) conventional or 160°C (320°F) fan-forced. Grease two 23 cm (9-inch) round springform pans. This temperature range gives your dessert an even rise.
Your batter needs careful mixing. Whisk the eggs and cocoa powder thoroughly into your melted chocolate mixture. Adding two cups of cold water helps cool everything gradually. This prevents the eggs from scrambling.
Pour the mixture evenly into your prepared pans. The baking time is roughly one hour and thirty minutes. Check for doneness with a skewer inserted into the center.
Leave the layers in their pans for ten minutes after baking. Then transfer them to a wire rack. Let them cool completely before you handle them further.
| Parameter | Specification | Purpose |
|---|---|---|
| Oven Temperature | 180°C (355°F) conventional / 160°C (320°F) fan-forced | Ensures even rise without burning edges |
| Pan Size | Two 23 cm (9-inch) round springform pans | Creates uniform layers for stable stacking |
| Baking Time | Approximately 1 hour 30 minutes | Achieves a cooked center and firm crumb structure |
| Cooling Time | 10 minutes in pan, then fully on rack | Prevents sinking and sets the internal structure |
Crafting a rich chocolate ganache
A rich, glossy ganache not only adds intense flavor but also acts as a crucial structural element in your layered creation. This firm disc sits between your baked layers, locking in moisture and providing a decadent contrast.

Steps for a glossy, smooth ganache
Begin by heating your heavy cream in a saucepan until it just reaches a simmer. You should see small bubbles form around the edges. Immediately pour the hot cream over finely chopped chocolate in a large heatproof bowl.
Let this mixture stand untouched for exactly three minutes. This allows the heat to gently melt the chocolate without scorching it. After the time is up, whisk everything together slowly from the center outward.
Your goal is a completely smooth and shiny mixture with no lumps. Pour the warm ganache into a 23 cm (9 inch) springform pan that you’ve lined with baking paper. This creates a perfectly round, firm disc as it sets.
- Transfer the pan to your refrigerator.
- Let the ganache chill until it is completely firm. This usually takes a few hours.
- A set disc is much easier to handle when stacking your dessert layers.
This process ensures your ganache layer is ready to provide that luxurious texture and stability. It’s the hidden secret to a professional-tier dessert.
Mastering the swiss meringue buttercream
Unlike standard frostings, Swiss meringue buttercream offers a uniquely light texture and a glossy finish perfect for piping. Your success starts with a completely clean mixing bowl. Any trace of water or fat can prevent the egg whites from whipping properly.
Achieving the perfect consistency and gloss
Whisk the egg whites and sugar over a double boiler until the sugar dissolves. Then transfer to your mixer. Beat the meringue for about 10 minutes until it is fluffy, glossy, and fully cool.
Next, add softened butter one piece at a time. Do this slowly by hand while the mixer runs on low speed. This method creates a smooth and stable buttercream that holds its shape beautifully.
Even tinting and flavoring techniques
Incorporate a teaspoon of vanilla extract at the very end. This adds a classic vanilla flavor that complements rich chocolate layers perfectly.
If you wish to color your buttercream, always use gel-paste food coloring. These vibrant hues won’t thin out your frosting. Your decorated dessert will look stunning for hours.
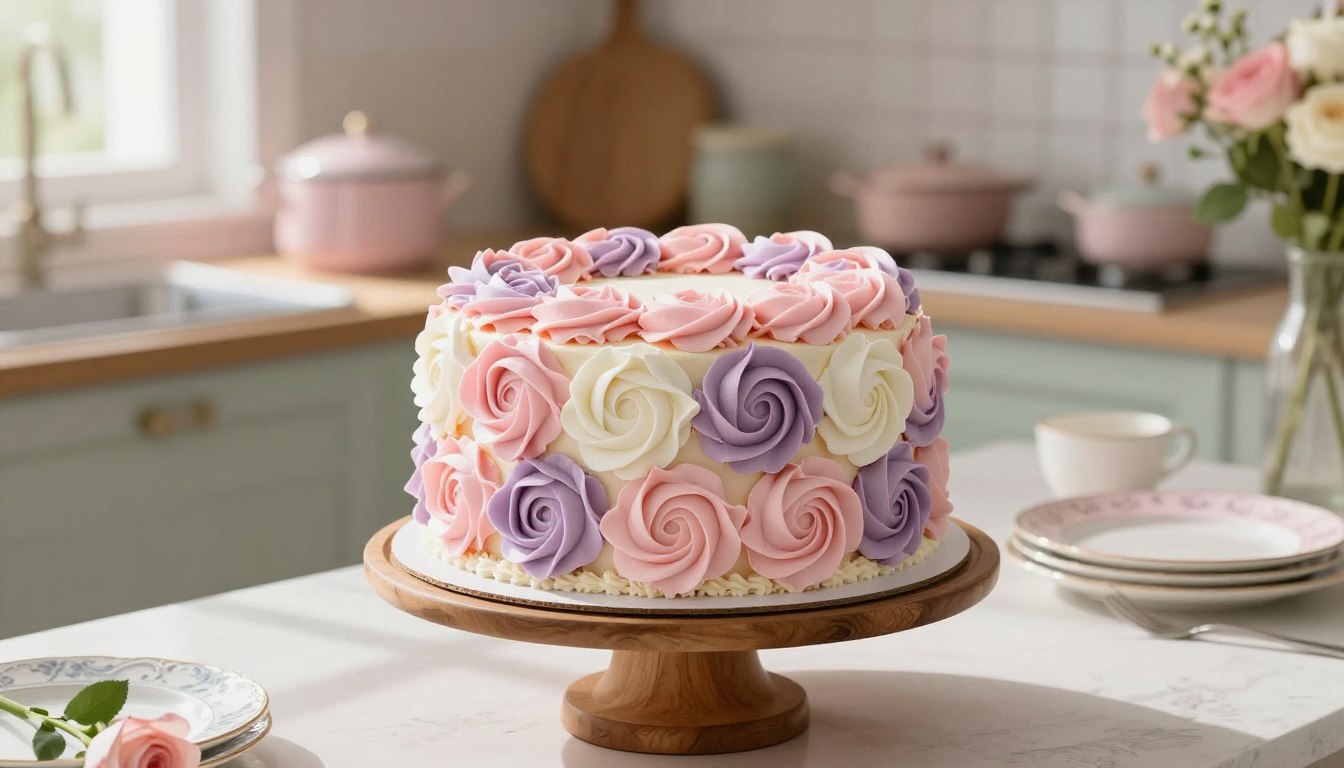
Expert piping techniques for beautiful rosettes
The artistry of your dessert truly comes to life when you master the swirl of a piping bag. These final touches transform your creation into a visual masterpiece. Let’s focus on the core skills for flawless buttercream flowers.

- 4 Pcs Baking Strips Perfect for baking a flat, even Rosette Cake. These absorbent cotton strips wrap around your cake pan to prevent doming and cracking. Ideal for kitchen, bakery, and restaurant use. Get professional results at home.
- Don’t miss our hummingbird cake recipe, carrot cake with brown butter frosting and pistachio cake.
Preparing your piping bag and star tip
First, securely attach a Wilton 1M star tip inside your bag. This prevents messy leaks. Fill it only two-thirds full with your buttercream. Twist the top tightly for superior control in your hand.
Perfecting the circular motion for rosette shapes
Hold the bag straight up and down. Start in the center and apply steady pressure. Move in a smooth, outward spiral to the edge. Practice this motion on parchment paper first. It builds essential muscle memory.
Overcoming common piping challenges
If your frosting softens, just chill the filled piping bag briefly. Keep a perpendicular angle for uniform swirls. To finish cleanly, stop pressure and flick the tip slightly. This hides the tail under the next flower.
Assembling and decorating your rosette cake
A flawless finish begins with a simple yet crucial step: applying a thin, sealing layer of frosting. This phase locks in your layers and sets the stage for the beautiful buttercream flowers that define your creation.
Applying a crumb coat for a clean base
Start by spreading a very thin layer of buttercream over the entire assembled dessert. This initial coat traps any loose crumbs. Your final layer will stay perfectly clean.
Chill the cake in your refrigerator until the coat is firm to the touch. This creates a stable, cool canvas. Your piping will be much easier on this solid base.
Strategic placement of rosettes for maximum impact
Before you pipe, use an offset spatula to lightly mark guidelines around cake. This ensures your rows of rosettes are evenly spaced. Planning is key for a professional look.
Fit your piping bag with the Wilton 1M star tip. Fill the bag two thirds full with your colored buttercream. Follow these steps for the best design:
- Begin piping from the bottom row and work upwards. This supports the weight of the decorations.
- Pipe each flower carefully, using a steady, circular motion.
- Fill any small gaps between rosettes with a simple star-shaped dollop of buttercream.
Working methodically from the sides to the top creates a stunning, full effect. Your elegant dessert is now ready to impress.
Creative variations and flavor twists
Your homemade creation becomes uniquely yours when you experiment with simple creative twists. This is where you can truly personalize your dessert for any specific event.

Exploring color ombre and custom frosting ideas
For a stunning visual, try an ombre effect. Divide your buttercream into separate bowls. Tint each portion with slightly deeper shades of the same color.
When you pipe your rows, the gradient will highlight the texture of your swirls beautifully. Experimenting with different piping tips also changes the look.
A smaller star tip creates tight, defined flowers. A larger open tip makes softer, more open shapes.
Adding unique flavors and textural elements
To deepen the chocolate flavor, replace half the water in your batter with strong brewed coffee. This significantly enriches the cocoa profile.
For a fruity contrast, add a thin layer of raspberry jam between your layers. It provides a subtle tang against the rich ganache.
These clever twists allow you to customize your creation. Your final presentation will feel truly unique and professional.
Storage, slicing, and presentation tips
The final steps of storage and presentation are just as important as the baking and decorating process. Your beautiful dessert needs proper care to stay fresh and look its best when served.
Best practices for refrigeration and freezing
Keep your creation in an airtight container in the fridge for up to five days. This preserves the flavor and texture of your buttercream.
For longer storage, freeze the individual layers before assembly. Wrap them tightly in plastic wrap. They will stay firm for about one month.
Techniques for clean slices and elegant presentation
Always bring your dessert to room temperature before serving. This allows the buttercream to soften slightly. The flavors will develop fully.
For perfect slices, warm your chef’s knife under hot water. Wipe it dry between each cut. This technique gives you clean edges that show off all the beautiful layers.
Follow these simple tips to showcase your hard work. Your guests will admire both the taste and presentation of your homemade masterpiece.
Conclusion
Your journey from mixing batter to piping the final swirl results in a dessert that delights both the eyes and the palate.
Mastering the art of the rosette cake is a rewarding experience. It blends precise baking with creative decorating techniques. Your guests will be impressed by the final presentation.
By following this recipe, you learned to balance rich chocolate layers with stable, glossy Swiss meringue buttercream. This achieves a professional finish for any special occasion.
Remember, practice is key for piping skills. Do not hesitate to experiment with your piping bag and star tip. Each attempt builds your confidence.
With the right storage tips and assembly techniques, your homemade creations stay fresh and beautiful. They are perfect for celebrations with friends and family.
We hope this guide gave you the confidence to tackle your own design. Share your delicious treats and enjoy the compliments.
Your email will not be published publicly.