
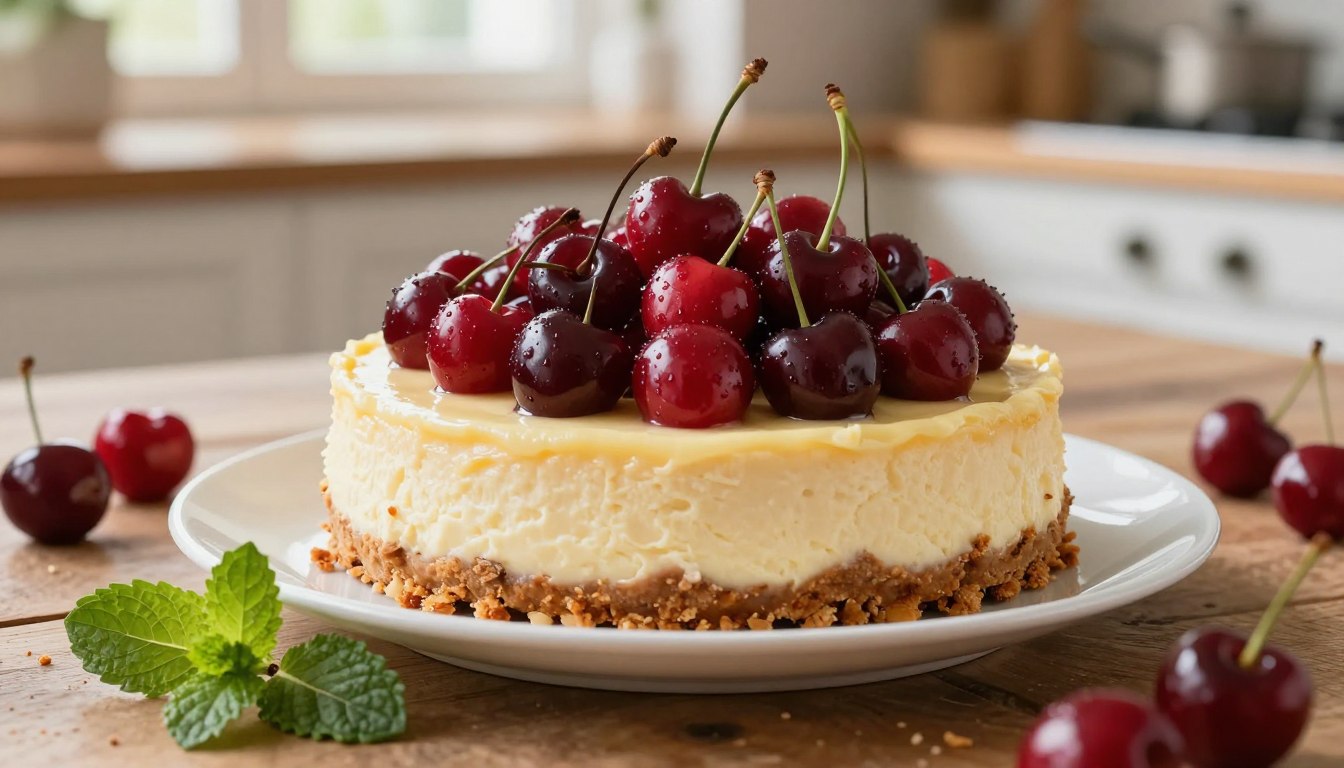
Easy cherry cheesecake recipe to impress your guests
Did you know that Americans consume over 30 million pounds of cheesecake each year? This creamy dessert ranks as one of the top three most requested treats at dinner parties across the United States. Your guests will be amazed when you serve them a homemade cherry cheesecake that tastes like it came from a professional bakery.
An easy cherry cheesecake recipe doesn’t need to be complicated. You can create a stunning dessert with basic ingredients and minimal time in the kitchen. Whether you’re baking for a special celebration or just want to treat your family to something delicious, this cherry cheesecake recipe delivers impressive results every single time.
The beauty of making your own cheesecake lies in how simple it really is. You won’t need fancy equipment or advanced baking skills. The creamy filling pairs perfectly with the sweet and tangy cherry topping. Your guests will ask for the recipe after tasting this show-stopping dessert.
In this guide, you’ll discover everything you need to know about making an easy cherry cheesecake. From selecting the right ingredients to mastering the baking process, you’ll learn insider tips that guarantee success. Get ready to become the dessert star at your next gathering with this cherry cheesecake that’s both beautiful and delicious.
This easy cherry cheesecake recipe is the creamiest dessert you’ll ever make at home! According to BBC Good Food, cheesecake is one of the most beloved desserts worldwide and this version proves exactly why. Love creamy no bake treats? Try our Philadelphia Cheesecake No Bake or our crowd favorite Biscoff Banana Pudding for more irresistible inspiration!
Discover more incredible no bake recipes in our ultimate guide to no bake desserts easy to make your complete collection!
Introduction to cherry cheesecake recipe
When you think of elegant desserts that impress your guests, a delicious cherry cheesecake stands near the top of the list. This dessert combines rich, creamy textures with bright, fruity flavors in a way that feels both special and comforting. Understanding the story behind this beloved treat helps you appreciate why you’re making something so timeless and cherished.
A brief history of cheesecake
Cheesecake has roots that stretch back thousands of years. Ancient Greeks created early versions of this dessert, combining cheese with honey and wheat. When the Romans conquered Greece, they brought these recipes home and adapted them with their own ingredients and techniques.
The dessert evolved dramatically over centuries. During the Middle Ages and Renaissance, European bakers developed richer, creamier versions using cream cheese. When immigrants brought their recipes to America, cheesecake became a signature dessert in New York City. American bakers perfected the cream cheese filling, creating what we recognize today as the classic cherry cheesecake that appears at celebrations and dinner tables across the country.
The allure of cherry topping
Cherries make the perfect partner for creamy cheesecake. The sweet and tart flavor of fresh cherries cuts through the richness of the filling beautifully. This balance creates a delicious cherry cheesecake that tastes sophisticated without feeling too heavy.
Beyond taste, cherries bring visual appeal to your dessert:
- Vibrant red color that catches the eye
- Glossy finish that looks professionally made
- Natural sweetness that complements cream cheese
- Tangy notes that refresh your palate
The combination of creamy filling and bright fruit has made cherry topped cheesecake a beloved choice for generations of home bakers and professional pastry chefs alike.
Ingredients you will need
Building a delicious homemade cherry cheesecake starts with gathering the right ingredients. You’ll need items for three main components: the creamy filling, the crunchy crust, and the beautiful cherry cheesecake topping. Having everything measured and ready before you begin makes the baking process smooth and stress free. Let’s break down exactly what you’ll need for each part.
Essential ingredients for the filling
The filling is the heart of your homemade cherry cheesecake. You’ll want to gather these ingredients in the amounts shown below:
- 8 oz cream cheese (softened to room temperature)
- 1/2 cup granulated sugar
- Zest of 1 fresh lemon
- 1 teaspoon vanilla extract
- 1 tub (8 oz) Cool Whip whipped topping (thawed)
The softened cream cheese is crucial. Cold cream cheese creates lumps and bumps in your filling. The lemon zest brings brightness and depth to the flavor. You can swap granulated sugar for powdered sugar if you want an even silkier texture in your filling.
The perfect crust ingredients
Your crust provides the foundation for everything above it. Gather these simple items:
- 1 1/2 cups graham cracker crumbs
- 1/3 cup granulated sugar
- 1/4 cup unsalted butter (melted)
Graham crackers create that classic, crunchy base everyone loves. The melted butter binds the crumbs together perfectly. This mixture forms a firm foundation that holds your cheesecake beautifully.
Cherry topping essentials
The cherry cheesecake topping is what makes this dessert truly special. You’ll need just one main ingredient:
- 1 can (21 oz) cherry pie filling
Canned cherry pie filling offers convenience and consistent results. You can also make your own cherry cheesecake topping using fresh or frozen cherries if you prefer homemade flavors. Either way, this vibrant topping crowns your creation with beautiful color and delicious taste.
Equipment required
Making the best cherry cheesecake starts with gathering the right tools. You don’t need fancy equipment or a professional kitchen to create something amazing. The tools you’re about to discover will make your baking experience smooth, enjoyable, and successful. Let’s explore what you need to have on hand before you begin mixing your ingredients.
Baking and mixing tools
Your foundation for the best cherry cheesecake begins with a 9 inch springform pan. This special pan releases easily from the sides, giving you that perfect presentation your guests will love. You’ll want to gather mixing bowls in different sizes for combining your ingredients separately.
An electric mixer or sturdy whisk is essential for beating your cream cheese until it reaches a smooth, creamy texture. If you don’t own a food processor, don’t worry. A sealed plastic bag and rolling pin work perfectly for crushing graham crackers for your crust. A rubber spatula becomes your best friend for gently folding ingredients and scraping down the sides of your bowls.
- 9 inch springform pan for easy removal
- Multiple mixing bowls in various sizes
- Electric mixer or whisk
- Food processor or rolling pin
- Measuring cups and spoons
- Rubber spatula for folding

Serving and storage utensils
After you create your best cherry cheesecake, you’ll need tools to serve and store it beautifully. Plastic wrap or aluminum foil keeps your cheesecake fresh during chilling. A sharp knife dipped in hot water between cuts creates clean, beautiful slices that impress everyone at the table.
Storage containers are important if you’re preparing your cheesecake ahead of time. An airtight container protects your creation in the refrigerator or freezer.
- Plastic wrap or aluminum foil for covering
- Sharp knife for clean slicing
- Hot water in a glass for knife dipping
- Airtight storage containers
- Cake server or wide spatula for serving
With these simple tools ready, you’re completely prepared to start your best cherry cheesecake adventure.
Step by step instructions
Building your cherry cheesecake dessert requires following a clear process. Each step matters, from the crust to the filling to the final topping. Let’s walk through how to create this impressive treat that will have your guests asking for the recipe.
Preparing the crust
Your crust forms the foundation of your cherry cheesecake bake. Start by combining graham cracker crumbs with melted butter and sugar in a bowl. Mix these ingredients until the texture resembles wet sand.
Press this mixture firmly into the bottom of your springform pan. Use the back of a spoon or a glass bottom to ensure even coverage. This step prevents crumbling when you slice your dessert later.
Bake your crust at 350°F for 8 to 10 minutes until golden brown and fragrant. Remove it from the oven and let it cool slightly before adding your filling.
Making the cheesecake filling
Beat your softened cream cheese until smooth and fluffy. Gradually add sugar, lemon zest, and vanilla extract while beating continuously. This process creates a light texture without lumps.
Gently fold in Cool Whip using a spatula. This technique preserves the airy quality that makes your cherry cheesecake dessert so creamy and delightful. Spread the filling evenly over your cooled crust.
Adding the cherry topping
Spoon cherry pie filling evenly across the top of your cheesecake layer. Spread it carefully to the edges for beautiful presentation. The bright red cherries create a striking contrast against the creamy filling.
Chill your creation for at least 2 hours until completely set. For best results, refrigerate overnight. Your cherry cheesecake bake reaches perfection when firm and ready to serve.
| Step | Task | Time Required | Temperature |
|---|---|---|---|
| 1 | Mix crust ingredients and press into pan | 10 minutes | Room temperature |
| 2 | Bake crust until golden | 8-10 minutes | 350°F |
| 3 | Beat cream cheese and add ingredients | 5 minutes | Room temperature |
| 4 | Fold in Cool Whip gently | 3 minutes | Room temperature |
| 5 | Spread filling over crust | 5 minutes | Room temperature |
| 6 | Add cherry topping evenly | 3 minutes | Room temperature |
| 7 | Chill until set | At least 2 hours | Refrigerator |
Pro tip: Allow all ingredients to reach room temperature before mixing for smoother results in your cherry cheesecake bake.
Tips for a perfect cheesecake
Baking a cherry cheesecake that impresses your guests requires more than just following a recipe. You need to understand the secrets behind achieving that perfect cheesecake texture and creamy cheesecake filling that keeps people coming back for more. Learning from common pitfalls and applying professional baking techniques transforms your dessert from ordinary to extraordinary.
Common mistakes to avoid
Your cheesecake’s success depends on avoiding specific errors that most home bakers make. The biggest problem starts with cold cream cheese straight from the refrigerator. Using chilled cream cheese creates lumps that nearly ruin your creamy cheesecake filling and make smoothing impossible.
Another costly mistake involves overmixing your batter after adding whipped topping. This deflates those precious air bubbles that give your dessert its light quality. You also need to press your crust firmly, especially around the edges. A weak crust crumbles when you slice and serve your masterpiece.
Rushing the chilling process is perhaps the most common error. Skipping overnight refrigeration means your filling stays too soft and won’t hold its shape properly.
Essential baking tips
Professional bakers follow specific steps to guarantee results. Here’s what separates good cheesecake from exceptional:
- Remove cream cheese from the refrigerator about one hour before baking
- Use a food processor to create the finest, evenly-sized graham cracker crumbs
- Press your crust extra firmly at the edges and bottom
- Chill your finished cheesecake overnight for the absolute best perfect cheesecake texture
- Allow flavors to develop fully during the extended cooling period
These tips ensure your cheesecake turns out perfectly every single time you bake it.
Variations of cherry cheesecake
Cherry cheesecake is wonderfully adaptable to your dietary needs and kitchen preferences. You can create delicious versions that work for nearly every situation. Whether you’re avoiding gluten or prefer quick preparation methods, you’ll find options that taste just as amazing as the classic recipe.
Gluten free cherry cheesecake
Creating gluten free cheesecake options is simpler than you might think. The filling and cherry topping stay exactly the same. Your only change involves swapping the crust ingredients.
Instead of traditional graham crackers, try these alternatives:
- Gluten free graham crackers (brands like Mary’s Gone Crackers and Kinnikinnick are widely available)
- Gluten free ginger snaps for added flavor
- Gluten free shortbread cookies for a buttery taste
- Almond flour mixed with melted butter for a grain free option
Mix your chosen crust base with melted butter and sugar, press into your pan, and bake at 325°F for 10 minutes. The rest of your preparation continues as normal.

No Bake Cherry Cheesecake
A no bake cheesecake is perfect for warm weather or when you want to skip oven time. This version keeps you out of the kitchen heat while delivering the same creamy texture.
The main difference involves chilling instead of baking:
- Prepare your crust base in the springform pan
- Chill the crust for 30 minutes to firm it up
- Mix your filling ingredients (the filling recipe stays unchanged)
- Pour filling over the chilled crust
- Refrigerate the no bake cheesecake for 2-3 hours minimum or overnight for best results
- Add cherry topping just before serving
A no bake cheesecake requires patience, but the reward is worth the wait. You’ll achieve the same creamy, delicious dessert without turning on your oven.
Both these variations prove that you can enjoy cherry cheesecake regardless of your dietary restrictions or time available. Your guests will love these adaptable desserts just as much as the original.
Pairing suggestions
Your cherry cheesecake deserves the right companions at the table. The perfect beverage combinations and dessert pairing ideas can transform your dessert experience from good to truly memorable. When you serve your cheesecake, think about what drinks and treats will complement those creamy, fruity flavors best.
Best beverages to serve
Coffee is a classic choice that pairs beautifully with cherry cheesecake. You’ll want to reach for a medium roast that doesn’t overpower the delicate vanilla and cherry notes. Dark roasts can be too bold, while light roasts lack the depth you need.
Beyond coffee, your beverage combinations can include:
- Sparkling water with fresh lemon for a refreshing palate cleanser
- Dessert wines like Moscato or late-harvest Riesling that echo the fruity sweetness
- Champagne or prosecco for special celebrations and elegant gatherings
- Sweet tea for a Southern twist that complements the richness
Complementary desserts and treats
Your dessert pairing ideas don’t stop at the cheesecake itself. When you’re creating a full dessert spread, fresh berries make an excellent addition. Raspberries and blueberries provide bright, tart notes that balance the sweetness.
Consider adding these treats to your table:
- Light cookies like shortbread or biscotti for textural contrast
- Chocolate covered espresso beans for a sophisticated coffee lover’s touch
- Vanilla wafers that won’t compete with your main dessert
- Almond biscotti for a delicate, crunchy element
These thoughtful beverage combinations and dessert pairing ideas show your guests you care about every detail of their experience.
Storing your cheesecake
Proper cheesecake storage keeps your delicious dessert fresh and ready to enjoy for days or even weeks. Your cherry cheesecake deserves the right care to maintain its creamy texture and vibrant taste. Learning the best storage methods ensures you get the most from your baking efforts.
Refrigeration tips
Refrigerating your cheesecake is the primary way to store it after baking. Cover your cheesecake tightly with plastic wrap or aluminum foil to prevent it from absorbing other flavors in your fridge. If you use plastic wrap, place toothpicks around the edge to keep the wrap away from the cherry topping. This simple trick prevents the fruit from sticking to the wrap.
Your refrigerated cheesecake stays fresh for up to 5 days. Keep it in the springform pan for the first day or two to help maintain its shape. After that, you can transfer individual slices to storage containers if you prefer. Your cheesecake will taste best when served chilled straight from the refrigerator.
Freezing your cheesecake
Freezing cheesecake is an excellent option for make ahead entertaining and long term storage. This method works beautifully for both whole cheesecakes and individual slices.
- Wrap individual slices or the whole cheesecake tightly in plastic wrap
- Place a second layer of aluminum foil over the plastic wrap
- Label your package with the date for easy tracking
- Store in the coldest part of your freezer
When freezing cheesecake, proper wrapping prevents freezer burn and keeps your dessert tasting fresh. Your cheesecake maintains excellent quality for up to 2 months in the freezer. The double wrapping technique with both plastic wrap and aluminum foil creates a protective barrier against ice crystals.
Thawing is just as important as freezing. Move your cheesecake to the refrigerator and let it thaw overnight. This slow thawing method prevents condensation from forming on the surface, which would make your cheesecake soggy. Avoid thawing at room temperature, as this can damage the texture and create food safety concerns.
| Storage Method | Duration | Best For | Key Steps |
|---|---|---|---|
| Refrigerator | Up to 5 days | Short term storage | Cover with plastic wrap or foil; keep in springform pan initially |
| Freezer | Up to 2 months | Long-term storage and make ahead meals | Wrap in plastic wrap and aluminum foil; thaw in refrigerator overnight |
Your cheesecake storage choices depend on when you plan to serve it. For immediate enjoyment, refrigeration works perfectly. For future gatherings, freezing cheesecake lets you prepare ahead without stress. Both methods keep your cherry cheesecake safe and delicious when done correctly.
Serving ideas
The way you present your cherry cheesecake can turn a delicious dessert into an impressive centerpiece. Your guests will notice the care you put into every detail, from the moment they see it on the table. Learning proper cheesecake presentation techniques helps you create a dessert that looks as good as it tastes.
Presentation tips
Start by releasing your cheesecake from the springform pan with confidence. Run a thin knife around the edges first to loosen it completely. This simple step prevents chunks from sticking and keeps your dessert looking clean and polished.
When serving cheesecake, your slicing technique matters. Dip your knife in hot water and wipe it clean between each cut. This creates perfectly neat slices with smooth edges that look professionally made. Your cheesecake presentation improves dramatically with this easy trick.
Garnishing options bring visual appeal to your dessert:
- A generous dollop of fresh whipped cream on top
- Fresh cherries with stems still attached for elegance
- A sprig of fresh mint for color contrast
- Light dusting of powdered sugar for a refined finish
- Drizzle of chocolate sauce for richness

Creative serving suggestions
Move beyond the traditional whole cheesecake approach. Individual portions in clear cups or mason jars look absolutely gorgeous and make serving at parties much easier. Your guests enjoy the convenience while you showcase your dessert beautifully.
Try these creative serving cheesecake methods:
- Create mini cheesecake bites in muffin tins for portion control
- Build a dessert board with your cheesecake as the centerpiece
- Surround it with fresh berries, cookies, and chocolate pieces
- Layer cheesecake in clear glasses with cherry topping and whipped cream
- Serve small slices alongside fresh fruit for balance
These approaches demonstrate that you’ve put thought into every aspect of your guests’ dessert experience. Your cheesecake presentation becomes a conversation starter that shows real care and creativity.
Cherry cheesecake for every occasion
One of the best things about cherry cheesecake is how it fits into your life. Whether you’re planning a big event or simply want to treat yourself on a Tuesday evening, this special occasion cheesecake works perfectly. The beauty of this dessert lies in its flexibility. You can dress it up for fancy celebrations or keep it simple for everyday enjoyment.
Celebratory events
Cherry cheesecake shines at parties and celebrations throughout the year. The vibrant red cherries make it ideal for birthdays. Your guests will love taking photos of this stunning dessert for social media. The romantic deep red color makes it perfect for Valentine’s Day dinners. For the Fourth of July, you can add blueberries and whipped cream to create a patriotic red, white, and blue presentation.
A celebration dessert needs to impress, and this cheesecake delivers every time. Dinner parties and potlucks benefit greatly from serving this treat. The real advantage is that you can prepare it completely ahead of time. It travels well and serves a crowd easily.
Everyday treats
You don’t need a special event to enjoy cherry cheesecake. Weekend afternoons are perfect for making this dessert when you’re craving something sweet. The no bake version requires minimal effort for a weeknight treat. Making smaller portions works great for just your household.
Treating yourself and your family to homemade dessert is its own celebration. Every slice of a delicious cheesecake reminds you that simple pleasures matter. Enjoy cherry cheesecake whenever the mood strikes you.
| Occasion Type | Best Features | Preparation Time | Serving Size |
|---|---|---|---|
| Birthday Party | Photogenic, impressive presentation | Advance preparation recommended | 8-12 servings |
| Valentine’s Day | Romantic red color, indulgent flavor | Can be made 1-2 days ahead | 6-8 servings |
| Fourth of July | Red, white, and blue color scheme | Make ahead friendly | 10-12 servings |
| Dinner Party | Travels well, impressive | Prepare 24 hours before | 8-10 servings |
| Weeknight Treat | No-bake option, quick assembly | 30-45 minutes | 2-4 servings |
Make your moments special by serving this delightful cherry cheesecake. Whether it’s your first time or you’ve made it countless times, this dessert brings joy to any table.
Healthier alternatives
You don’t need to skip dessert to stay on track with your health goals. Creating a healthy cheesecake is entirely possible with smart ingredient swaps and creative modifications. Your favorite indulgent treat can transform into a nutritious option that satisfies cravings while supporting your wellness journey.
Low calorie options
Reducing calories doesn’t mean sacrificing the creamy texture you love in a low calorie dessert. Start by swapping regular cream cheese for Neufchâtel cheese, which contains about 30% less fat while maintaining that smooth, rich consistency.
You can blend thick Greek yogurt with your cream cheese to cut calories and boost protein content. This combination creates an unexpectedly delicious filling that feels indulgent without the guilt. Light whipped topping serves as another excellent replacement for heavy cream, saving calories without dramatically changing the dessert’s appeal.
- Use reduce fat cream cheese (Neufchâtel) as your base
- Replace half the cream cheese with plain Greek yogurt
- Choose sugar free whipped topping for toppings
- Select sugar free cherry pie filling
- Make individual mini cheesecakes for natural portion control
Sugar free variants
Managing sugar intake gets easier when you understand which sweeteners work best in cheesecake. Erythritol and stevia measure cup for cup like regular sugar, making substitutions straightforward.
Sugar-free cherry pie filling tastes remarkably similar to traditional versions and is readily available at most grocery stores. Some sugar substitutes may slightly affect texture, so you might need minor adjustments to chilling time. Your healthy cheesecake remains delicious while meeting your nutritional needs.
| Sugar Substitute | Measurement | Best For | Texture Impact |
|---|---|---|---|
| Erythritol | 1:1 ratio | All cheesecake recipes | Minimal |
| Stevia | 1:1 ratio | Filling and crust | Slight crystallization possible |
| Monk Fruit | 1:1 ratio | Cherry topping | Very minimal |
Your journey toward enjoying a low calorie dessert shows that taste and nutrition work together beautifully.
Conclusion and final thoughts
You’ve now learned everything needed for making cherry cheesecake from start to finish. The process breaks down into simple steps that lead to impressive results. You prepare a graham cracker crust, blend together a smooth cream cheese filling, top it with bright cherries, and let it chill until set. Each step builds on the last one, creating a dessert that looks fancy but tastes even better.
Recap of key steps
Let’s walk through what you’ll do when you’re ready to bake. First, you’ll create that perfect crust using graham crackers and butter. Next, you’ll whip up the cream cheese filling, making sure it’s light and airy. Then you’ll pour it over your crust and let it bake until golden. The cherry topping goes on last, adding color and flavor. Finally, patience matters as your cheesecake chills and sets. This straightforward process delivers homemade dessert success that your guests will love.
Encouragement to experiment
Once you master the basic recipe, your kitchen becomes your playground. Try different fruit toppings like strawberry, blueberry, or mixed berry. Switch up your crust with chocolate cookies, vanilla wafers, or even pretzels for a sweet salty twist. Adjust the sweetness to match your taste. Baking is both science and art, meaning you get to play with flavors once you understand the foundation.
Trust your instincts and have fun while making cherry cheesecake. Even if your dessert doesn’t look perfect, homemade treats made with care beat anything from a store shelf. You’re ready to create a cherry cheesecake that will become your signature dessert.
Your email will not be published publicly.