
Homemade mochi ice Cream recipe: The best unique dessert you’ll ever make
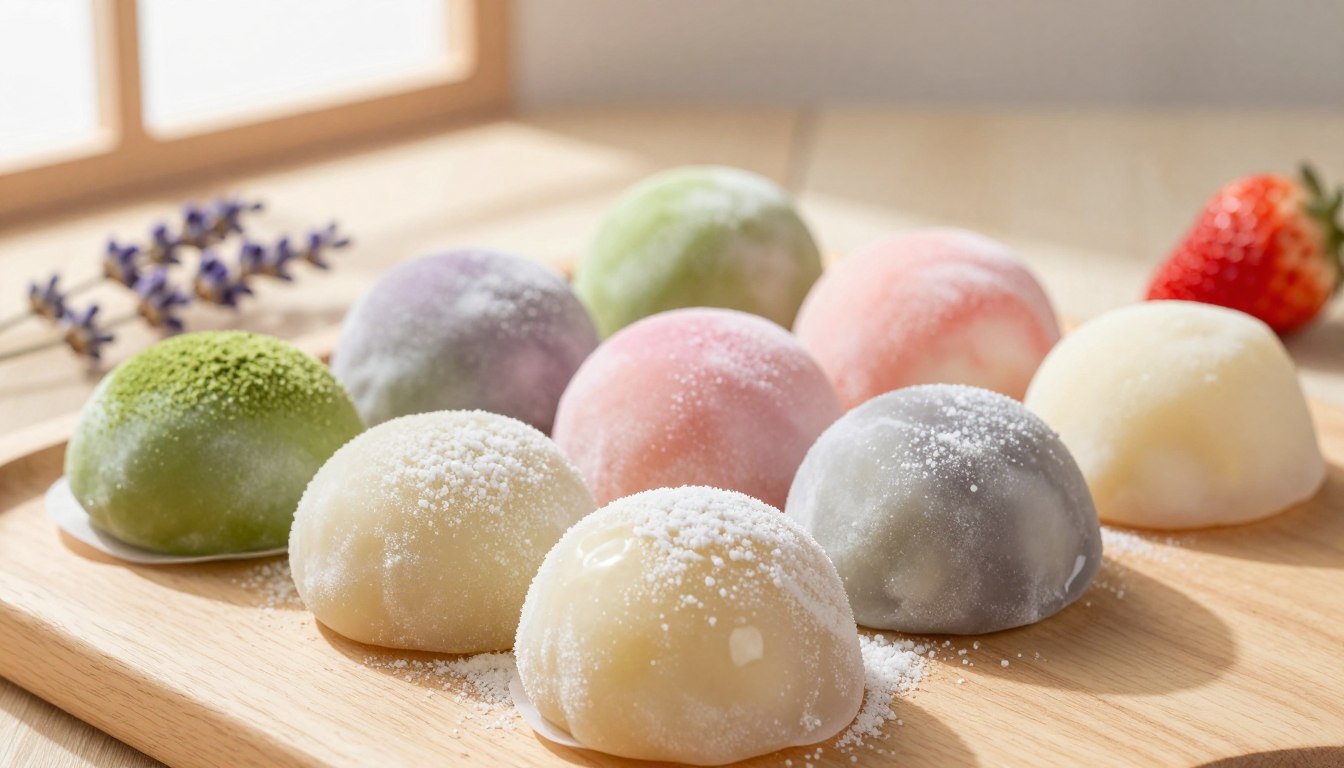
Remember the first time you saw those colorful, dusted balls in the freezer aisle? You were probably just grabbing your regular pint. But there they were, a delightful surprise from Japan, now sitting right next to the classic American brands.
As food expert Gemma Stafford has noted, this unique treat has become a grocery store staple everywhere. It’s a fantastic fusion of textures that catches everyone off guard.
Imagine biting into a perfectly soft and chewy rice cake. Then, you hit the cold, creamy center. That exciting contrast is what makes it so special. It’s a fun eating experience you can’t find with other sweets.
Its journey to popularity in the United States is a great story. It moved from specialized restaurants to mainstream shopping carts. Now, you can find it in stores across the country.
But why just buy it? Making your own version at home unlocks a world of flavor. You get to choose exactly what goes inside. This means you can create a personalized treat that matches your cravings perfectly.
You also enjoy a fresher, superior product. Store bought options can be limited. In your kitchen, you control the quality and the creativity. It’s a rewarding project for any curious cook.
The sweet appeal of mochi ice cream
What began as a niche import has exploded into a mainstream American dessert phenomenon. Recipe developer Cecilia Ryu notes its super trendy status, with availability now at major retailers like Costco. This accessibility proves its widespread sweet appeal.
Why this dessert stands out
Its charm isn’t a mystery. The experience is defined by a thrilling textural contrast. You get a soft, squishy rice dough hugging a perfectly frozen, creamy center.
This fusion creates a unique eating adventure. Other key advantages include:
- Perfect Portion Control: Each piece is a sophisticated, bite sized serving. It satisfies a craving without feeling overly heavy.
- Customizable Core: The center can be any flavor you love, from classic vanilla to vibrant matcha.
Trends in american dessert culture
Modern American tastes have fully embraced this Japanese classic. There’s a growing curiosity to master the delicate, chewy wrapper at home. This trend moves beyond simply buying it.
The versatility ensures its lasting popularity. Whether you prefer traditional flavors or modern twists, this treat adapts. It fits perfectly into a culture that values unique, shareable, and Instagram worthy food moments.
The history and cultural Roots of Mochi
The story of this chewy confection begins not in a modern kitchen, but in the ancient traditions of Japan. Its unique texture comes from a specific type of glutinous rice. This rice is processed into a fine flour and then steamed to create a soft, versatile dough.
Learn more about Mochi on Wikipedia
Ancient Traditions and modern popularity
For centuries, this food held meaning far beyond a simple snack. It was, and still is, a powerful symbol of good fortune. The celebration where it shines brightest is the Japanese New Year.
Families enjoy it to wish for prosperity in the year ahead. The traditional method of preparation is key to achieving that perfect, pillowy chew you love.

How mochi became a global favorite
Its journey to your freezer was a brilliant act of culinary fusion. The classic chewy exterior found a perfect partner in a cold, creamy center. This pairing bridged deep tradition with modern, global tastes.
Understanding these cultural roots helps you appreciate the texture. It turns your kitchen project into a connection with history. Today, its popularity spans continents, proving ancient traditions can deliciously adapt.
Essential ingredients and tools
The secret to that perfect, chewy texture lies in one specific type of flour. Gathering the correct supplies before you start is your most important task. This ensures your kitchen project is fun and frustration-free.
Key ingredients: Sweet rice flour and more
As food expert Gemma Stafford stresses, you must use sweet rice flour. Brands like Mochiko are ideal. This special flour is different from regular rice flour. It gives the dough its unique, stretchy quality.
Other core ingredients are simple. Granulated sugar adds sweetness and helps with the texture. You’ll mix it with water and the sweet rice flour to form the base. Don’t forget a pile of cornstarch. It’s your best friend for keeping everything from sticking.
Must have kitchen tools for success
Your equipment list is short but specific. A large, microwave safe bowl is non negotiable for cooking the dough evenly. A flexible rubber spatula makes stirring the hot mixture safe and simple.
A few other tools will make assembly a breeze:
- A sturdy ice cream scoop: This guarantees each frozen center is the same size. Uniform portions are vital for wrapping.
- Plenty of cornstarch: Dust your hands and work surface generously. This prevents the sticky dough from becoming a messy challenge.
With these ingredients and tools ready, you’re set up for a smooth, successful creation process.
Setting up your kitchen for success
Before you even measure your first ingredient, take a moment to assess your workspace. A well prepared kitchen is your secret weapon for a smooth, enjoyable process. It turns a potentially tricky project into a fun and rewarding experience.

Expert Cecilia Ryu offers a crucial tip: crank up your air conditioning. The heat from your fingers can melt your frozen filling very quickly. A cool room protects your dessert’s integrity from the start.
Preparing your workspace
Clear a large, clean surface for rolling. Your next step is to manage the famously sticky nature of the sweet rice dough. A generous dusting of cornstarch is your best defense against a messy situation.
Have a big bowl of cornstarch within easy reach. Line part of your counter with parchment paper. This makes cleanup simple and provides a spot to rest your dough.
Gather all tools before you begin. This includes your ice cream scoop, rolling pin, and any cutters. Having everything ready saves you precious time during the fast-paced assembly phase.
| Essential Item | Primary Purpose | Pro Tip |
|---|---|---|
| Cornstarch | Prevents the dough from sticking | Keep a full bowl nearby for frequent dusting. |
| Parchment Paper | Ensures easy cleanup and dough transfer | Use sheets to move wrapped pieces to the freezer. |
| Cool Room Temperature | Keeps the ice cream firm during handling | Lower your home’s AC before starting work. |
| Pre-Assembled Tools | Saves time and reduces stress | Set your scoop, pin, and cutter on the counter. |
This simple prep work is the key to handling the delicate components. It ensures your frozen treat stays perfect from wrapper to first bite.
Mastering your mochi ice cream recipe
Let’s dive into the core technique that turns sweet rice flour and water into that iconic, stretchy casing. This process is straightforward but requires precise timing.
Step by step preparation of mochi dough
Begin by combining sweet rice flour, sugar, and water in a large, microwave safe bowl. Whisk until smooth.
Following expert Gemma Stafford’s method, cook the mixture in a 1200 watt appliance. Heat for one minute, then stir. Repeat for another minute, stir again, and finish with a final 30 second burst.
The dough will become very sticky and translucent. Use a wet spatula to handle it safely.
Turn the hot mass onto a surface generously dusted with cornstarch. Roll it out to a thickness of no less than 1/4 inch. This prevents tearing later.
Chill the rolled sheet for 30 minutes to firm up. This makes cutting and wrapping much easier.
Tips to prevent Sticky mishaps
Stickiness is the main challenge. Keep these pointers in mind:
- Cornstarch is your friend. Dust your hands, rolling pin, and surface frequently.
- If the dough clings to tools, dip them in water or add more cornstarch.
- If your microwave has a different wattage, adjust cooking minutes slightly. Watch for a glossy, elastic texture.
With patience, you’ll create a perfect wrapper for your frozen filling.
Creative twists and flavor variations
Think of the chewy wrapper as a blank canvas waiting for your personal touch. This is where your homemade creation truly becomes a signature dessert. Moving beyond the store bought standards opens a world of delicious possibilities.
Mixing different ice cream flavors
While classic vanilla is a wonderful choice, why stop there? Expert Gemma Stafford suggests using homemade Ube for a vibrant purple hue. You can also use refreshing fruit-based sorbets or dairy free alternatives.

For a rich, decadent twist, incorporate cocoa powder into your dough. This creates a chocolate-forward version that feels incredibly special. The beauty is that any frozen filling pairs perfectly with the soft, stretchy casing.
| Flavor Type | Key Characteristic | Best Paired With |
|---|---|---|
| Classic Vanilla | Familiar & creamy | Matcha powder dusting |
| Vibrant Ube | Sweet, earthy, colorful | Coconut flake topping |
| Refreshing Sorbet | Light & fruity | Citrus infused dough |
| Decadent Chocolate | Rich & indulgent | Sea salt sprinkle |
| Dairy Free Alternative | Inclusive & modern | Any of the above wrappers |
Experimenting with different bases is the best way to make this treat your own. It ensures your dessert caters to all tastes and dietary needs. Your unique vanilla alternative or chocolate creation will be a memorable hit.
Pro tips for perfect mochi and ice cream assembly
Mastering the seal is the difference between a messy kitchen and a beautiful batch of desserts. This final phase is all about technique and temperature control.
How to maintain cold ingredients
Your frozen filling must stay rock hard. Portion it into cream balls using a scoop. Freeze them for a full hour before you start.
Keep your workspace cool. Remove only one frozen ball at a time. The moment it leaves the freezer, the clock starts ticking.
Work with speed to prevent melting. This keeps your structural integrity perfect.
Techniques for a sealed, flawless wrap
Use a 3.5 to 4 inch cutter to create dough circles. This size gives you enough material to fully envelop each portion.
Brush off excess cornstarch so the dough sticks to itself. Place a ball in the center of a circle.
Use a piece of plastic wrap to help you gather and pinch the edges shut. This trick ensures a tight, professional closure.
Immediately wrap each finished piece in more plastic. Place it seam side down in the freezer.
Let it set for at least two hours. This step is non negotiable for the perfect shape.
Don’t miss our tiramisu lotus biscoff,Try our french macarons recipe and mini bundt cake recipes.
Conclusion
With this guide complete, you’re ready to enjoy and share a truly special dessert. Mastering the technique takes practice, but the payoff is worth every effort. You’ll create a delicious, chewy, and cold treat that delights everyone.
Store your finished pieces in an airtight container in the freezer. They will stay fresh for up to one week. When serving, let them sit at room temperature for a few minutes. This softens the center perfectly.
Making your own version gives you full control over quality. You can explore endless flavor combinations that stores rarely offer. We hope these steps build your confidence.
Your homemade mochi ice cream will shine at any gathering. It brings a restaurant-quality experience right from your kitchen.
Your email will not be published publicly.